Weaver could be positioned in all three lanes and be played either as a solo or more commonly in a dual lane.
He is a flexible and powerful laner and you should use his early game strength to give yourself a good start.
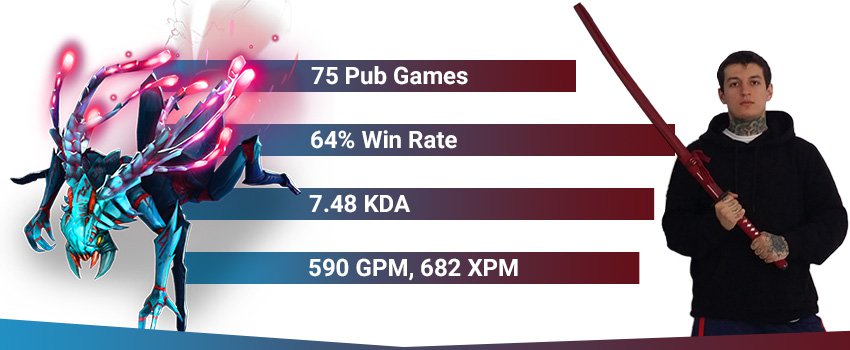
Welcome to Nikobaby's Book of the Weaver, a hero guide part of the Book of Dota series!
Here you will find all the information you need to learn to play Weaver on a high level – from drafting and builds to the optimal playstyle in different lanes and situations. We hope you’ll enjoy this guide and find it useful!
Draft: Weaver is a perfect pick in the later drafting stage when you see that the enemy team has few disables. This will allow you to abuse heavily your mobility in fights and to split-push and farm around the map safely.
Early Game: Despite being a carry, Weaver is quite strong in the laning phase – try to use this to bully your lane opponent(s) while also getting farm. You are a flexible laner, so decide carefully where you want to lane. Don’t automatically go to the safe lane - an offensive dual lane is often a good idea with Weaver + a strong support.
Mid & Late Game: If you are ahead – farm close to your team and join fights when your teammates force them. You are very mobile so getting to the fight with Shukuchi (or TP + Shukuchi) is easy and with your core items you will be very impactful in early-mid game fights. If you are playing from behind avoid fights and split-push until you get the items you need to survive and deal damage in fights.
Weaver is one of the most mobile and elusive carries in Dota 2. He has two escape mechanisms (Time Lapse and Shukuchi) that make him hard to gank or kill in team fights. In addition to his mobility, he has high damage output and harassment early on, which makes him a very strong laner.
Weaver scales very well with items, which combined with his elusiveness and mobility makes him a strong carry. However, his problem is that he is a very low HP hero with low (for an AGI hero) armor and if he gets disabled, he can be burst down very quickly. This means he is vulnerable against drafts with strong disables and needs defensive strong items most of the games.
In the mid and late game, Weaver becomes a potent damage-dealing carry that can be very useful in team fights by using his mobility to pick-off the enemy backline heroes. At the same time, he can easily avoid engagements and split-push thanks to his mobility and high physical damage. In rare occasions, thanks to Aghanim’s upgrade to his ult allowing him to save allies, he could be played as a utility hero.
MAJOR:
High mobility and elusiveness:
Weaver has two mobility/escape mechanism spells. Shukuchi helps him move around the map to farm, split-push or position himself more favorably in fights. His ultimate helps him survive even when he gets focused down by opponents. Both spells make him very hard to deal with and as a result, this allows him to take risks, be active and apply pressure. He is one of those heroes that make fights chaotic – Weaver can switch targets quickly due to his mobility and cannot be focused down easily without hard disables.
Lane dominator:
Weaver is a carry that can do well on his own in the lane without the help of supports. He can harass, even zone out almost any hero thanks to the high early damage output of Shukuchi and Geminate attack. His base damage is very high for a ranged hero which helps not only in the passive Geminate attack harass but also in getting last hits and denies. Moreover, he is a very hard target to gank thanks to his elusiveness.
Scales well with Items:
Geminate Attack, Weaver’s in-build survivability and the fact that he is an AGI carry help him scale very well with items. This makes him a potent carry that is very strong in the late game but at the same time is self-sufficient early on.
MINOR:
Vision:
Although the vision of The Swarm on target heroes might not seem a big deal, that vision allows Weaver to stick to his opponents when he is chasing with Shukuchi. This means that enemies cannot juke in between trees or low/high ground to get away from Weaver. Moreover, a well-timed Swarm before a fight can give Weaver’s team the much-needed info to take a favorable fight or dodge an unfavorable one.
Not mana dependent:
Weaver has low mana cost spells in addition to decent intelligence gain for an agility hero. This is great for a hero with spammable spells.
Doesn't need boots in the late game:
Shukuchi, especially with the tallent, gives you all the mobility you need. This means you have an additional slot for a luxury item.
MAJOR:
Squishy:
Although Weaver has
escape mechanisms, he can be easily burst down if he gets disabled by a stun or
a silence. He has one of the lowest health
pools in the game in addition to low armor for an AGI hero. Therefore, he can
be countered hard by heroes with strong disables, especially those that go
through BKB.
Very item-dependent:
Weaver needs a
lot of items in order to be effective in the mid and late game. If he doesn’t
get a good start and gets no items, he will be almost useless in engagements.
Weaver doesn’t have any utility spells to contribute to the fight - he is a
damage dealer that needs his items to hit hard.
MINOR:
Low Base Armor:
Weaver’s low
base armor could be problematic in the early game. Because of it, he takes a lot of damage if he gets
harassed by physical attacks in the lane.
MATCH ID: 4072699199
Replay
VP pick Weaver early and decide to lane it together with Venge in the offlane. This is a very strong dual lane and VP probably feel quite safe that Mineski wouldn't be able to counter them fully or to draft a greedy safe lane. Moreover, later on they would pick Treant, who can assist with armor globally, and would make their dual offlane almost impossible to deal with.
Weaver also has great synergy with most of VPs heroes: the armor reduction is combined with the armor reduction from Venge and possibly the Deso/Medallion from Clinkz. Both Weaver and Clinkz deal heavy physical damage and use the armor reduction and Venge's aura well. The control from Treant is also great in team fights. Moreover, the whole draft has multiple saves: Swap, Time Lapse (later with Aghanim's), Treant's Armor.
Pasha knows that his team deals more than enough damage, so he goes for a relatively defensive build that makes him very hard to kill. Initially, he invests in the stats of Aquila, Treads and Dragon Lance, which make him hard to burst down but also give him some damage and mana regen. Diffusal is his next item, which gives him all the offensive potential he needs (and is great versus WK when combined with the mana-steal talent).
Afterward, he goes for BKB and Linkens - both items combined with his Time Lapse and if needed Swap make him impossible to bring down because they counter the multiple single-target disables of Mineski.
Interestingly, initially, he thinks about buying Nullifier to increase his offensive strength because he knows he is survivable enough. Nonetheless, he goes for Agh's because he decides it's more important for him to keep his other two cores alive in case they get focused nuked down (he is playing a pos. 3 Weaver and has two other heroes to deal damage).
Pasha gets an Obs and uses Shukuchi to get to the offlane first. This allows him to block the small camp unnoticed.
In the early-mid game, he controls his own lane and doesn't rotate a lot. If something happens and he is needed on another lane, he can always join the fight with TP and Shukuchi. This playstyle allows him to steadily get a lot of farm - VP enter the mid-late game with three scaling cores.
Before BKB and Linkens he doesn't push-out the waves too deeply because he knows he is playing against potent gankers. Once he gets them, however, he knows how hard he is to kill and he abuses this by playing like a front-line core, trying to draw the attention of the enemy team on himself and in this way creating a lot of space for his two other cores.
MATCH ID: 4078478649
Replay
S4 plays a pos. 3 Weaver in a very long game against team Liquid. Notice that he goes to the safe lane - this is a smart choice if EG expect Liquid to pressure EG's safe lane. Weaver is their core who can handle the pressure best thanks to the mobility from Shukuchi.
He split-pushes a lot because he knows he is extremely hard to bring down with BKB + Linkens. Moreover, he has a fast Maelstrom, which helps him push-out waves much faster. Keeping all creep waves pushed into Liquid's base gives EG a big map control advantage - all three cores from Liquid (CK, Ench, and Veno) are good at fighting but are terrible at pushing the waves back.
This is a great replay to watch in order to learn how to win the game with Weaver if you need to avoid direct engagements at some point in the game.
MATCH ID: 3783599263
Replay
Agressif plays a flawless game on Weaver – he has the highest hero and tower damage in the game, while at the same not dying even once. Even more impressively, he manages to do it versus decent disables (SK + Bat) and ranged damage dealers who are hard to kite (Viper + Gyro).
He starts the game in the offlane together with his Chen and occasionally the rotating Earth Spirit. LGD.FY expect this aggression and because of this take their hard carry Gyro to the offlane, but this leaves their Bat against a very hard lane. Agressif demonstrates the kill potential of the hero in the early game and manages to get 6 kills before the 10th-minute mark by dominating his lane and even making a few rotations to the other two lanes.
A great replay for learning laning-stage domination when you have a favorable matchup with Weaver.
MATCH ID: 3792361808
Replay
Eternal Envy plays Weaver in an offensive dual lane with his support Chen. He goes for a very unconventional super defensive item build – he gets a fast Hood to be able to survive against magical burst damage, then goes back for a Linken’s Sphere and afterward builds Solar Crest and HOT. Having 4 defensive items, he dies only once in a game against two silences. Much more impressively, he manages to deal the most hero damage in the game - more even than Abed’s BF, Diffusal and Manta PL.
Weaver is more of a counter pick to the enemy draft – when the enemy heroes don’t have good lockdown for him (for instance when they have only slows) and/or when he counters most of the opponent’s picks (if they have melee carries). In such a case, picking Weaver will make it very hard for the enemy team to deal with him. If they spend too much time trying to deal with the hero (constantly rotating, trying to zone him out or helping allies that get zoned out by him), then you other teammates will have much more space to farm up their items.
Besides as a counter pick, Weaver can be utilized as lane dominator in a favorable matchup against an enemy solo (usually in a 1v1 or 2v2 situation in a side lane).
When you play Weaver as a 1st position carry, you might want to get another semi-carry in the mid or offlane to increase your carry potential.
Weaver excels in most 1v1 situations - his skills allow him to harass and zone out opponents. This makes the hero ideal for strategies with multiple carries. You can invest the time of your supports to ensure the laning stage of another carry while Weaver is doing fine 1v1 and simply occasionally gank his lane. The most common example would be to send Weaver safe lane while having two active roaming supports who spend more time in the mid and offlane. Having an early game carry that doesn’t need a lot of help in the lane is very valuable and could propel you ahead in the mid game.
The idea of Weaver in a dual lane is to zone out and harass the enemy heroes and win the lane. Coupled with another strong early game laner, the dual lane will be very hard to deal with – the amount of harass will be too much to handle for the enemy duo (or even some trilanes). Such a dual lane can create a lot of space for the other cores to farm up if enemies commit a lot of time and resources (i.e. sentries, regen) to deal with you. For example, if you go to the offlane with such a strong duo the enemy supports will spend most of their time trying to ensure farm for their safe lane carry, which will give lots of free space to your mid laner (he will not be ganked too often) and can even net you kills against slow and squishy supports.
Although Weaver has a lot of mobility he is not one of the heroes that can always go to the offlane. The reason for this is that the hero is very farm dependent. If you cannot ensure that he will be able to get at least some farm in the lane, he could become useless in the mid and early late game.
Ensuring farm in the offlane, however, is very difficult. The reason for this is that his Shukuchi at low levels has a relatively long cooldown and if you are using it to farm and harass you cannot rely on it to escape when you get initiated upon. If Weaver gets caught when his Shukuchi is over, then enemies will have enough time to bring him down or harass him to a great extent.
Therefore, Weaver in the offlane can be a suitable option only in lanes that can’t zone him out/kill him early on. For example, against a dual lane that doesn’t have good harass or control, Weaver can do quite well. Once he gets more levels, it will get harder and harder for his lane opponents to deal with him (his Shukuchi CD decreases).
Generally speaking, Weaver in the offlane is more of a counter pick to the enemy safe lane. If you have him there, you usually want to rotate there with your supports to pressure the enemy safe lane as often as possible. If he gets completely shut down and gets only a little experience and no farm, then he will have a very hard game (he cannot catch-up by ganking or jungling efficiently). Usually, in the late laning stage, you might want to rotate the Weaver elsewhere to let him get more farm if he is having a hard time.
Because of his good laning presence and the insane utility that his ultimate provides with Aghanim’s, it is possible to play Weaver as a position 4 support. Your role is to bully your lane opponents early on, to find some space to farm your Aghanim’s and to save your cores in mid and late game fights with it. Solar Crest is also a great item on a pos. 4 Weaver because it synergizes offensively with the minus armor of Swarm, while also having great defensive capabilities.
Armor reduction: Shadow Fiend, Slardar, Bristleback, Dazzle, Templar Assassin, Naga Siren, Vengeful Spirit
Weaver’s ability The Swarm reduces gradually the armor of heroes once its effect is applied. Therefore, other teammates that also decrease the armor of enemies have good synergy with the hero. The lower the armor, the more physical damage your opponents will take. Weaver can take advantage of this thanks to his Geminate Attack high physical damage output.
Strong dual lane supports: Venge, Naga, Ogre, Lich, Sand, AA
Weaver is very strong in the early game thanks to his high attack damage, mobility, and spammable abilities. If he has a strong lane support, he can dominate his lane opponents. The best partners are heroes who can win low-level harass trades. If they have a slow or disable - even better because Weaver has none and this gives the lane kill potential.
DPS buffs: Beastmaster, Magnus, Troll Warlord, Drow Ranger, Luna, AA, Venge
Weaver is a ranged hero that has an inbuilt ability (Geminate Attack) that allows him to attack heroes twice every 2.5 seconds. Therefore any hero that buffs his damage will effectively increase his DPS output in fights by a lot. Attack Speed buffs (even though they don’t have synergy with Geminate Attack) are also very useful because with Weaver you tend to go for items that grant bonus damage.
Long range initiators: Clockwerk, Puck, Storm Spirit, Ember Spirit, Earthshaker
One of the strengths of Weaver is his mobility. He can quickly reach a target, help finish it off with a few attacks and then retreat without getting caught. In that sense, he synergizes quite well with heroes that can initiate from a distance and provide the needed control to kill the target while Weaver is doing damage. If those heroes have the mobility to disengage like Weaver – even better. Together with a hero such as Storm or Clockwerk you can dive in, kill a target (let’s say a squishy support) quickly and get back unscathed.
Slows & other weak disables: Lifestealer, Brew, Veno, Lich, Dazzle, Visage, Warlock
Heroes that rely on disables that slow movement speed to latch on target have a hard time dealing with Weaver since his Shukuchi neutralizes the slow effect (Weaver always moves at maximum movement speed in Shukuchi). Therefore such heroes cannot control Weaver in fights and can be easily kited. Other weak disables (short stuns, slow projectiles, etc.) are also not enough to deal with Weaver's mobiltiy.
Melee carries: Lifestealer, Sven, Wraith King, Ursa, Juggernaut, CK
Melee carries need to get close to the target in order to attack. Weaver’s mobility and elusiveness allow him to kite such enemies easily. If the opponent’s heroes have no proper disable to lock down Weaver, melee carries will be unable to get in range to attack him.
X-hits to kill: Undying, Phoenix
Shukuchi and his attack range allow him to reach the Egg or Tomb, while Geminate Attack and his good attack speed help him kill it very fast.
Strong stuns & silences: Void, Drow, Bloodseeker, Puck, Riki, Slardar, Bane, Axe, Earth Spirit, Earthshaker, Silencer, Legion, Sky
Weaver is a squishy hero that heavily relies on his spells (escape mechanisms) to stay alive. Hard, long-lasting disables and silences can spell disaster for Weaver very quickly. Silences are usually the bigger problem because they last longer and you have a very bad MS for running away once you're in trouble.
This problem is solved with defensive items like BKB and Linken's, but getting these items takes time and even this is sometimes not enough if the enemy team has disabled that pierce spell immunity like e.g. Chrono and Bashes.
Hard-to-kite heroes: Luna, Drow, Dragon Knight, Lone Druid, Gyro, Bristle
Because of his squishiness, Weaver cannot man-fight other carries for long (without an item advantage). The hero relies on kiting his targets to deal damage and at the same time avoid getting punished for it. Because of this, carries that can stand their ground and fight back and are hard to kite thanks to their good range or disables are problematic for Weaver. Playing against such heroes will make it more difficult to team fight and because of this, you will have to avoid engagements and split-push/farm-up instead. In fights, the best thing to do would be to focus more squishy targets, but this means that your team will have to deal with the man-fight carries on their own.
Strong 5-man Drafts with Pushers: Drow, Death Prophet, Luna, Lone, Lesh, Lycan, DK, SF
Weaver likes skirmishes, not 5-man team fights in the early and mid game. In a game against a 5-man pushing strat, your role would be to split-push and farm while your allies are defending/stalling the pushes. Weaver, however, is a slow split-pusher in the early and mid game and you would need your teammates to successfully stall the enemy push for a very long time before you get in position to fight or at least take favorable trades by split-pushing.
Weaver launches a swarm of 12 young Weavers that latch on any enemy unit in their path, attacking and reducing armor until it is killed.
Cast Animation: 0.3+0
Cast Range: 3000
Max Travel Distance: 3000
Beetles Spawn Radius: 300
Beetles Latch Radius: 100
Number of Beetles: 12
Hero Attacks to Destroy: 4
Non-Hero Attacks to Destroy: 8
Tick Interval: 1.25/1.1/0.95/0.8
Damage per Tick: 18/20/22/24
Armor Reduction per Tick: 1
Beetle Duration: 16
CD: 44/36/28/20
Mana: 110
The AoE and range are considerably large, you can cast the spell from quite far away (3000 range) without getting exposed to danger. Mind the projectile speed, however – it is not too fast (600), so if you are aiming at a target that is far away you need to predict its movement and shoot in that direction.
The Beetles are magic immune – heroes cannot simply cast a spell to kill a Beetle that has latched on them. In fact, targets have to commit 4 auto-attacks (8 from units) on the Beetle to kill it off, which means that an enemy hero will have to stop to attack. This will give you more time to kill the target off, should it decide to kill the Beetle. If not, then the armor will be substantially reduced, which will, in turn, increase your damage output.
The spell not only deals direct damage over time to its target (a maximum of 420 on max lvl) but also increases your auto-attack damage, since it gradually reduces the armor of the enemy unit. Therefore, it is good to use the spell when you go for a kill. You can Shukuchi in, cast it right away (so that the enemy won’t have enough time to react to dodge it) and start right-clicking the hero down. In team fights, you should aim to hit as many people as possible with the spell because the minus armor will help your allies deal more physical damage as well.
The Swarm not only deals damage and reduces the armor of latched units, but also gives vision (321 sight range) on all hit targets for the duration of the spell (or until the beetle is killed). This is a very valuable addition to the ability because it allows Weaver and his teammates to chase targets down without losing track of them. Since it grants Vision you can, in fact, scout with Swarm. If you think that enemies might be on the other side of a cliff, for example, you can cast the spell in that direction – if any opponents are in fact there, you will be able to scout them. Keep in mind that invisible targets won’t be hit by the Swarm. In addition, if a target becomes invisible, the beetle will drop off the target.
Apart from providing vision and dealing damage, The Swarm can be used to push/split-push faster. If you cast the spell in the direction of a big creep wave, beetles will latch and deal damage to the incoming creeps. Moreover, creeps will stop moving and start attacking the beetles. This means that you can go behind the enemy tower and cast The Swarm on the incoming enemy wave to prevent it from coming close to your creeps that are attacking the tower.
Weaver shifts out of visibility, gaining the ability to move at maximum speed through physical units--doing harm to any enemies it passes through.
Cast Animation: 0+0
Fade Time: 0.25
Damage Radius: 175
Damage: 100/125/150/175
Haste Speed: 550
Duration: 4
CD: 12/10/8/6
Mana: 70
Shukuchi is the spell that makes Weaver what he is – it defines his play style. It grants him a lot of mobility to survive when he gets focused, it allows him to harass in the laning stage, to position himself favorably in fights later on or to move fast around the map in general in order to split-push or simply farm faster.
First, you can only damage a unit once each time you cast the spell, no matter how many times you pass through the target.
Second, if you attack while in Shukuchi, you will break the effect - you will turn visible again and will no longer move at max MS or damage opponents with the spell. You will have to wait for the ability to get off CD to use it again, which means that you won’t have your escape mechanism (apart from your ultimate) to survive if you get initiated upon. Therefore you should be careful where you position yourself after Shukuchi’s effect ends – try to always be in a safe position, don’t find yourself in the middle of the enemy team without Shukuchi available.
Third, Shukuchi can be used to dodge some projectile stuns (provided that enemies don’t have reveal). For example, Wraith King and Vengeful Spirit’s stuns can be dodge if you Shukuchi before the projectile hits you. Shukuchi has a fade time of 0.25 seconds – this means that you might get hit by an auto-attack or a spell within those 0.25 seconds even if you have cast the spell already. Therefore don’t wait until the last possible moment to use Shukuchi if you are close to dying or if you are trying to disjoint projectiles.
The last mechanical thing to remember about the spell is that it doesn’t damage invisible units.
In the early game, Shukuchi is your harassing spell, since it deals damage, has low mana cost and relatively low CD. In other words, you want to use it as often as you can to run into damage the enemy hero. Then you have a choice: either start right-clicking the hero to drive him away or run backward while you are still having the Shukuchi effect (invisibility, max MS). The former is advisable when you know that the enemy can’t fight you back but will have to run. This is the case when the hero is weaker during the laning stage and has no way to answer your harassment or threaten to kill you (for example Sniper). The latter case is a good idea when the hero can fight back and potentially even kill you (e.g. Gyrocopter with Rocket Barrage).
While harassing you have to be careful not to push out the creep wave (if you don’t want to) – move in such a way so that you don’t damage the enemy creeps.
As the game progresses, Shukuchi shifts its focus of use, that is, you stop using it as a harassing tool and start thinking of Shukuchi as a positioning spell. It helps you choose a favorable positioning in fights, chase after retreating heroes and avoid getting killed. You can use the ability to quickly switch between targets in a fight. For example, You can go behind the enemy lines to snipe a support and then run back to the front of the fight to deal damage to other heroes. Shukuchi in that sense creates chaos in a fight – each enemy can be potentially your target and squishy opponents can hardly choose a safe position.
Apart from a positioning and harassing tool, Shukuchi is a great way to speed up your farm. It not only damages units (in AoE) but also helps you move much faster around the map. This means that you can quickly move between camps in the jungle or across lanes, meaning you have very little down time in which you are not farming.
The mobility is also essential when it comes to split-pushing – you can quickly go to a lane, use your attacks and spells to push out a wave and then run back before your opponents have an opportunity to gank you.
Allows Weaver to dispatch two attacks at once.
Effect Delay: 0.25
CD: 9/7/5/3
Attack Damage Bonus: 10/20/30/40
Geminated Attack is the spell that
grants Weaver a high damage output in the mid to late game. At level 4, the
ability grants a double attack every 3
seconds – if combined with items with high bonus damage this will increase
Weaver’s physical DPS very significantly.
When your first attack begins (the projectile starts flying at the enemy hero) the second attack (the one from Geminate Attack) will proc and fly at the enemy even when you are no longer in range to hit. For example, you can attack and use Shukuchi immediately to run away. The second attack (provided Geminate Attack is off cooldown) will activate after 0.25 sec and fly at the enemy even if you are already beyond attack range.
Early in the game, whenever Geminate Attack is off CD, you should use it to harass enemies in the lane.
You should be careful how you utilize the spell when it comes to last-hitting since the ability can mess up your last-hit timing if you don’t consider the damage of the second attack. You will deal 2x the damage on your target whenever you attack once and Geminated attack is available – if you keep this in mind you can use it to your advantage and take last hits with the secondary Geminate attack projectile without giving your opponent (even if he has very high attack damage) the opportunity to deny. Whenever a creep is relatively low on HP, but not within a single attack last-hit range, you can use Geminate to effectively hit the creep twice in a quick succession, dealing enough damage to take the last hit but not giving enough time for your opponent to deny after your first projectile hits.
Weaver warps backward to whatever position it was in five seconds earlier--regaining the HP and mana from that time. No effect on cooldown, gold or experience.
Cast Animation: 0.3+0
Lapsed Time: 5
CD: 70/55/40
Mana: 150/75/0
Reduces cooldown, and allows Weaver to cast Time Lapse on an ally.
Mechanically Time Laps is quite simple – it returns you to the place you were 5 seconds ago on the HP and Mana you were at that time.
An important mechanic of Time Lapse is that it removes some debuffs. For example, slows will be removed (Lifestealer’s Open Wound, Rod of Atos) or Bounty Hunter’s Track. Moreover, you can use your ultimate to dispel some abilities that lock you down - Ensnare of Naga Siren or Frostbite of Crystal Maiden. However, Time Lapse won’t dispel some debuffs such as Bloodseeker’s Rupture or Bane’s Enfeeble.
Time Lapse could be used to disjoint projectiles.
The way you use Time Lapse defensively is relatively straightforward – whenever you take a lot of damage in a short period of time, you can trigger the spell to get back in time and regain your HP. In other words, if you were full HP and you got nuked down to 10% HP in 2 seconds, you can use the spell to virtually negate all the damage taken. However, you will also be returned to the place where you were 5 seconds ago -you might find yourself too far away from a fight (for example if you teleported in from your base). Therefore, you should count the seconds to realize where you will go back in time when you use your ultimate.
To illustrate this point, suppose if you got burst down to 25% HP in 3 seconds but you instantly got healed to 70% HP by a teammate (for example by Omni knight’s Purify) and because of this, you decided to chase a hero to get a kill. In another 4 seconds, while you were chasing, you got damaged again and being close to dying you decided to use Time Lapse. However, the spell returned you back in time when you were at 25% HP just after getting burst down. If you wait 1-2 seconds more, you will return to the point in time when you were at 70% HP (after you got healed).
Time Lapse can be used to dive in, get a snipe on a hero and then return to a safe position (where you were 5 seconds ago, preferably before you dived in). For example, you can dive an enemy tower early on, get a kill and use the spell to return in time to save yourself from enemies teleporting on the tower to help their ally and get a counter-kill.
Another common trick is to use buyback and Time Lapse right afterward to return to an engagement. This is useful whenever you got burst down from full HP very quickly (within 5 seconds). Otherwise, you run the risk of buying back and returning to an engagement on low health, which can get you killed again (a die-back).
The dive-in into Time Laps and buy-back into ult are very common tricks, but the mobility of the spell can be useful in other situations and allows a lot of creativity:
For example, you can participate in a fight, chase after a hero to kill him off and afterward, you can cast Time Laps to instantly return to the location of the fight to help your allies.
You can also use the spell when trading blows with the enemy carry – if you are on full HP you can start trading hits with an enemy for 5 seconds and use Time Lapse when you get low on HP to return back to full health and continue man-fighting. This is a risky thing to do if you don’t have good vision on the rest of the enemy team because you can end up getting stunned just before you are about to use your ultimate.
The skill build of Weaver is not versatile. You always want to max up Shukuchi first, since the cooldown of the spell gets reduced significantly. This means that at max Shukuchi level, you will only be visible for 2 seconds in between casts. The damage also increases which helps a lot with farming and harassing.
The only choice you have to make is whether to max your 3rd or your 1st spell. If you get a point in The Swarm early you can increase your kill potential. If you skip The Swarm and level up Geminate Attack, you will be able to harass the opponent more often. You always get a point in your ultimate (Time Lapse) in order to increase your survivability if you get initiated upon. The escape mechanism aspect of Time Laps also allows you to make more risky plays - dive the enemy tower, etc.

The build gives you decent harass in the lane along with high mobility and decent kill potential.
You prioritize Shukuchi as always and max up Swarm as your 2nd priority. This will allow you to chase down more squishy or low armor heroes and be more useful in fights.
This is more situational Weaver build. You go for max Shukuchi as always but choose to max your Geminate Attack after. The idea is to dominate the 1v1 matchup by harassing with Geminate and farm up a bit faster because of your higher physical DPS.
+1 Geminate Attack
+200 Shukuchi Movement Speed
+2 Swarm Attacks to kill
+ 0,5 Swarm Armor reduction
+14 STR
+20 Mana Break
+35% XP Gain
+75 Shukuchi Damage
Lvl10: The XP gain is very significant and you want to get it most of the time because it will let you snowball harder. You need to max your skills ASAP and in addition - it will help you reach your lvl15 Mana Break talent faster if you're going for a Diffusal build. Go for the Shukuchi damage only when you feel you need more AoE damage e.g. to clear creep waves and split-push faster.
Lvl15: The Mana Break is the standard choice. It helps your single target DPS and has great synergy with Diffusal, which makes it superior for fighting. Go for the STR only when you're having a hard time surviving the enemy burst damage.
Lvl20: The choice here is hard, but if you have some Minus Armor items (Solar Chrest, Deso, Assault) it is a bit better to take the Armor Reduction talent. Otherwise, the + attacks to kill might be more reliable.
Lvl25: Almost always MS is the best choice, as it allows you to move quicker than anyone in the game (even without boots) and be extremely mobile in fights or when moving between lanes. There are some rare cases in which you might opt to go for Geminate Attack - maybe you want to burst down heroes like Ench for example and you need the extra hit, but this is extremely situational and the MS is usually more useful.
Being a carry, you naturally want to go for items that increase your damage output. Because of how Geminate Attack works, for you, these are usually items with high bonus damage rather than attack speed.
Weaver is a squishy hero even though he has 2 escape mechanisms – if he gets disabled, he can easily die. Therefore, you need some items that make you more survivable. Items that give you HP to solve the problem of squishiness and in addition counter spells are usually the best choice.
Lastly, you need some HP and Mana regen even from early on to use our spells (mainly Shukuchi) as much as possible. This way you will be able to harass more often and farm up faster.
You start with early Wraith Bands. The early Ring of Health can be bought from the sicret shop near you and solve your early game HP problems against harassment. Afterward you want to get your Linken’s Sphere to be more survivable and have HP/Mana regeneration to farm up faster. After Linken’s you go back for your DPS item - Desolator.
In this example you invest in another defensive item: A BKB is a great choice if the enemy team has a lot of disables and the Linken’s isn’t enough to let you fight freely. In the very late game, you want to increase your DPS impact further and invest in MKB/Bloodthorn to counter any sources of Evasion and a Butterfly to increase your EHP even further in addition to giving you more DPS.
Wraith Band: increases your damage and stats early on and helps you out last-hit an enemy opponent. It is a good choice in a situation when you don’t need a lot of regeneration to deal with harass, but need more damage to last hit and/or to harass the enemy laner against you more.
Magic Wand: Weaver is a low HP hero that can be killed fast if focused. The item grants him an HP boost that can save his life in a fight. Moreover, if you get focused and you are running very low on HP, you can use your Wand before you Timelapse or cast Shukuchi. Since Weaver has a casting time of Time Lapse and Shukuchi has 0.25 seconds fading time, using any of those spells first might not be fast enough to get you out of danger. Lastly, Weaver relies on his two spells to survive. If he gets out of mana and cannot use his spells he is likely to die. A Wand can come in handy and give the hero the required mana to get out of danger.
Power Threads: PTs are the most common boots upgrade for Weaver. If switched to STR, Treads make the hero more tanky and survivable. You can also switch PTs to INT when you cast Shukuchi to minimize your mana loss. On AGI, you will maximize your DPS.
Unlike most heroes, Weaver can afford not to upgrade his boots early on or even not to buy boots for a while – the reason is the mobility Shukuchi gives. When the spell is activated, you will move at max MS regardless of having or not Boots. Nevertheless, delaying your PTs too long isn’t a great idea – the item is very cost efficient for the stats it gives.
Linken’s Sphere: Linken’s is the most common first big item for Weaver. It grants the hero survivability and freedom in fights – you get extra HP and are less vulnerable to some direct disables (Doom, Lasso, Fiend’s Grip etc.). Weaver also benefits from the HP/mana regen the item grants. He can use his spells much more often to farm up faster and split-push.
Desolator: Since it synergizes with The Swarm ability, Desolator reduces the armor of a target substantially and allows Weaver to deal a much higher amount of damage. Going for the item in the later stages of the game after you have other big items is also not a bad choice. The armor debuff scales very well with other items that grand you good damage. In addition, it will allow you to take down building faster (it works on towers), which will make you an even better split-pusher.
Black King Bar: The item is a must-have
for Weaver, even though the hero has two escape mechanisms. If the enemy
line-up has a lot of control ( Stuns,
Hexes etc.) then staying alive with Weaver in a fight will be near to
impossible. Moreover, all the hero needs in engagements is freedom to attack and move from target to
target. BKB is a perfect item that grants him that luxury and helps him team
fight much better.
You basically have two choices. The first one is to build BKB early on as a
substitute for your core Linken’s. This is a good idea if the enemy team
doesn’t have powerful direct disables (especially ones that go through BKB) but
has a multitude weaker ones or a lot of nuke damage. The second option is to
buy a late game BKB (after Linken’s) if
you need to counter both disables that go through BKB and other control spells.
Daedalus: If you need as much damage as possible and the enemy heroes against you don’t have evasion, then Daedalus is a great choice to boost your DPS. The high bonus damage synergizes with Geminate attack and the crit increases your DPS substantially especially because it can proc with the second Geminate projectile as well.
Butterfly: This item for Weaver can be described as a more defensive DPS item. It is very useful against strong physical DPS heroes that can burst you down in fights, since Butterfly grants evasion. Moreover, Weaver is an Agility carry and benefits from the high agility boost of the item. Nevertheless, Weaver benefits more from bonus damage rather than attacks speed, so BF is usually bought as a third big item rather than your first offensive choice.
The suggested build is an early-mid game fighting oriented build. It is a suitable item progression if you want to apply pressure on enemy heroes from early on. You get Power Treads early and after this you rush Diffusal, allowing you to bring down almost any squishy hero after you reach Mana break talent. After this you have to decide what defensive item you want to take (this depends on the heroes you play against) - BKB/Linken’s/Pike are the options. After you have one of these defensive items you go for Butterfly which helps you against physical DMG and at the same time increase your own DPS. You can change the Butterfly with Heart for example if you need more HP to survive. After you go for the “Doom” item combo: Bloodthorn + Nullifier, which will help you kill enemies without allowing them to escape with skills or items.
Wraith Band: increases your damage and stats early on and helps you out last-hit an enemy opponent. It is a good choice in a situation when you don’t need a lot of regeneration to deal with harass, but need more damage to last hit and/or to harass the enemy laner against you more.
Wraith Band: increases your damage and stats early on and helps you out last-hit an enemy opponent. It is a good choice in a situation when you don’t need a lot of regeneration to deal with harass, but need more damage to last hit and/or to harass the enemy laner against you more.
Magic Wand: Weaver is a low HP hero that can be killed fast if focused. The item grants him an HP boost that can save his life in a fight. Moreover, if you get focused and you are running very low on HP, you can use your Wand before you Timelapse or cast Shukuchi. Since Weaver has a casting time of Time Lapse and Shukuchi has 0.25 seconds fading time, using any of those spells first might not be fast enough to get you out of danger. Lastly, Weaver relies on his two spells to survive. If he gets out of mana and cannot use his spells he is likely to die. A Wand can come in handy and give the hero the required mana to get out of danger.
Power Threads: PTs are the most common boots upgrade for Weaver. If switched to STR, Treads make the hero more tanky and survivable. You can also switch PTs to INT when you cast Shukuchi to minimize your mana loss. On AGI, you will maximize your DPS.
Unlike most heroes, Weaver can afford not to upgrade his boots early on or even not to buy boots for a while – the reason is the mobility Shukuchi gives. When the spell is activated, you will move at max MS regardless of having or not Boots. Nevertheless, delaying your PTs too long isn’t a great idea – the item is very cost efficient for the stats it gives.
Diffusal: Your best early DPS item, synergizes very well with your Geminate Attack and your lvl10 Mana Break talent. If you manage to take Diffusal early in the game you can be very dangerous to squishier and immobile enemies (i.e. most supports).
Dragon Lance: Dragon Lance can be very good for Weaver in the early game - it gives him good stats and allows him to survive nukes more easily. You can go for this item earlier if you are afraid that you might get nuked before you can use your ultimate (for example when playing against Tiny, Lion, etc.).
Hurricane Pike: If you feel that you need more mobility to kite melee cores you can upgrade Dragon Lance right away. Otherwise you can delay it.
Black King Bar: The counter to Weaver are disables. The counter to disables is BKB. In most games, you will need either a BKB or a Linke's, sometimes both. BKB is better against multiple disables and nukes, while Linkens is obviously better against powerful single target spells. Getting the BKB later in the game is ideal, but often you wouldn’t have this luxury.
Butterfly: This item for Weaver can be described as a more defensive DPS item. It is very useful against strong physical DPS heroes that can burst you down in fights, since Butterfly grants evasion. Moreover, Weaver is an Agility carry and benefits from the high agility boost of the item. Nevertheless, Weaver benefits more from bonus damage rather than attacks speed, so BF is usually bought as a third big item rather than your first offensive choice.
Bloodthorn: works very well with Geminate Attack (more attacks = more crits) and can secure you late game pick-offs.
Nullifier: Situational item, but combined with Orchid/Bloodthorn can totally incapacitate a target and give you enough time to kill him alone. The slow from the Nullifier synergizes well with your Geminate Attack, as does the bonus damage. It is a great item choice if enemies are trying to last longer against you with Ghost Scepter.
The utility build is used either on a support or on an offlane Weaver that doesn’t have farm priority. The idea is to increase your early game strength an win the lanes with cheap stat items and later to get your Aghanim’s to be able to save your cores in team fights. The Aghanim’s Timelapse is one of the strongest saving mechanics in the game and its impact shouldn’t be underestimated.
Magic Wand: Weaver is a low HP hero that can be killed fast if focused. The item grants him an HP boost that can save his life in a fight. Moreover, if you get focused and you are running very low on HP, you can use your Wand before you Timelapse or cast Shukuchi. Since Weaver has a casting time of Time Lapse and Shukuchi has 0.25 seconds fading time, using any of those spells first might not be fast enough to get you out of danger. Lastly, Weaver relies on his two spells to survive. If he gets out of mana and cannot use his spells he is likely to die. A Wand can come in handy and give the hero the required mana to get out of danger.
Medallion of Courage: The item synergizes well with The Swarm since it also reduces the armor of the target. Combined with the ability, Medallion can help Weaver quickly burst down single targets with his attacks. If you want to be more active on the map early on and kill targets, buying Medallion is a good choice. If you intend to rather farm up more and fight less, then going for other items will usually be better.
Power Threads: PTs are the most common boots upgrade for Weaver. If switched to STR, Treads make the hero more tanky and survivable. You can also switch PTs to INT when you cast Shukuchi to minimize your mana loss. On AGI, you will maximize your DPS.
Unlike most heroes, Weaver can afford not to upgrade his boots early on or even not to buy boots for a while – the reason is the mobility Shukuchi gives. When the spell is activated, you will move at max MS regardless of having or not Boots. Nevertheless, delaying your PTs too long isn’t a great idea – the item is very cost efficient for the stats it gives.
Aghanim’s Scepter: The item reduces the CD of your ultimate to 20 seconds (a significant reduction, in prolonged fights you could even use your ult twice) and more importantly - allows you to cast it on allies. This is extremely powerful for saving your cores when they get focused down, and the low CD means you are not necessarily giving up on using the ultimate on yourself a bit later.
Solar Crest: Great defensively against physical damage cores.
Linken’s Sphere: Linken’s is the most common first big item for Weaver. It grants the hero survivability and freedom in fights – you get extra HP and are less vulnerable to some direct disables (Doom, Lasso, Fiend’s Grip etc.). Weaver also benefits from the HP/mana regen the item grants. He can use his spells much more often to farm up faster and split-push.
Octarine Core: Get this in the late game when you have Aghanim’s – the CD reduction is very good on your ultimate because you will be able to use it multiple times in a fight.
Getting a fast Maelstrom increases your farming speed a lot as it helps you clear waves much faster. After Maelstrom, in this example, you get Orchid which increases your kill potential a lot. Afterward, you buy BKB. In case you feel you need the defensive item faster, you can switch their places. Upgrading the Orchid to Bloodthorn is the logical choice, and since you already have Maelstrom and Bloodthorn upgrading your Mjollnir and buying Nullifier is the quickest way to further increase your offensive potential. In the super late game, you can finalize the build with another defensive item that will keep you alive for longer versus the enemy carries that probably hit hard at this point – HOT is a good choice, as you have a low HP pool.
Wraith Band: increases your damage and stats early on and helps you out last-hit an enemy opponent. It is a good choice in a situation when you don’t need a lot of regeneration to deal with harass, but need more damage to last hit and/or to harass the enemy laner against you more.
Power Threads: PTs are the most common boots upgrade for Weaver. If switched to STR, Treads make the hero more tanky and survivable. You can also switch PTs to INT when you cast Shukuchi to minimize your mana loss. On AGI, you will maximize your DPS.
Unlike most heroes, Weaver can afford not to upgrade his boots early on or even not to buy boots for a while – the reason is the mobility Shukuchi gives. When the spell is activated, you will move at max MS regardless of having or not Boots. Nevertheless, delaying your PTs too long isn’t a great idea – the item is very cost efficient for the stats it gives.
Magic Wand: Weaver is a low HP hero that can be killed fast if focused. The item grants him an HP boost that can save his life in a fight. Moreover, if you get focused and you are running very low on HP, you can use your Wand before you Timelapse or cast Shukuchi. Since Weaver has a casting time of Time Lapse and Shukuchi has 0.25 seconds fading time, using any of those spells first might not be fast enough to get you out of danger. Lastly, Weaver relies on his two spells to survive. If he gets out of mana and cannot use his spells he is likely to die. A Wand can come in handy and give the hero the required mana to get out of danger.
Maelstrom: The item can help the hero clear out waves and summoned units faster. If you have to deal with pushers that have a lot of summons, then buying Maelstrom can be a good idea. Moreover, Maelstrom helps Weaver farm-up and split-push faster because of the AoE damage it gives.
Orchid: Gives you great kill potential on heroes with good defensive mechanisms or disables. The mana sustain is also very useful for spamming your spells.
Black King Bar: The counter to Weaver are disables. The counter to disables is BKB. In most games you will need either a BKB or a Linkes, sometimes both. BKB is better against multiple disables and nukes, while Linkens is obviously better against powerful single target spells. Getting the BKB later in the game is ideal, but often you wouldn’t have this luxury.
Bloodthorn: works very well with Geminate Attack (more attacks = more crits) and can secure you late game pick-offs.
Mjolnir: an upgrade to your Maelstrom. Don’t forget to use the active on your frontline tank.
Nullifier: Situational item, but combined with Orchid/Bloodthorn can totally incapacitate a target and give you enough time to kill him alone. The slow from the Nullifier synergizes well with your Geminate Attack, as does the bonus damage. It is a great item choice if enemies are trying to last longer against you with Ghost Scepter.
Heart of Tarrasque: Great in case the enemy team has a lot of nuke damage. It is also very good for long fights because combined with your mobility it will allow you to disengage, regenerate and reengage.
Manta Style: Manta is a situational choice for Weaver – it is an item that is a bit more offensively oriented than the usual BKB or Linken’s but serves a similar defensive role. Manta is a good choice if there is one or two disables in the enemy team that can be dispelled by the split (mainly silences). If the enemy team has a lot of disables that can lock you down and can’t be dispelled by Manta (stuns, hexes) then BKB will be a much better choice. Manta, however, will help you farm faster and get your late game items earlier. Additionally, Manta is very useful if you want to split-push with Weaver (later on in the game you can leave the illusions to push out the wave).
Boots of Travel: an item usually purchased when you have no slot for TP. Weaver doesn’t benefit from the high movement speed that the BoTs grant since he has Shukuchi, which grants him max movement speed. The teleportation, however, is very useful – it lets you split push more efficiently in the late stages of the game or quickly join fights.
Monkey King Bar: The item gives you a bit less DPS than Daedalus but helps you counter heroes with Evasion. The bonus damage can proc with the second Geminate Attack projectile as well.
Skadi: A more offensive option than Heart, it makes you tanky but it also increases your DPS a bit and helps you stick to your targets.
Weaver could be positioned in all three lanes and be played either as a solo or more commonly in a dual lane.
He is a flexible and powerful laner and you should use his early game strength to give yourself a good start.
Getting as many last hits as possible is important early on since you are a very farm-dependent hero – if you don’t get enough out of the laning stage, you won’t be able to contribute to your team.
Weaver has very high base damage for a ranged hero and a decent attack animation. Moreover, he has two abilities that could help him get last hits.
His Shukuchi can be used to last hit just one or a few creeps at the same time. You can, for example, damage 2-3 creeps until they get low on HP and use Shukuchi to get the last hits – this will make it much harder for an enemy to deny your creeps (in a 1v1 situation). Moreover, besides getting the last hits with Shukuchi you can also run into the enemy hero to harass him. However, you don’t want to disrupt the creep equilibrium and cause your wave to push into the enemy tower (unless you are going for the rune). To keep a good equilibrium, you should be careful how you use Shukuchi when you harass and the last hit - don’t damage the creeps in the lane unnecessarily, rather move around them.
Weaver has Geminate Attack, which also helps to get last hits. If Geminate is off CD, you can time your attack so that the secondary projectile gets the last hit – this will make it very difficult for your lane opponent to contest these last hits.
Weaver is a harassing carry. He has two abilities that make him very hard to lane against.
First, Shukuchi can be used to quickly rush in, damage the enemy hero with the spell and then return to a safer position (the “hit and run” tactics). Don’t spam Shukuchi too often – even though it costs little mana, you can easily run out and you won’t have an escape mechanism if you get initiated upon. When you run in with Shukuchi try to be 500 range away from the creep wave if you want to attack the enemy hero afterward – otherwise, you will aggro the creep wave on you and will mess up the equilibrium. Moreover, make sure that you can actually win a man-fight against the hero you are going to harass/attack once you get out of Shukuchi. If you can’t you could get caught and die, since Shukuchi has a longer CD at lower levels and you won’t be able to use it soon enough to get away.
Second, Geminate Attack is a perfect harassing tool. Every time the passive is off CD you can attack the enemy hero. You can even combine both Shukuchi and Geminate attack to zone out an enemy– go in, damage the enemy with Shukuchi, then start attacking and either man-fight or walk backward. Once Shukuchi is off CD again, use it to damage the hero for a second time and return back to your creep wave to not miss last hits.
Taking all this into account, you should try to harass and zone out the enemy as much as possible – last-hitting passively with Weaver is a mistake. However, don’t get too over-aggressive. You need to be methodical and harass a lot but in the same time, you need to take all last hits while also taking care of your Shukuchi mana cost and CD in order not to over-extend and get killed.
The creep equilibrium and the length of the lane (the distance between your tower and the enemy tower) play a role in the way you can harass. In longer lanes, such as the side lanes, you will be able to chase down and harass an enemy for a longer distance (until he gets to safety under his tower), which can transition to a kill attempt especially if you use Swarm. In the mid lane (or if the equilibrium is close to the enemy tower), you will not be able to do this and you will usually have to harass and immediately go back behind the creep wave.
Weaver is a very elusive hero thanks to his Shukuchi and Time Lapse. Shukuchi can be used to dodge certain projectiles (only if enemies do not have reveal) if you are getting ganked – e.g. stuns like Wraith King’s Blas. The maximum movement speed of the spell also allows you to easily create distance between yourself and your opponents – this could allow you to move out of initiation range even if they have true sight. Time Lapse, on the other hand, can be cast to remove certain debuffs. For example, if you get ganked by Naga Siren and you get trapped in her net, you can use your ult to dispel the effect and then use Shukuchi to run away. Therefore, getting Weaver killed is a very hard job.
However, you should be careful how you use your Shukuchi early on and where you position yourself when the spell ends. Since it has a much higher CD at low levels, if you play too aggressively to harass the enemy hero, you might get yourself in a place where you could get initiated and killed. Without Shukuchi or Time Lapse available you are very vulnerable. Therefore, if you don’t see where enemy supports are, you should run in with Shukuchi and get back to a safe position closer to your tower when you harass rather than ending Shukuchi in an aggressive position. Keep in mind that Shukuchi and Time Lapse are not omnipotent escape mechanisms - if enemies have good lockdown, you can easily get nuked down.
Weaver has high kill potential early on even on his own thanks to his mobility and high single target damage output. Thanks to his Shukuchi, Weaver can not only harass and damage an enemy but also chase him down to get a kill. You can run in with Shukuchi, cast The Swarm to increase your damage output (lowers the target’s armor and deals damage), start attacking and when your mobility spell is off CD - continue chasing. You can even dive the tower if you have your ultimate ready – run in, get the kill and use your Time Lapse to get back in a safe position.
Keep in mind that your ult early on costs 150 Mana and because of your low mana pool, it’s likely that you won’t have enough to cast it if you’ve been using your spells often. Therefore, always check your mana before you make such a move.
Being too aggressive might be risky if enemies have disables that can prevent you from running away with Shukuchi or Time Lapse – if you dive an enemy and get stunned, you can easily die, since you are a low HP/low armor hero. The last thing to consider about Weaver’s kill potential is where you are laning. In the side lanes (safe lane/hard lane) you will have a higher kill potential since you can chase enemies for a longer period – the distance between your and the opponent’s tower is larger. In the mid lane, it is harder to chase a target with Shukuchi, since you will always have to dive under the enemy tower should you attempt to do so.
In the laning stage, your first timing is when you get to level 4. Then you will usually have 1 point in The Swarm, 2 in Shukuchi and 1 in Geminate Attack. Having all three spells will allow you to get a kill on a hero, especially in the side lanes as we explained above. You won’t have your ult yet so don’t play too aggressively.
The second timing is when you get to level 6/7 and have your ultimate plus a higher or preferably maxed level of Shukuchi. Your ult allows you to play more aggressive and dive enemies under the tower. The higher/highest level of Shukuchi will help you chase and damage targets much easier since the CD of the spell gets substantially reduced.
If you are going for an aggressive item first (usually Diffusal), you have a very strong timing on lvl10 – the Diffusal + mana break talent increases your DPS a great deal and you should use this to join your team for a fight and claim some map control.
As a carry, your top priority should be to get farm. However, you have a very high harassing potential and you should harass/zone out the enemy offlaner to prevent him from getting last hits and experience.
Weaver is not the type of carry that likes to farm passively for very long. In the later laning stage, you can TP to another lane to join fights and chase down damaged enemies to secure kills. You shouldn’t start to actively search for fights and ganks, but when the opportunity presents itself, you definitely should TP to join a fight and finish enemies off – you can go back to farming right away when the fight is over.
He showcases the kill potential of Weaver right from the start of the lane. Notice how he is trying to use every Geminate attack on heroes not on creeps to harass more efficiently and possibly set up for other kill attempts.
Getting an early Aquila to sustain his mana and increase his attack damage is very important.
By the end of the laning stage, even after Weaver`s team managed to kill Ench a couple of times, Enchantress has high levels and is becoming more dangerous on the lane. So, Weaver decides to TP bottom and get some free farm instead of trying to fight Ench. This is a very good decision – after using your strong early game potential, you need to focus on your farm to be able to scale as a carry in the mid and late game. Constantly fighting with Weaver is not a good idea, because you will end up being item-starved.
Combined with another good harasser, a dual lane with Weaver is very hard to deal with and could possibly disrupt the farm of the enemy carry.
You are a harassing carry and your job would be to get last hits but also zone out the enemy heroes against you. Early on you are stronger than most other carry heroes and can use that to your advantage to attempt kills or just push your opponents out of the lane together with your support.
In the lane, you want to exploit your early game harassing and kill potential. Simply trading farm won’t be enough to justify your dual lane if the enemy dual/tri-lane has lower kill/harassing potential (which will be usually the case). Therefore, you should try to zone out and harass the enemy heroes as much as possible together with your partner. The difference from a solo Weaver is that your support complements and amplifies your harass and kill potential a great deal and you can be much more aggressive.
If an enemy support is away from his carry or other support (e.g. he wants to take the Bounty/to ward/to stack), you should try to chase him down together with your support. He will have a long distance to walk to safety and usually, this will be enough time to secure the kill.
Weaver needs a support that can amplify his laning strengths - harassing and kill potential. If you combine Weaver with a hero such as Naga Siren that is also strong early on, then the dual lane becomes very hard to deal with. (In the case of Naga, she has very high armor early on and can trade harass, she has an additional source of armor reduction which will amplify your attacks a great deal and she has a source of disable – something you lack).
Preferably (but not a must), the support should not only have good harassment but also some form of disable, since Weaver has none. This way your partner can lock down a target, while you deal the damage – this will give you kill potential. Nevertheless, the emphasis should fall on harassing when you build a dual lane with Weaver.
Examples: Naga, NP, Clock, Ogre
Weaver goes to the offlane alone only when against a weak lane that can’t zone him out, usually because they lack enough damage (the safer choice is to go to the offlane with a strong lane support). He has a good escape mechanism early on in the form of Shukuchi but if he gets locked in place, he can be easily brought down, especially when Shukuchi is at low levels and has longer CD. Therefore, the play style of Weaver as a solo offlaner is generally very defensive at the start and gets more offensive when he gets levels.
Your top priority is to get experience and some farm. Don’t try to be aggressive to get last hits early on. Rather, try to leach experience and get farm only when you can do so safely. After you get a few levels you can feel safer (since Shukuchi will have lower CD) and you can start trading blows with the enemy supports who are trying to zone you out. Your high attack damage + your passive means you will usually win these exchanges. Moreover, if an enemy support overextends you can use Swarm and chase down with Shukuchi for the kill.
Weaver could be played as a position 4 support because of his strength in the lane and because in the mid and late game he can be extremely useful with an Aghanim’s on his ultimate – it is one of the strongest save mechanics in the game.
With a pos. 4 Weaver you usually want to start the game as a lane support either in the off or safe lane and use your Shukuchi and high damage attacks to harass and create space for your farmers. When you get some levels you can start rotating, controlling the runes and TP-ing to other lanes to join fights and kill attempts much more often than a core Weaver.
If your team could provide you with some space to farm (e.g. a free safe lane while the carry is farming the jungle), you should take it in order to get your Medallion + Aghanim’s faster – your mid and late game presence is much stronger with Agh’s as you will be able to start saving your cores in fights.
Weaver is strong in the early-mid game engagements and if you should use that in your favor to win fights if you have a good team composition for that. Otherwise, Weaver is a farm-dependent hero that will need to get his late game items in order to become a strong carry.
As we explained already, Weaver is a farm-dependent carry and you should farm up as a top priority. This, however, doesn’t mean that you shouldn’t join engagements or fight at all. On the contrary, if you have a good team fight in your line-up, you should join fight with Weaver, since your mobility and elusiveness make you hard to deal with when enemies don’t have the lockdown to control you.
If the enemy, however, has very good team fight potential and you can’t engage on them head on, then you should not only farm but also split-push to delay the game and force enemies to go back to defend their towers. Weaver doesn’t have a good anti-push ability and needs a lot of farm, so staying to defend towers against 5-man pushers is not advisable. Instead, focus on split-pushing and farming and try to turtle until you get your carry items to be able to fight.
If the laning stage went well, you should attempt to pressure your enemies by fighting, since Weaver is strong in the early-mid engagements due to his skill set. However, if your team lacks team fight potential, then you should continue farming and split-pushing at least until you get your first big item (Linken’s, BKB etc.).
If the laning stage went poorly, you should attempt to catch up in terms of farm to get your core items. By and large, you have a hard time being active and applying pressure from behind. It falls to your teammates to create space for you. Nevertheless, if your team has a good team fight potential, you should try to fight and win engagements – even without many items, you could have an impact in the early-mid engagements. When playing from behind, however, you should be very careful with your positioning while fighting. If you still don’t have your defensive item you should keep track of all important enemy disables and go in once they are in CD. If you can’t fight, you should split-push as much as possible to delay the game.
In team fights, you are not a hero that runs in and starts the engagement, simply because you don’t have any initiation tools. Rather, you follow up an initiation from an ally.
With Weaver, you want to focus a single target. The hero has a lot of mobility that allows him to run after heroes and finish them off. Therefore, if heroes on low HP are retreating, it is your job to get them killed.
In terms of targets, you can focus, you have generally two choices - either go for the enemy carry or go behind enemy line to pick-off squishy supports. The former is a good decision and should be attempted if you and your team have the damage output to quickly kill the enemy carry. If not, then it isn’t advisable to try to bring him down – it will take too much time and will give freedom to his teammates to counter initiate and kill you. The better alternative would be to snipe squishy supports – since you are very mobile with Shukuchi you can easily go behind enemy lines, kill a hero or two and then return to kill the enemy cores.
Moving around in fights is vital to your survival – if you just stand your ground and man-fight you will be much more vulnerable. If you get disabled and focused on multiple enemies you could get killed before you get a chance to use your ult and run away.
Therefore you should use your repositioning abilities to your advantage. You can go in, use The Swarm on as many heroes as you can, hit a few times. Then, when enemy heroes turn on you, you should use Shukuchi to kite them, especially when they are melee DPS heroes. Stay on the outskirts of the fight, go in, go out. These hit and run tactics will help you win an engagement against strong man-fight heroes that don’t have a way to get close to you (for example against Lifestealer) and will make it very hard for the enemy team to predict your movement and lock you down.
Apart from Shukuchi, using your ultimate in fights is also crucial. There are three ways you can use Time Lapse:
First, when you get focused you can use your ultimate to avoid getting burst down. You can use it to dispel a disable such as Naga Siren’s Ensnare or debuff such as Track – Shukuchi won’t help you in that case, or you can simply use it to recover your HP. Second, you can use your Time Lapse to get into a more favorable or safer position. Let’s say you run into 3-4 enemy heroes. If they have detection and you use Shukuchi to run away, they can still disable you and kill you. Therefore, using your ultimate right away would be a better choice. Last but not least, you have an option to buy back and use Time Lapse to return to an engagement. This is only advisable when enemies managed to burst you down in the span of a few seconds. Then using buyback and Time Lapse would bring you back into the fight at a point in time when you were full HP (before getting burst down). If, on the other hand, you were very low on HP for more than 5 seconds, then buying back and Time Lapsing would return you to the fight with low HP again. This might get you killed twice, which wouldn’t help your team in any way.
Envy
realizes that the enemy supports are too far away from their teammates and uses
the mobility of Weaver to pick them off on his own. This allows his team to
turn around and help him secure an additional kill on the enemy DP – a great
example of how good Weaver is in chaotic, drawn-out fights.
Weaver is a good split-pusher since he has the mobility to move fast and stay safe, AoE spells to clear out creep waves faster and good physical DPS to push down towers (especially in the late game). By using Shukuchi you can quickly move to a lane in order to split-push. You should use the spell on CD to damage and push out the creep waves as fast as possible. Moreover, you can also cast The Swarm on an incoming creep wave to bring it down faster – if you want to split-push more, then higher levels in The Swarm early on will help you clear out waves quicker. Weaver also has high single target damage thanks to Geminate attack ability. Therefore, he can bring down towers at a relatively fast speed especially if he has Deso.
Since Weaver needs a lot of items until he reaches his true carry potential, he usually needs to farm up for a long time. If you can’t fight the enemy team early on, you have to delay the game by split-pushing. If you passively farm and don’t split-push, your team is likely to lose towers, while having destroyed none of the enemy buildings.
When it comes to your team pushing as 5, Weaver should most of the time stay back out of initiation range because he is low HP and if he gets disabled he can easily die. Only in cases when enemies don’t have a way to initiate on you and lock you down should you stay in front and attack the opponent’s building (or if you are very tanky because of a resource advantage).
Weaver is not a good ganker because he doesn’t have control for the enemy heroes. Even if you gank a squishy hero, an opponent can always use TP to get away (you have no stun to cancel the TP and you deal gradual rather than nuke damage). However, if you are very farmed and have a high damage output, you can manage to kill an enemy hero very quickly. In such a case you could successfully gank on your own.
Most of the time, however, you wouldn’t have the damage or the control to gank by yourself. Therefore, the only reliable way to gank a hero would be with the help of an ally that can provide good disable. Together with other mobile gankers such as Storm Spirit or Puck you can quickly go in, snipe a target and then get away in time before enemies have a chance to counter-initiate.
With Weaver, you can use The Swarm to scout the positioning of enemy heroes. For example, if you think that enemies are in the Roshan pit you should cast the spell in that direction. Don’t scout with Shukuchi, especially in the very late game – you are a squishy hero and enemies are likely to have true sight for you. Moreover, you are a carry and if you die, your team your item development will be slowed and your team will be unable to fight without you.
Being an item-dependent carry, you should farm a lot during the mid and late game. Weaver is not one of the fastest farmers in the game since he doesn’t have a flash farming ability to help him clear waves or neutral stacks quickly. Nonetheless, Shukuchi and Geminate Attack give him good damage output that can be useful to clear creep waves or jungle camps relatively quickly. Use your Shukuchi to not only damage creeps but also to move faster between lanes and camps. You can use the Swarm to clear jungle stacks faster – the beetles will tank a couple of creep hits, so you will also take less damage.
Last but not least, keep in mind that through split-pushing you are also farming. Shukuchi allows you to farm and split-push lanes where you have little map control. In fact, split-pushing helps you to get a lot of farm, while delaying the game so that you can have the time to get your late game items.

