Ember Spirit Guide by Xcalibur
Artist: Valve
  • Guide Navigation
  • HOME
  • ABOUT
  • DRAFTING
  • SKILLS & BUILDS
  • ITEMS & BUILDS
  • EARLY GAME
  • MID & LATE GAME
Author:
Xcalibur & Co.
Date: 01/2019
Tags:
text
Ember Spirit
Analysis
Tactics
Builds

Welcome

Welcome to Xcalibur's Book of the Ember Spirit, a hero guide part of the Book of Dota series!

Here you will find all the information you need to learn to play Ember on a high level – from drafting and builds to the optimal playstyle in different lanes and situations. We hope you’ll enjoy this guide and find it useful!

Xcalibur Ember Stats
TL;DR:

Draft: As Ember, you’re mostly afraid of lane counters. Either pick him after you know the enemy cores (especially the mid laner) or if you get countered try to dodge the lane as best as you can.

Early Game: Before lvl6 you are a weak laner. Focus entirely on your own item and level development, don’t try to be too aggressive unless your supports rotate and you are helping them secure a kill. Get lvl6 and your first core item – at this point you can start rotating more. The ult mobility helps a lot offensively, defensively, and in terms of farming efficiency.

Mid & Late Gam: When the mid game comes and enemies start grouping together you need to stop fighting and focus on farming again. Out-push lanes and split-push in order to get your expensive late game items as fast as you can. If enemies don’t have strong instant disables you can afford to farm the more dangerous areas in order to leave the safe space to your teammates.

Dominate late game team fights with the farm you have and push when the enemy team is dead to secure the win.

Authors

Steve "Xcalibur" Ye
Endorsement & Info

Xcalibur is one of the biggest pub-stars in the history of Dota - he has claimed the number 1 spot on the EU leaderboard numerous times and before the reset, he peaked at over 9 000 MMR.

His incredible success in pubs made him one of the hottest stand-ins in the pro scene and later on allowed him to play for major Dota teams like Fnatic.

Nikolay "CTOMAHEH1" Kalchev
Info & Editing

CTOMAHEH1 started his pro career as a support in Basically Unknown together with Mind Control. Since then he has consistently been playing on the European T2 scene, most recently on Unchained Esports. 

His highest placement on the EU ladder is top 100 - he plays all roles (mainly support), which is untypical for high-ranking players and shows his great versatility and understanding of the game.

Toon "Jeten" Casteele
Writing

An IT dev by day, a Dota enthusiast by night.

Toon is not a stranger to writing Dota guides - he has a whole series of them in r/Dota2! He has a very versatile hero pool and loves watching and analyzing pro games.

Kyril "MrNiceGuy" Kotashev
PM & Editing

Esports and gaming enthusiast since forever and founder of Dotahaven.

Has been playing Dota since 2005 (5.84). An Ancient I player in Dota 2.

Balance in all things!

Ember Spirit is a melee agility hero with unique mobility and damaging abilities. Thanks to having both high magical damage and potentially even higher physical damage, he’s a big threat in every fight. He’s also very hard to catch due to 2 low cooldown and high mobility skills.

Ember is a high skill cap hero, which means that if you learn to play him well enough you have the possibility to outplay your opponents and carry the game for your team. Doing that, however, isn’t easy and you need to understand the ins and outs of Ember in order to do it.

Ember Loadout
Stats
Level 1
Level 15
Level 25
STR
21
Low
57
Medium
83
High
AGI
22
Very High
47
Medium
65
Medium
INT
20
High
45
Medium
63
Medium
Attack
52-56
High
77-81
Very Low
95-97
Very Low
Armor
4.4
High
9.4
High
13
High
Resistance
26
Medium
28
Medium
29
Medium
HP
578
Medium
1226
Medium
1694
Medium
MP
315
Medium
615
Medium
831
Medium
MS
309
High
313
High
317
High
STRENGTHS

MAJOR

High Mobility:
Especially thanks to Fire Remnant, Ember Spirit has extremely high mobility. Combined with teleports, he can be at any place on the map at almost any time and also escape ganks.

High sustained damage:
Regardless of what items you get, Ember Spirit’s damage remains high and constant. All of his skills do a decent amount of damage and have a low cooldown.

Great anti-push and high ground defense:
Ember Spirit is amazing and consistently pushing out lanes and defending towers from a distance. This is mostly thanks to Sleight of Fist, but also his other skills. His high mobility helps him to do this often and with confidence.

MINOR

One of the best counters against illusions and summons:
Even though there might be more obvious heroes that counter illusion heroes, like Earthshaker, Ember Spirit is outstanding against such heroes.

Decent crowd control:
Thanks to talents, Searing Chains has gotten a serious upgrade in uptime. This allows you to CC well and often from a distance.

Flexible laner:
Especially thanks to the current meta, as well as his possible item builds, Ember can go into different lanes and even fulfill different roles (although he’ll always be a core hero).

WEAKNESSES

MAJOR

Squishy:
When he does get locked down, Ember Spirit dies incredibly easily, even with the small protection Flame Guard gives. Being squishy also makes him easy to zone out. Because of this, he is very reliant on skills to get farm.

Vulnerable to instant disables:
Tying into the above, the best way to catch Ember Spirit is with instant disables and silences. That makes him easily countered by a lot of popular heroes like Rubick, Skywrath, Lion, etc.

Poor laner:
Ember Spirit loves to get a lot of experience since all of his skills scale decently. That’s why he’s most often played in a solo lane capacity. The downside to this is that Ember Spirit often struggles to get farm, especially against ranged heroes with high physical damage like Razor, Outworld Devourer, Clinkz and Exort Invoker.

MINOR

Struggles against magic immune heroes:
Especially in the early game, Ember Spirit struggles against heroes that can be magic immune or have more magic resistance. The best way for this hero to get to the end game with decent farm is to get kills and snowball past the dead zone that is his mid game.

Replays

OG vs PSG.LGD, TI8

MATCH ID 4080856812
Replay

Ana performs astoundingly well on a safe lane Ember in the 5th deciding game in the grand finals of TI8. With $7 million at stake, cracking under the immense pressure would be extremely easy, especially bearing in mind the bad early game for his team and the fact that he is playing against multiple Ember counters (Silencer, the instant disable from Shaker, the disable through BKB from Bat, X-Marks the spot from Kunkka).

Ana, however, keeps his composure and performs flawlessly in most mid-game fights. The quick Eul's pickup helps him stay alive in a lot of bad situation when combined with Ember's other defensive mechanisms.

Ana reaches above 700 GPM and above 38k hero damage in total with the help of Empower from Mag - more even than his Zeus.

Mineski vs PSG.LGD, CHINA DOTA2 SUPER MAJOR

MATCH ID 3934135077
Replay

Moon has a very good start with Ember and manages to snowball and absolutely stomp one of the best teams in the world at the time – PSG.LGD. He utilizes Ember’s kill potential early on to get a good start and as a result, finishes the game with 28k damage in a 28-minute game and a stat of 17-0-13.

Notice that despite having a very good start, he opts to go for a safe and defensive build – Blade Mail into Linken’s. This ensures that he will not throw away his lead. Moreover, Blade Mail is great in this game because the enemy team has a lot of AoE damage (KotL, DK & Gyro).

Team Secret vs Na’VI, Epicenter XL

Match ID: 3856880792
Replay

MidOne plays an almost flawless game on Ember and manages to secure an extremely fast victory for his team. He showcases how strong Ember could be after the laning stage and has by far the highest damage output in the game.

MidOne goes for the magical damage build, which makes his eamrly-mid game timing even stronger.

Secret vs Newbee, Epicenter XL

Match ID: 3854498593
Replay

MidOne plays a safe lane Ember against Newbee. Since he is getting pressured early on, he decides to go for the magic damage build but to substitute the offensive Veil for a more defensive Blade Mail – the active will discourage enemies from focusing him, which will makes staying alive easier. Despite the rough start, MidOne manages to deal the most damage on his team, creates a lot of space and allows his Lone Druid + DK to claim objectives and secure the game.

Notice that his late game item build is quite defensive – after Maelstrom he gets Linkens and after Mjollnir – BKB. This allows him to stay alive against SK’s initiation and OD’s high magical damage output.

Drafting

More often than not, Ember Spirit is a hero you want to pick up later on in the draft. This is due to his weaknesses discussed above. The most important one being the instant disables and silences that counter you. The second reason to draft Ember Spirit, later on, is to get him a better lane matchup.

Once you’ve overcome these 2 weaknesses, you come to the real reasons to draft Ember Spirit: If he’s hard to catch, it means Ember Spirit can fight, push-out lanes and create space for your other cores with less risk.

If you can give him a decent lane and early game, Ember could snowball - he has a very strong timing in the early-mid game (10-20 minutes) followed by a slump in the mid game (20-30ish minutes) until he gets his late game items and starts being strong again. You can use his timings e.g. to build a very aggressive early-mid game team and claim a lot of map control. Once this is achieved, Ember will have a lot of space to stop fighting and start flash-faring and out-pushing the waves. This will allow him to reach his late game timing earlier and secure the victory.

An Ember with farm is pretty much a guarantee that the game goes late thanks to his great space creation and turtle skills. This makes him a great partner for strong late game carries.

Position #2 Mid Lane

In general, Ember Spirit goes into a solo mid lane. The main reasons being that he should get a lot of experience here and can easily access side lanes and runes once he gets level 6 by using Fire Remnants to move back to his lane quickly. The risk to this is that he loses a lot of matchups. A support can help him, but if no help can be offered, Ember can safe lane or even offlane with support instead to ensure he gets the necessary levels and farm. 

Synergy

Heroes that increase your damage output:  Dark Seer, Magnus, Bloodseeker, Vengeful Spirit, Pugna

Dark Seer
Magnus Portrait
Bloodseeker
Venge
Pugna

Depending on what build you use, these heroes allow you to increase your damage output. Dark Seer and Magnus work amazingly well with cleave on your Sleigh of Fist, while the other heroes can provide more generic buffs to your physical or magical damage output.

Heroes with great follow-up control:  Earth Spirit, Jakiro, Earthshaker, Ogre, Shadow Shaman, Lion

Earth Spirit
Jakiro Portrait
Earthshaker Portrait
Ogre Magi Portrait
Shadow Shaman
Lion

Even though you have Searing Chains, you need some follow up control after catching someone out to ensure a kill (and that they don’t kill you). Not coincidentally, these heroes are also often supports that can help you get an edge in the lane.

Strong team-fighters:  Enigma, Faceless Void, Mag, DS, Earth, Jakiro

Enigma Portrait
Faceless Void Portrait
Magnus Portrait
Dark Seer
Earthshaker Portrait
Jakiro Portrait

Because he’s so squishy but has a very large damage output, Ember Spirit can really use moments in which he can go to work uninhibited, regardless of cooldown on his skills and fear of being caught out. These heroes provide the control that allows him to do just that.

Heroes with a save:  Omniknight, Shadow Demon, Dazzle, Oracle, Tusk 

Omniknight portrait
Shadow Demon Portrait
Dazzle Portrait
Oracle Portrait
Tusk

Not only can they give you a chance to get out of a sticky situation, most of these (except Shadow Demon and Tusk) also allows you to continually output your high damage with little fear of retribution.

Counters

Strong Against:

Many units in close quarters: Terrorblade, Chaos Knight, Phantom Lancer, Nature’s Prophet, Meepo, Beast, Brood, Naga

Terrorblade
Chaos Knight
Phantom Lancer
Nature's Prophet Portrait
Meepo
Beastmaster
Broodmother Portrait
Naga siren

If you go for the Battle Fury build, these heroes will have great trouble team fighting and pushing whenever you’re alive, especially if you are farmed enough.

Non-instant disables: CK, Mag, WD, Lesh, Jakiro

Chaos Knight
Magnus Portrait
Witch Doctor
Leshrac
Jakiro Portrait

You have one of the fastest escapes in the game, which makes you very hard to catch if you have quick reflexes, even against heroes with relatively fast disables. Sleigh of Fist can also be used to dodge projectiles while saving your ult for more dangerous situations.

Squishy supports with weak disables: CM, WD, Lich, AA

Crystal Maiden
Witch Doctor
Lich
Ancient Apparition Portrait

Regardless of what build you use, Ember Spirit will always output a lot of (collateral) damage. Even if you’re not really focusing on the enemy supports, they can die just from being in a fight against a farmed Ember Spirit. In the early-mid game, they are also very easy targets for Ember – he has no problem getting to the back lines of the enemy team with the help of his ultimate to take these easy kills.

Weak Against:

Solo lane dominators: Huskar, Clinkz, OD, Ursa, Viper, Monkey King, Razor

Huskar Portrait
Clinkz Portrait
Outworld Devourer
Ursa Portrait
Viper
Monkey king
Razor

These are heroes you can barely lane against. You can’t really threaten any of them and those you can hit, hit back harder than you do. Avoid laning against these heroes at all costs (swap lanes if needed even after the start of the game). Some of these heroes will also be a problem later on in the game, though. Huskar, for example, has extremely high magic resistance, which makes him unkillable in the mid game against your high magical damage. This also coincides with your weakest timing, which makes him a big problem. Clinkz, on the other hand, could buy Orchid and easily kill you with his very high physical damage.

Silences and instant disables:  Silencer, Death Prophet, Skywrath Mage, Drow Ranger, Rubick, Shadow Shaman, Lion, Nyx Assassin, Orchid Malevolence

Silencer
Death prophet
Skywrath Mage Portrait
Drow Ranger
Rubick
Shadow Shaman
Lion
Nyx
Orchid

Even with the Physical damage build, you rely almost solely on spells to deal damage and escape. Being silenced might as well mean you’re stunned. Therefore any hero that can disable or silence you before you can react, is a strong threat. Heavily consider getting a Linken’s Sphere or even Black King Bar when against heroes with a silence or fast disables.

Dispels:  Eul’s Scepter of Divinity, Invoker, Oracle, Razor

Euls
Invoker
Oracle Portrait
Razor

Especially in the earlier stages of the game, your damage comes from Flame Guard. It’s big weakness, however, is that it is dispelled by any purge. This can render it almost useless against some heroes. 

Magic immunity: Jugg, Lifestealer, Omniknight, Black King Bar

Juggernaut
Lifestealer Portrait
Omniknight portrait
Black King Bar
Huskar Portrait
Viper

You can barely damage heroes with magic immunity, especially in the early game. Even later on, you still rely heavily on hitting your spells, even with the Physical damage build.  Resistance is not that bad but it still can be a problem especially early on.

Skills

Ember Searing Chains
Ember Sleight of Fist
Earth Spirit Flame Guard
Ember Spirit Fire Remnant

Ember Spirit unleashes fiery bolas that wrap around nearby enemies, anchoring them in place and dealing damage each second.

STATS

Cast Animation: 0+0.87

Search Radius: 400

Max Targets: 2

Damage per Second: 60/80/92/100

Duration: 1.5/2/2.5/3

CD: 14/12/10/8

Mana: 110

Searing Chains

Mechanics:

  • 2 random non-allied units within Ember Spirit’s range are affected upon cast by this spell.
  • Deals a total of 80/120/240/300 damage (without talents).
  • Roots the affected units for 1/2/2/3 seconds (without talents).
  • Cooldown scales with levels (14/12/10/8).
  • Does not affect units you can’t see (invisible, fog of war, etc.).
  • Can be cast during Sleight of Fist and Activate Fire Remnant

Uses:

Even though it’s not actually a stun, this is your main (also your only) disable. It has a pretty high uptime, which allows you to slowly but consistently take an enemy down.

Use this with Sleight of Fist and Fire Remnant to get close to the enemy and root them. Hitting it accurately with Sleigh of Fist requires good timing, so it is worth it to train this skill a couple of times in demo mode.

When using Searing Chains with Sleight of Fist, always cast Sleight outside of range of the creep wave to maximize your chances of getting the root onto a hero.

Tip: In most cases, you’ll combo this with Sleight of Fist. Usage: Cast Sleight of Fist on your target (preferably 2 targets at the most). When Sleight of Fist goes off (which is immediately if you’re already in range and don’t have to turn anymore), immediately cast Searing Chains. Ember Spirit will be positioned on top of the target and will get rooted if you executed correctly. It’s harder to do this on one target compared to two, as you will spend less time on top of it, but it is still possible to do it very consistently with experience.

Ember Spirit dashes around with blazing speed, attacking all enemies in the targeted area of effect, then returning to his start location. Deals bonus damage to heroes, and less damage to creeps.

STATS

Cast Animation: 0+0.7

Cast Range: 700

Effect Radius: 250/350/450/550

Jump Interval: 0.2

Hero Attack Damage Bonus: 40/80/120/160

Creep Attack Damage Reduction: 50%

CD: 30/22/14/6

Mana: 50

Sleight of Fist

Mechanics:

  • Hits all units that were in the AoE when the spell was cast.
  • Damage is reduced to 50% of your regular damage for creeps and 40/80/120/160 damage is added when hitting heroes.
  • Attack modifiers are applied to each hit in Sleight of Fist.
  • AoE is 250/350/450/550.
  • Cooldown also scales with levels (30/22/14/6).
  • Can become charge based with the level 25 talent.
  • Also hits units in the AoE that are in the fog of war.
  • Hits every unit that was in the AoE when the spell was cast. Doesn’t hit units that come into the AoE while the spell is ongoing.

Uses:

This is your main way of dealing damage with the Physical damage build and the main reason you buy Battle Fury with this build.

For any build, Sleight of Fist is used to dodge projectiles and land your Searing Chains on the target you want.

Tips:

  • You can pick up items during Sleight of Fist. This can come in handy for an Aegis of Immortality steal or even a clutch fountain play (for instance to retrieve a Gem of True Sight).
  • If Sleight of Fist is cast during the fade time of activating Shadow Blade, the bonus damage from the Shadow Blade hit is applied to every target. Furthermore, when Sleight of Fist is over, Ember Spirit will be invisible. Like every active item, you can use Shadow Blade while Sleight-of-Fisting.
  • Any movement that happens while jumping in Sleight of Fist is pointless because Ember Spirit will always arrive back in the spot from which he started the skill. The only exception to this is Activate Fire Remnant, which overrides this position.

Ember Spirit surrounds himself with a ring of fire that consumes incoming magic damage, leaving him unharmed. Flame Guard deals damage per second in an area around Ember Spirit while Flame Guard is active. If the shield is broken, the damage is also lost.

STATS

Cast Animation: 0+1.07

Damage Radius: 400

Damage per Second: 30/40/50/60

Magical Damage Absorbed: 80/220/360/500

Duration: 8/12/16/20

CD: 35

Mana: 80/90/100/110

Flame Guard

Mechanics:

  • Flame Guard lasts 8/12/16/20 seconds or until it has negated 50/200/350/500 damage (without talents).
  • Deals 30/40/50/60 damage per second in a 400 unit radius (without talents).
  • Cooldown is 35 seconds at all levels, which makes the downtime of the spell when it’s maxed out 15 seconds.

Uses:

Especially in the early game, this is your main damaging spell. Use it to push out the lane and to do sustained damage to the enemy heroes.

This is your main farming tool but be careful not to push out the wave at inopportune times.

Be aggressive when Flame Guard is available to you, be more careful when it’s down – the Spell Shield is pretty strong in the early game.

Tip: Pay close attention to what dispels the enemy team has. A basic dispel takes of Flame Guard completely, which means you really don’t want to use it before that point.

Ember Spirit generates Fire Remnant charges every 38 seconds, with a max of 3 charges. Releasing a charge sends a Fire Remnant that runs to the target location at 2.5x Ember Spirit's speed. Using Activate Fire Remnant, Ember Spirit can dash out to his Remnants, exploding them for area of effect damage. The targeted Remnant will be arrived at last.

STATS

Cast Animation: 0+0.53

Cast Range: 1500

Max Charges: 3

Remnant Duration: 45

Charge Replenish Time: 38

Activate Fire Remnant:

Cast Animation: 0+1.07

Cast Range: Global

Remnant Damage Radius: 450

Remnant Damage: 100/200/300

Mana: 150

(Activate) Fire Remnant

Mechanics:

  • Has 3 charges that refresh every 35 seconds (without talents).
  • When a Fire Remnant is out, you can use Activate Fire Remnant to jump to the remnant closest to your cursor.
  • Ember Spirit will jump through each Fire Remnant and consume them before reaching the targeted one.
  • Each consumed Fire Remnant explodes and deals 100/200/300 damage upon explosion in a 450 radius.
  • Ember Spirit will travel towards the final remnant at a minimum speed of 1300 damage or at a speed high enough to reach the final remnant in 0.4 seconds.
  • The speed of placing a Fire Remnant is 2.5 times Ember Spirit’s current movement speed.
  • Jumping to a Fire Remnant breaks any trees you pass through.
  • Ember Spirit damages enemies within a 225 radius around him as he travels, and in a 450 radius around a remnant upon reaching it.

Uses:

Your main mobility tool. Has several uses.

Fire Remnant gives you the ability to have a global presence, especially combined with Town Portal Scrolls or Boots of Travel. When teleporting out, leave a Remnant. Once you’ve healed or pushed out another lane, go back to your Remnant. Rinse and repeat to make you a real annoyance to catch.

It also makes you very hard to gank. If your reaction speeds are good, you can get out of almost all situations by warping back to a Fire Remnant that you’ve left behind in a safe place. It has no cast time, so only your turn time and reaction speed stops you from getting out of everything. Even without a pre-prepared Remnant, you can still throw a new Remnant in the direction you want to run to and use Activate to get to this point faster than your opponents.

Especially when going for a more magic damage oriented build, the final usage of the skill is to use it for its chase potential and burst damage. Use multiple remnants at a time on the same spot on disabled enemies to deal huge burst damage to your target(s). 

Tips:

  • Similar to Sleight of Fist, you’re invulnerable while traveling to a Remnant. Use it together with Sleight of Fist to be untargetable and to dodge projectiles.
  • Just like Sleight of Fist, you can use items, spells and pick up items while traveling towards a remnant. You can do some cool plays like pick up a Rune and travel right back to mid with 2 remnants, or do the same for Aegis steals.
  • Activate Fire Remnant can be used to get out of Slark Pounce leash or Disruptor Kinetic field, but it has to be noted that your movement speed is reduced to 0 if you move against the edge of both. So, if you still have to place the remnant itself, move away from the edge so it can travel fast enough.
  • If a Remnant is still there when you respawn, you can jump right back into the action. This makes it possible to buy back and rejoin the fight almost instantly.

Skill Builds

Ember Spirit has 2 major play styles, but even though the items you want to get are very different, the early game plays out very similar. This means the skill build also often overlaps.

Standard Build
Earth Spirit Flame Guard
1
Ember Searing Chains
2
Earth Spirit Flame Guard
3
Ember Searing Chains
4
Earth Spirit Flame Guard
5
Ember Spirit Fire Remnant
6
Earth Spirit Flame Guard
7
Ember Sleight of Fist
8
Ember Searing Chains
9
Talent Icon
10
Ember Searing Chains
11
Ember Spirit Fire Remnant
12
Ember Sleight of Fist
13
Ember Sleight of Fist
14
Talent Icon
15
Ember Sleight of Fist
16
Ember Spirit Fire Remnant
18
Talent Icon
20
Talent Icon
25
Pros: high magic damage in the early game; good ganking potential and crowd control; maximizes your early farming tools;
Cons: little possibility to dodge projectiles; no ranged Searing Chains from Sleight of Fist;

First, you want to max out Flame Guard so you can maximize your farming potential through its AoE damage. Use it to push out the lane so you can safely secure the rune every 2 minutes.

Second, you want to level Searing Chains so you can get more crowd control for when you start ganking. Moreover, Searing Chains is a great harassing tool as well. Try to land it on the enemy laner (often together with the ranged creep).

Your ultimate is leveled whenever available because especially early on you will still need it for added damage.

There are several adjustments that can be made on a game to game basis.

You can get Searing Chains at level 1 depending on the movement speed of enemy heroes for instance. If other heroes are faster than you and you need some crowd control, Searing Chains at level 1 is going to do more for you.

Searing Chains can also be maximized if the enemy is constantly dispelling your Flame Guard (e.g. when against Invoker with Tornado).

Often you want to get a value point into Sleight of Fist at some point before completely leveling both Searing Chains and Flame Guard. This is mostly to dodge projectiles such as stuns or Queen of Pain’s Shadow Strike, but also to use together with Searing Chains to catch up to ranged heroes and chase them down with Flame Guard.

When going for the Physical Damage Battle Fury build, Sleight of Fist should be fully leveled by the time you complete your Battle Fury. This will increase your farming speed a lot. 

Talents

-25 Fire Remnant Charge Restore Time

25

2 Sleight of Fist Charges

True Strike

20

+10% Spell Amplification

+1s Searing Chains

15

+60 Flame Guard DPS

+250 Flame Guard Absorption

10

+25 Damage

Lvl10: For the Magic damage build, get the extra Flame Guard absorption. It will allow you to keep it up longer in a fight. When building Physical damage, get the extra damage. The only situation in which you want to get the damage in the Magic damage build is when the Flame Guard is constantly getting dispelled so the absorption doesn’t come into play.

Lvl15: In the physical damage build you want to get the extra Searing Chains duration in almost any case. The only way you’re really getting close to enemy heroes with this build is during Sleight of Fist. This means that the extra crowd control can help out a lot more. In the magic damage build you mostly want to get the extra Flame Guard damage. This can be changed though if you feel like you’re not the main damage dealer in your team and you need more crowd control.

Lvl20: Again, the choice here is mostly dependent on your build. Get the True Strike if you went for Physical damage. Get the Spell Amplification for the Magic damage build.

Lvl25: The 2 charges on Sleight of Fist are absolutely amazing for an Ember Spirit with Battle Fury. If the enemy doesn’t react in time at this point in the game, they could just die within 2 very fast consecutive Sleight of Fists. On the other hand, for the Magical Damage build the faster recharge on Fire Remnants allows you to play more liberally with them, often using them for both damage and escapes.

Item Builds

Physical Damage Build

This is a pretty set in stone build with little Situational items, at least not until you reach late game. The idea is to abuse the splash from Battle Fury with Sleight of Fist and the high crits of Daedalus to deal extremely high AoE damage in team fights.

Starting items
Quelling Blade
Stout Shield
Healing_Salve_icon
Pulled Tango
Pulled Tango
Iron branch
Early Game
Wraith Band
Bottle
Boots of Speed
Magic wand
Mid Game
Battle_Fury_icon
Boots_of_Travel_1_icon
Daedalus
Late game
Linken's Sphere
Blink_Dagger_icon
Divine Rapier
Quelling Blade

Quelling Blade: Greatly increases your early last hitting. A must for most melee mid lane heroes. Builds into your Battle Fury later on. 

Stout Shield

Stout Shield: Helps you sustain in lane. You’re very squishy so having a Stout Shield to start with helps you to not just die to enemy harass.

Healing_Salve_icon
Pulled Tango
Pulled Tango
Iron branch
Wraith Band
Bottle

Bottle: Your basic regeneration is likely gone by this point and your mana is getting low. This will come as a god sent. Use your mana more liberally, both to harass and to push out the lane with Flame Guard right before the rune spawns. If you Bottle up a good rune like haste or invisibility, feel free to gank the enemy lane earlier on or call for a gank on your lane.

Boots of Speed

Boots of Speed: Given that your primary source of damage in the early game is Flame Guard, you want to be able to keep the burn going on the enemy. That’s why you need these.

Magic wand

Magic Wand: Another source of sustain which you will need if you want to keep snowballing into your core items.

Battle_Fury_icon

Battle Fury: The item that defines Physical damage Ember Spirit. Cleave is applied in Sleight of Fist, which means your damage output with it will also increase dramatically. Enemies that don’t have great sustain won’t be able to withstand the constant burst from Sleight of Fist. Also increases your farming speed, allowing you to rely solely on Sleight to farm and being able to save your mana for your other spells.

Boots_of_Travel_1_icon

Boots of Travel: If there’s one thing Battle Fury allows you to do, it’s pushing out lanes. Given that Ember Spirit also has one of the best escapes in the game, Boots of Travel will allow you to be a huge split pushing nuisance while you also farm your next items. Use your Remnants with Boots of Travel to quickly and constantly jump from lane to lane.

Daedalus

Daedalus: The main thing you want to get after Battle Fury and Boots of Travel is more damage so you can actually burst people down with Sleight of Fist. Daedalus is a must have for this as it can also do critical hits while jumping around with Sleight. Again increases the speed at which you push out lanes.

Linken's Sphere

Linken’s Sphere: If you find yourself getting caught out by (near) instant disables or silences, Linken’s Sphere will be a must. Playing against Ember Spirit pretty much begs enemy heroes to buy Orchid Malevolence or Scythe of Vyse, so be prepared to get this in most games.

Blink_Dagger_icon

Blink Dagger: Amazing item for Ember Spirit because in combination with Sleight of Fist and Fire Remnant it gives you almost endless mobility and makes you incredibly hard to catch, even when silenced.  Sleight of Fist on a lot of units could buy you the needed time for the break CD of Blink to pass, which will allow you to blink instantly after Sleight is over. Consider Blink if you sometimes get silenced without immediately receiving damage or when you find yourself dying after you had to use Fire Remnant for extra damage. The reason this isn’t core is that it doesn’t give anything except mobility, meaning no extra damage. If you prefer to do so you still might want to get it in every game.

Divine Rapier

Divine Rapier: As stated previously, extra damage output from Sleight of Fist is the main thing Ember Spirit wants. Given that you can use Sleight of Fist safely most times and have Fire Remnant to fall back on when you’re in a bind, Divine Rapier is actually a viable extension item for Ember Spirit. If the enemy team brings a creep wave, summons or illusions, they might just die within one Sleight of Fist.

Magical Damage Build

A build that saw a lot of popularity when talents were introduced. Ember Spirit got some very strong Magic damage oriented talents and a new build saw play - one that focusses on getting extra magical damage and amplifying that damage.

Starting Items
Quelling Blade
Stout Shield
Pulled Tango
Pulled Tango
Iron branch
Healing_Salve_icon
Early Game
Bottle
Boots of Speed
Magic wand
Wraith Band
Mid Game
Veil of Discord
Boots_of_Travel_1_icon
Radiance
Late Game
Linken's Sphere
Blink_Dagger_icon
Octarine_Core_icon
Quelling Blade
Stout Shield
Pulled Tango
Pulled Tango
Iron branch
Healing_Salve_icon
Bottle

Bottle: Your basic regeneration is likely gone by this point and your mana is getting low. This will come as a god sent. Use your mana more liberally, both to harass and to push out the lane with Flame Guard right before the rune spawns. If you Bottle up a good rune like haste or invisibility, feel free to gank the enemy lane earlier on or call for a gank on your lane.

Boots of Speed
Magic wand
Wraith Band
Veil of Discord

Veil of Discord: Veil of Discord will boost both your own damage as well as that of your allies, often allowing you to burst down heroes in seconds, especially with a +1. Once you get Radiance it increases your damage even further.

Boots_of_Travel_1_icon

Boots of Travel: These will allow you to leverage your cheap, yet high efficiency, items. Use these together with your Fire Remnants to have a global presence and be a constant threat through your burst damage.

Radiance

Radiance: Not a must have, but it is your main core item in most games. Radiance allows you to consistently wear down enemy heroes and push out lanes, while also helping you against enemy Physical damage cores thanks to the evasion.

Linken's Sphere

Linken’s Sphere: Improves all stats, which helps a lot for this build. Linken’s Sphere also gives you a second chance when you find yourself in the thick of things and want to get out.

Blink_Dagger_icon

Blink Dagger: Amazing item for Ember Spirit because in combination with Sleight of Fist and Fire Remnant it gives you almost endless mobility and makes you incredibly hard to catch, even when silenced.  Sleight of Fist on a lot of units could buy you the needed time for the break CD of Blink to pass, which will allow you to blink instantly after Sleight is over. Consider Blink if you sometimes get silenced without immediately receiving damage or when you find yourself dying after you had to use Fire Remnant for extra damage. The reason this isn’t core is that it doesn’t give anything except mobility, meaning no extra damage. If you prefer to do so you still might want to get it in every game.

Octarine_Core_icon

Octarine Core: More health and mana for you, but more importantly a very large boost in your sustain thanks to the lifesteal you get from your constant Magic damage. Furthermore, it brings your already low cooldowns further down, allowing you to deal even more damage and be more evasive.

Maelstrom Build

Rushing Maelstrom after your early game items will significantly increase your farming speed and is very useful in fights as well. Linken’s afterward is the usual choice – it’s a standard defensive item for elusive mana-intensive cores.

Octarine and Shivas are your last two items. Shiva’s is great against physical damage carries, while Octarine buffs your HP a lot and allows you to use your spells more often (in the late game this is amazing since you can use a lot of Fists and Remnants).

Starting Items
Quelling Blade
Stout Shield
Tangoes
Healing_Salve_icon
Early Game
Bottle
Wraith Band
Magic wand
Power treads Strength
Mid Game
Maelstorm
Linken's Sphere
Late Game
Octarine_Core_icon
Mjollnir_icon
Shiva's_Guard_icon
Quelling Blade
Stout Shield
Tangoes
Healing_Salve_icon
Bottle

Bottle: Your basic regeneration is likely gone by this point and your mana is getting low. This will come as a god sent. Use your mana more liberally, both to harass and to push out the lane with Flame Guard right before the rune spawns. If you Bottle up a good rune like haste or invisibility, feel free to gank the enemy lane earlier on or call for a gank on your lane.

Wraith Band
Magic wand
Power treads Strength

Power Treads: PTs work fine if you want to be aggressive early in the game and you need a bit more tankiness (you can keep them on STR and tread-switch when you use your abilities).

Maelstorm

Maelstrom: A great item to increase your farming speed and DPS in fights. Especially good against enemy cores that don’t get Black King Bar early on. Cheaper than Battle Fury and Radiance.

Linken's Sphere

Linken’s Sphere: Improves all stats, which helps a lot for this build. Linken’s Sphere also gives you a second chance when you find yourself in the thick of things and want to get out.

Octarine_Core_icon

Octarine Core: More health and mana for you, but more importantly a very large boost in your sustain thanks to the lifesteal you get from your constant Magic damage. Furthermore, it brings your already low cooldowns further down, allowing you to deal even more damage and be more evasive.

Mjollnir_icon

Mjollnir: The lightning bounce works in Sleight of Fist, which makes the skill that deals the least damage with the magic build suddenly a very large threat. Use the active on one of your tankier cores that loves to be in the middle of the fight.

Shiva's_Guard_icon

Shiva’s Guard: Great against right click cores and has an extra magic damage nuke. Everything you need when you’re worried mostly about right-clicks.

Other Items

Early & Mid Game
Drums
Euls
Blade Mail
Black King Bar
Late Game
Solar Crest Icon
Bloodthorn_icon
Nullifier
Lotus Orb
Scythe of Vyse
Assault_Cuirass_icon
Drums

Drums of Endurance: If you’re now snowballing through the early game with your team and taking towers fast, this can be a decent pickup. It’s preferred if someone else on your team gets it though.   

Euls

Eul’s Scepter of Divinity: Another item that helps you escape sticky situations, especially as a cheap alternative to Linken’s Sphere or Black King Bar when against silences.

Blade Mail

Blade Mail: Helps when you’re up against a lot of AoE damage. Especially good for the Magical damage build to ensure you get the kill after diving in with Fire Remnants. 

Black King Bar

Black King Bar: An item that can help you survive, especially against non-instant, non-BKB piercing disables and silences. When you go for the Magical damage build you can also often find yourself in the middle of the fight to keep your burn damage going, in which case Black King Bar can really help you survive.

Solar Crest Icon

Solar Crest: A defensive item useful versus heavy physical damage lineups. The evasion stacks with the miss chance from Radiance.

Bloodthorn_icon

Bloodthorn: If you’re stronger than an enemy hero but still can’t kill them because of his escapes, this can be a great item. Especially good for the Physical damage build. 

Nullifier

Nullifier: Depending on what items the other heroes have against you, this might be an amazing pickup. 

Lotus Orb

Lotus Orb: You don’t want to get this as an Ember Spirit. If no one on your team is getting it though you might find you need to buy it yourself. 

Scythe of Vyse

Scythe of Vyse: If your team lacks catch and you have plenty of farm, this can be a game winner. Especially viable as a backpack slot. 

Assault_Cuirass_icon

Assault Cuirass: Great against line-ups with high Physical damage. If you have no physical damage dealer on your team that wants to get it, you probably should.    

Early Game

Ember 350px

Ember is a relatively weak laner and you need as much levels and gold as possible in order to get your core items and to start being active after the laning stage.


This means you need to prioritize farming rather than harassing and attempting kills. That being said, thanks to Flame Guard you can do well against melee lane opponents and with the help of your supports you can even threaten kills.

Farming:

Try to get every single last hit, but make sure you read the power the enemy hero has. Calculate if your Flame Guard can be burst off quickly by the enemy nuke or not, assess the enemy’s right click damage and based on that you can see how aggressive you can be, both for farming and harassing. Only be aggressive when you have Flame Guard available.

When a rune is about to spawn, especially after you get your Bottle, push out the lane with Flame Guard and maybe also use it to harass the enemy together with Searing Chains.

Once you get your ultimate, you can be a little more aggressive in finding farm because you have an escape. When you get low on health and/or mana you can Teleport back to base and jump back to a Fire Remnant you left near your tower after healing.

Harassing & Zoning out:

Your actual harassing potential is really low. Save your skills for when you want to push out the lane or actually get a kill.

That being said, against melee heroes you can usually utilize Flame Guard to harass while pushing out the wave and prevent them from easily getting last hits. You can also use Searing Chains on both the ranged creep and the enemy hero (sometimes even on ranged heroes), which deals decent damage.

Survival:

Flame Guard and good map awareness are your main tools for survivability before you get Fire Remnant. However, they are weak tools and when you get ganked you might still die. Consider getting an early level of Sleight of Fist if it can help you dodge enemy skills.

Once you have Fire Remnant though, you can farm a lot more confidently in most cases. Only when the enemy heroes have instant disables and/or silences should you still be extremely careful. When they don’t though, you’re probably the hero that tries to find farm in the hardest to farm places.

Kill Potential:

If you have a couple of levels up in Flame Guard and have equal or faster movement speed as your enemy, you have possible kill potential. Be very careful though because your health pool is really low and if you get turned on you might just die first.

With an allied hero helping you out, your kill potential becomes really high, mostly thanks to your high sustained damage output and the fact that the enemy is going to have bigger problems retaliating.

Once you get your ultimate your solo kill potential becomes a lot higher because you can use the damage from Fire Remnants to get that final push of damage in on the enemy. This doesn’t mean you should man-fight: use the mobility from Fire Remnant to get to easy to kill, squishier targets.

Timings and Rotations:

Before level 6, your rotation timings depend mostly on what runes you can get. (Don’t forget to always push-out the wave before going for a rune in order not to miss farm.) If you find haste or invisibility, this strongly increases your ganking potential since it can guarantee you get a lot of burn damage from Flame Guard as well as you landing the Searing Chains. At the end of the day, it’s almost always a safe bet to stay mid and ensure your farm rather than try to make plays too early and miss kills.

After level 6, you should definitely get active all around the map. Both your control and damage become very high at this point, which is also why you get Boots of Travel early in most cases. It allows you to farm as well as be there for almost every fight. Before Boots of Travel, always have a Teleport Scroll ready for when ganks happen on other lanes. Leave a Fire Remnant mid, get kills and immediately go back to farming if possible.

Mid & Safe Lane Carry:
Get as many last hits as possible
Don’t die
Kill the enemy laner
Teleport to help allies
Make rotations with good runes

The main thing you want to do in the early game is simple to understand and at the same time not that easy to execute. You want as many last hits as possible in your lane. Given that you are a melee hero with no innate escape before you get your ultimate, this can be hard to do. Therefore you also want to avoid dying at all costs. Getting killed sets you much further back than just missing a couple of last hits. Moreover, it transfers your gold into the hands of the enemy.

When rotations do happen from your allies to your lane, try to assist them in killing the enemy, but never at the cost of your own life!

Weak as you are in the early game, that’s how strong you become in the late game. Pressure lanes, burst heroes down, etc. Keep threatening while you work on your larger items. Even though you’re not really one, you mostly need to get gold like a snowballing carry, not a farming one. 

Video Example:

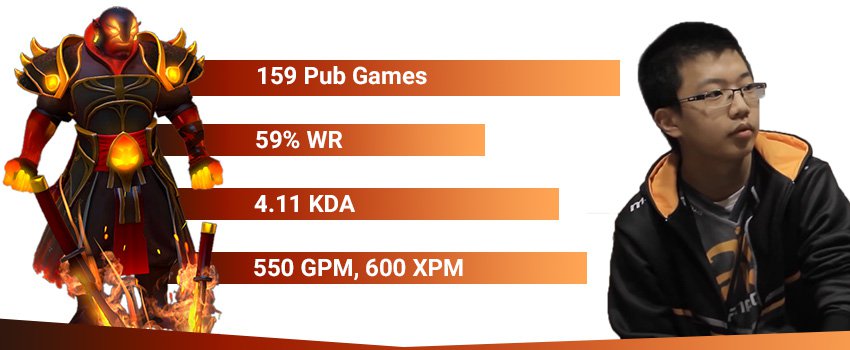
A game from Epicenter XL between Secret and Na’Vi. Ember Spirit played by Secret.MidOne.
ID: 3856880792

Ember Spirit is laning against Outworld Devourer:

-0:20 – Secret smoke up close to their own middle tier 1 tower and infiltrate the enemy jungle where they find Elder Titan, but decide against initiating on him. Secret gets the 2 bounty runes top while Na’Vi takes the ones bottom. Ember Spirit goes back to middle lane to block his creep wave.

0:40 – Ember Spirit uses Flame Guard to get some damage onto Outworld Devourer, allowing him to secure his first couple of last hits while the enemy retreats. He still drops low from the constant harass though and uses his pooled tango on a planted Iron Branch for double heal.

1:40 – Both the allied (Bounty Hunter) and enemy support (Elder Titan) rotate in. With help from Ember Spirit, the Bounty Hunter could kill the Outworld Devourer, but Ember Spirit makes the right decision and doesn’t commit because he’s too low on health to go up against 2 enemy heroes with disables. Afterward, Ember Spirit does get salved safely because of this by the Bounty Hunter.

2:30 – With the first piece of the Ring of Aquila on him (skipping both Bottle and Magic Wand and opting to get the mana regen from the Ring of Basilius early on), Ember Spirit feels a little safer to stand under the enemy tower, dropping aggro when needed and using Searing Chains to hit both the ranged creep and the enemy Outworld Devourer. Once cast, Ember retreats back to block the creep wave so he can farm in an optimal position from his high ground.

2:59 – With the Ring of Basilius just delivered, Ember Spirit gets a little bit more aggressive, using Flame Guard and catching Outworld Devourer with Searing Chains to get a lot of damage onto him. He still has the Astral Imprisonment though so killing him is not really an option.

3:20 – Picking up a value point in Sleight of Fist helps Ember Spirit out here as he dodges a tower attack with it. At this point, these attacks would hurt him a lot.

3:40 – A rotation comes from the enemy Vengeful Spirit. Ember Spirit almost dies, but Outworld Devourer ran out of mana for the Arcane Orb, which probably saves Ember Spirit’s life. To be sure, he also pops a healing salve before the last hit comes in. He might have died without it. Having no Bottle to keep his mana up, Ember Spirit gets a Mango delivered to him and finishes the Ring of Aquila.

4:36 – After teleporting back to his lane, Ember Spirit gets Outworld Devourer very low, but help from Vengeful Spirit comes in, stunning the Ember Spirit. Bounty Hunter and Ember Spirit have to dive under the tower and a Sleight of Fist together with a final Jinada hit finish Outworld Devourer off, while Ember Spirit retreats safely. Because of the dive though, Bounty Hunter dies. The end result is still worth it though.

5:28 – Another gank comes in, but this time it’s a 3v3 situation. Ember Spirit gets stunned, but narrowly dodges the follow-up Echo Stomp with Sleight of Fist. Thanks to this and the help from his supports, MidOne can get a kill on Vengeful Spirit and the enemy team has to retreat. Boots of Speed get delivered to Ember Spirit after this and the Shrine brings him back up to full health and mana.

6:40 – Ember Spirit spots an invisibility rune top and given that it hasn’t been taken yet, it’s a safe bet that the enemy team doesn’t have vision there. He picks up the invisibility and rotates to top lane with his ultimate ready for extra damage. With the help of his other cores (Timbersaw and Chaos Knight), they get the kill on Dragon Knight. Afterward, he Teleports back to his lane to continue farming.

7:45 – Knowing Outworld Devourer’s orb is starting to hurt and wanting to make the most of Flame Guard, Ember Spirit backs off into his jungle to farm the 2 camps closest to him with it. Working towards the Veil of Discord, he gets a Null Talisman delivered and a clarity to allow him to farm more. Note that he no longer really cares for health. If he gets stunned he’s likely not getting out anyway and for every other situation, he can fall back on Fire Remnant. Once he has farmed up all he can with the sliver of health he has, he leaves a Fire Remnant and teleports back to base. This allows him to heal with minimal time loss. Back in the base, he picks up the second Null Talisman.

9:25 – Initially under-estimating the damage Outworld Devourer does, Ember Spirit uses Searing Chains and Flame Guard, hoping to hit him with both. Searing Chains doesn’t hit and especially with help coming in from the enemy Vengeful Spirit he has to use a Fire Remnant to get out safely. As always, he still makes the most of the Flame Guard duration by farming a jungle camp.

MidOne stays in lane for 2 more minutes and finishes the Veil of Discord - this is when he starts to make rotations and the laning stage ends.

Mid & Late Game

ember effigy

Ember has interesting timings:

  • Strong in the early-mid game
  • Weak in the mid game
  • Strong in the late game

This means initially you are able to be active and fight from lvl6 onward. In the mid game, however, (usually when your opponents start to group-up) you need to start playing carefully and focus more on farming your late game items in order to get to your “late game” timing quicker.

The late game is where you become really strong. Regardless of the item build you went for, the combination of items and talents makes you really scary, especially with regards to sustained damage. Your one and only downside in the late game is that you are terrible at hitting towers. However, you defend them like no other.

Farm
Create Space by ganking and fighting with your team
Create space by out-pushing waves and farming dangerous locations
Anti-push, defend HG
Item Timings:

For either build, Boots of Travel is a really big milestone. It allows you to have a global presence and get out your damage in fights as well as push out lanes quickly.

For the Physical damage item build, Battle Fury is obviously very important, but at that point, it mostly allows you to farm faster, not really kill people with physical damage yet. Having Daedalus on top of that makes you a much bigger threat though.

If you’re going for the Magical damage build, getting your Radiance is also a big power swing, similar (but bigger) to Battle Fury for the other build.

Comeback Potential:

Given that he has at least some farm, Ember Spirit is one of the best comeback heroes in the game thanks to his huge high ground defense strength.

However, if you don’t have farm from the start and have trouble getting your core items, you will be very irrelevant because you die instantly if caught out and your only damage comes from Flame Guard. Your weakest timing is the mid game – if the enemy team is strong enough to push at this point you might have problems. More often than not, however, you will be able to protract the game long enough to get at least your Battle Fury or Maelstrom, at which point your anti-push becomes insane.

Team Fights:

Try to stay out of harm’s way, but use your spells off cooldown to maximize the damage you deal.

When using the Magical damage build, Stay close enough to keep the Radiance burn going and use Fire Remnants when needed to finish off heroes and when you see an opportunity to burst a lot of them together. With the Magical Damage build it’s common to try to get to the back lines and quickly eliminate the enemy supports.

With the physical damage build it’s more common to simply spam Sleight of Fist until you feel safe enough to commit to an important target with right clicks and finish it off.

The most important skill/feel you need to develop in team fights is to assess the situation and decide whether you can be in the middle of the fight safely or not. If not, focus on getting your damage and Searing Chains off with Sleight of Fists.

Pushing:

5-man pushing:

You’re not the best at hitting towers. Focus on bursting the creep wave as quickly as possible and keeping the threat high on enemy heroes behind their tower with Sleight of Fist and Searing Chains.

Split-Pushing:

Again, you don’t hit towers well. However, you’re extremely good at pushing out the waves because of your high global presence and how fast you can clear a creep wave. Leave a Fire Remnant in one lane, use your Boots of Travel to go to another, push out the lane and jump back to your Fire Remnant to immediately push the other lane as well. Be aware of the instant catch the enemy team has and always leave a Fire Remnant behind you to get out.

In this example, MidOne leaves a Remnant behind and uses BoTs to the bot lane immediately when he sees that the enemy team is top. He pushes out the bot lane and when most of the enemy team disappears from vision he immediately returns to the top lane to defend his tower and out-push that lane as well. Notice how he waits a bit to make sure that the enemy team isn’t waiting for him there.

Ganking:

Especially with the Magical Damage build, you can burst down enemy heroes pretty quickly. If possible, try to get Searing Chains and Flame Guard on the enemy hero before you commit to using Fire Remnant. Use Fire Remnant only when you need to and when you know no enemy support is coming to turn it around.

If another hero initiates the gank you might have the time to cast a couple of Remnants on the target and burst it down very quickly. Be careful when you do this (especially if you use all of your Remnants) because you will have no way to easily disengage.

Map Control & Vision:

It shouldn’t be underestimated how strong pushing out lanes is for map control and vision. However, other than that, Ember Spirit doesn’t have any skills that give you vision. The main thing you can use to scout if you have to is Sleight of Fist because it hits units in the Fog of War.

Farming:

If you’re not finding many kills anymore and fights become too dangerous, focus on pushing out creep waves to get your farm. In most cases, once you have Boots of Travel especially, you want to leave the safer lane farm and jungle farm to your allied cores while abusing your high mobility to farm more dangerous locations, force reactions by the enemy team and get away unharmed. Make sure you always have a Remnant ready for an instant retreat in case you get ganked.