Earthshaker Guide by LeBron
Artist: RocketAlex
Author:
LeBron & Co.
Date: 01/2019
Tags:
text
Earthshaker
Analysis
Builds
Mechanics
Tactics

Welcome

Welcome to Lebron's Book of the Earthshaker, a hero guide part of the Book of Dota series!

Here you will find all the information you need to learn to play ES on a high level – from drafting and builds to the optimal playstyle in different lanes and situations. We hope you’ll enjoy this guide and find it useful!

Lebron Earthshaker Stats
TL;DR:

Draft: ES is a relatively flexible hero and for this reason you can even open the draft with him – his stuns and initiation can always be useful. Nonetheless, this will decrease the chance that you play against multiple melee heroes or heroes with summons/illusions. Because of this you can wait a bit and pick him after such heroes are drafted by your opponents.

Early: Start by blocking the wave in your offlane with Fissure. As a roamer you need to roam and attempt kills on your opponents with the help of your allies. Decide which lanes are most vulnerable to Fissure blocks and kills and spend most of your time there. As a core make sure you get as much farm as possible to get your Dagger as fast as possible.

Mid & Late: You have two options – the first one is to initiate ganks proactively and get kills with your allies. The second one is to stay close to your allies and be ready to counter-initiate fights. In your free time find some farm – if you have enough mana sustain you can clear camps and waves with your two spells and Aftershock. 

Authors

Nikola "LeBronDota" Popović
Endorsement & Info

LeBron is a professional Dota player currently playing support for EPG.

He rose to fame after finishing first in a season of the Faceit Pro League - a very impressive feat for a support player. Later he found success in various pro teams, including EPG and Na'Vi.

Nikolay "CTOMAHEH1" Kalchev
Info & Editing

CTOMAHEH1 started his pro career as a support in Basically Unknown together with Mind Control. Since then he has consistently been playing on the European T2 scene, most recently on Unchained Esports. 

His highest placement on the EU ladder is top 100 - he plays all roles (mainly support), which is untypical for high-ranking players and shows his great versatility and understanding of the game.

Kyril "MrNiceGuy" Kotashev
PM, Writing & Editing

Esports and gaming enthusiast since forever and founder of Dotahaven.

Has been playing Dota since 2005 (5.84). An Ancient I player in Dota 2.

There may be many earths, but there's only one Earthshaker

Earthshaker is one of the best initiators in Dota – he has multiple spells giving him AoE control both from long and short range AND an instant disable. This makes him great at ganks and even better at controlling team fights. Additionally, he has the rather rare ability to create a physical barrier with his Fissure, which allows for creative usage both offensively or defensively. All things considered, ES could have game-breaking impact even without too many resources with the right usage of his skills. Nonetheless, Shaker is a hard hero to master because he is extremely timing and positioning sensitive.

Earthshaker is a utility hero – a team fight and gank initiator. Because of this, he is usually played in the support position, most commonly roaming and trying to gank the enemy solo heroes. It is also possible to put him in a solo position – this will allow him to get his mobility items faster and become an even greater threat to the enemy team.

Earthshaker Loadout
Stats
Level 1
Level 15
Level 25
STR
22
High
71
Very High
106
Very High
AGI
12
Very Low
31
Very Low
45
Very Low
INT
16
Low
41
Low
59
Low
Attack
46-56
High
95-105
Very High
130-140
Very High
Armor
1.92
Low
5
Low
7.2
Very Low
Resistance
26
Medium
30
Medium
32
Medium
HP
695
Very High
1797
Very High
2585
Very High
MP
267
Low
567
Low
783
Low
MS
311
High
314
High
317
High
STRENGTHS

MAJOR

Initiation: Even without Dagger, ES has a very reliable (no projectile, hence very difficult to dodge) long range initiation in Fissure. The skill is the main thing that makes him a powerful ganker in the early game. After he gets Dagger, ES has access to two other AoE stuns that could be used to initiate. Echo Slam is particularly powerful for initiation because it has instant cast animation.

Control: ES has three different sources of AoE stun – if utilized correctly you could chain stun multiple enemy heroes for more than 4 seconds. Moreover, Fissure gives you the ability to create a physical barrier. This could prevent your targets from disengaging or could disallow enemy heroes from joining the fight.

MINOR

Anti-Push: Fissure is a great spell for stalling pushes – it allows you to stun enemies, damage them from a safe distance and most importantly to block your opponents from reaching the tower. Moreover, if the enemy team decides to commit to a push they always face the threat of an Echo Slam initiation.

Movement Speed: ES has above average MS. This is important because after using Fissure from a long range it allows ES to catch up to targets to use his melee range abilities – this contributes to making him a good early game roamer and ganker.

 Scales well with Items: Mobility items allow ES to utilize his major strengths much more efficiently and consequently his potential in the game increases a lot when he acquires them. Moreover, luxury items could amplify a great deal the damage output of the hero. A farmed ES can start fights favorably but also can finish them.

WEAKNESSES

MAJOR

Weak Laner: ES is a relatively weak lane support compared to other heroes. His main tool early on for contribution is Fissure, and if this isn’t enough he cannot offer much more to turn fights. Moreover, he is a melee hero and his long-range spell Fissure costs too much mana to be used as a harassing tool in the laning stage.  If played as a farmer, he could have big problems against some lane dominators and if his item development is slowed down he would struggle to have a big enough impact.

Extremely Positioning and Timing Sensitive: Before you get your mobility items, positioning yourself in fights with ES could be very difficult. If you are not close enough your only contribution would be Fissure, and if you are too close you could very easily die before you have a chance to have an impact. Positioning and timing is also extremely important for your Fissure usage – it is possible to actually hinder your team rather than help out if the barrier is placed in the wrong place at the wrong time.

MINOR

Mana Problems:  ES is a STR hero, which means he has low mana pool and mana gain. This is a big problem early on as it prevents him from using his spells (mainly Fissure) often. It makes farming fast enough difficult and it makes unsuccessful gank attempts costly (you would likely have to go back to base to recharge which wastes a lot of time).

Item Dependent early on: ES needs his Blink Dagger ASAP in order to increase his initiation and kill potential by a great deal. Getting Arcanes and/or other mana sustain items is also important in order to be active around the map and to farm efficiently. This is a problem because in the early game it is difficult to find sufficient gold for these items and at the same time if you delay them too much your impact on the game will be sub-optimal.

Slow cast animation: ES has a slow casting animation (except for Echo Slam, which is instant) – this could be a problem if you need to react instantly to what your opponents are doing and could lead to missing or misplacing an important stun. Moreover, it gives time to your opponents to react if they see you.

Replays

Newbee vs OG, Corsair DreamLeague season 9

Match ID: 3795753791
Replay:

Kaka plays a roaming ES against the aggressive Huskar draft of OG and manages to find a lot of success even though this seems like a hard ES game – the enemy cores are all ranged heroes, which means they don’t naturally clump up for game-changing Echo Slams. Moreover, an aggressive draft means as a roaming ES you are in danger of getting pushed before you have your Blink and are ready to fight. Despite this manages to deal the most damage on his whole team (which is unusual for a roaming ES).

The early game is a great example of how the hero should be played – he start the game with Boots and manages to find a few kills in the laning stage, which in turn allows him to buy his core items quickly and start initiating and counter-initiating fights.

Drafting

Earthshaker Effigy

Shaker shines at fight initiation and control and this is something that is extremely useful for all kinds of strategies, which makes him a decent choice for most games. When picking him you need to think about his impact in the early game – if he would have difficulties ganking and finding farm early on he could struggle to find the resources he needs fast enough.


The reason to draft Raigor in competitive lineups is usually his amazing initiation and counter-push potential. If you need a hero to start and control team fights ES is a great choice.


His instant initiation is also ideal for latching to elusive heroes and setting up kills.

One thing to bear in mind is how the hero works in the early game: he is a weak laner, which means that in a sense he is a relatively greedy pick. At the same time, if the enemy team is vulnerable to getting blocked by Fissure, he could have a big impact early on from successful gank rotations.

Roaming Shaker

Since ES is a bad lane support (bad at zoning out and harassing), he is usually utilized as a roaming semi-support. This is the ideal position for him mainly for two reasons:

  1. He is outside of vision which is perfect for surprising Fissures. It is very hard to block heroes that see your positioning, but if you stay in the fog of war you might get perfect ganking opportunities.
  2. He could utilize the jungle and pull to get resources. This is quite important because ES is actually item dependent – he needs mobility and mana sustain ASAP.

Substitutes:

Sand King

Sand King: Similarly to ES, SK is a bad babysitter but a good semi-support with outstanding team fight initiation, control, and damage. A difference is that in the early game on one hand ES can latch onto targets from a distance, while SK has to be very close to his target to stun. On the other, SK provides a bit more damage and control thanks to his passive and is able to farm the jungle more efficiently if he needs to with Sand Storm to get his Dagger.

Solo Earthshaker

Putting ES in a solo lane is more unconventional but could work very well in certain situations. The access to levels and farm (a fast Dagger) could make ES an amazing ganker in the early/mid game. You have not only initiation and control, but also very good nuke damage thanks to the high levels in Enchant Totem and your ultimate, which could allow you to score solo kills easily.

Offlane: The main thing to consider in this case is the lane in which you want to put ES. Usually, you want to put him in the offlane, so that the mid and safe lane are free for more farm dependent heroes. Nonetheless, if he the enemy has a very strong offlane ES could struggle to find farm. His biggest weapon is his ability to block his lane creeps with Fissure and in this way move the creep equilibrium towards his tower.

Mid lane: The hero can spam Enchant Totem to take farm in most cases, but very strong 1v1 laners with good harassing potential (e.g. QoP) could end up zoning him out and dominating him – you need to avoid such lanes. ES is actually quite strong against melee heroes because of his Enchant Totem harass. If you, see that the enemy mid laner is a melee hero and you need a good tempo-control mid lane hero ES could be a great choice.

Sand King

Sand King: a solo Shaker is good against melee heroes because he can harass them with Enchant totem and Aftershock. With the farm he gets he becomes a powerful initiator. The same is true for SK – he is strong against melee laners thanks to his passive and gets his dagger fast to become active on the map. In the offlane they play out a bit differently – Shaker relies on blocking the creep wave to get farm, while SK cannot do this, but if he is pressured he has the option to farm the jungle. Both can sack the lane and start roaming.

Synergy

Good friends to have are:

Heroes that need setup: Mirana, Kunkka, Gyrocopter, Elder Titan, Leshrac, Lina

Mirana
Kunkka
Gyro
Elder titan
Leshrac
Lina
Earthshaker could easily set up for the hard-to-land spells of his allies.

Heroes with hard-to-land skill shots synergize very well with your reliable initiation. In the early game, you could initiate from a distance with Fissure and later on you could jump in and stun enemies instantly with Echo Slam. If your teammates have good follow-up this could secure you easy pick-offs.

Team fight combos: Dark Seer, AA, Magnus, Gyro, Kunkka

Dark Seer
Ancient Apparition Portrait
Magnus Portrait
Gyro
Kunkka
ES could be part of a devastating team fight combo together with heroes with powerful AoE spells.

Since ES provides very good team fight initiation, heroes that could follow-up the initiation and secure the fight work very well with ES. E.g. Kunkka could use his ultimate while ES has chain stunned multiple enemy heroes. The synergy could also work the other way around – a Vacuum could set up for a devastating Echo Slam.

Counters

Strong Against:

Immobile Heroes: WK, CM, SF, Sniper

Wraith King
Crystal Maiden
Shadow Fiend Portrait
Sniper
Slow and immobile heroes are the easiest gank targets for ES in the early game.

Slow and immobile heroes are very vulnerable to Fissure because it is much easier to block and trap them with the spell. The reason is quite simple – they don’t have a mechanism that helps them to get over/around the obstacle fast enough and this could cost them their lives, especially in the early game.

Squishy heroes relying on escape mechanisms: QoP, Weaver, Storm, Puck

Queen of pain
Weaver
Storm spirit
Puck Portrait
ES is a great hero to gank and lock down elusive characters.

Fissure doesn’t have an instant cast animation, but it has no projectile and it has a long casting range. This means that more often than not your targets wouldn’t see you casting your spell and they wouldn’t have time to react and avoid it. The reliable stun from Fissure is invaluable for ganking such squishy but elusive targets. Later on, in the game, you could initiate just as reliably with a Blink into an instant Echo Slam.

Heroes with many units/illusions: Meepo, Phantom Lancer, Chaos Knight, Broodmother, NP

Meepo
Phantom Lancer
Chaos Knight
Broodmother Portrait
Nature's Prophet Portrait
Lineups that tend to summon a multitude of units increase the power of your ultimate.

The counter here is quite obvious: the more units there are in a fight the more powerful Echo Slam becomes. Moreover, the skill could very efficiently clear groups of multiple units and reduce the impact of said heroes. Nevertheless, don’t rely on this as a hard counter. Your opponents will be aware of this mechanism and if they play well enough they will make sure they don’t stand next to their units when Echo Slam is available. Moreover, if you are forced to use your long CD ult just to clear easy to spawn summons or illusions you are in a relatively bad situation.

Additionally, most heroes that summon units or illusions are usually either pushers or split-pushers (or both). Since ES is very good at anti-pushing thanks to Fissure, even if he is unable to utilize his Echo Slam he would still be extremely useful against such opponents.

Weak Against:

Mobile Heroes in the early game: Mirana, PA, Anti-Mage, QoP

Mirana
Phantom Assassin
Anti mage
Queen of pain
ES is not a good early game ganker against heroes with “jump” abilities that are able to move through his Fissure block.

In the early game, your main ganking tool is Fissure. Often to secure a kill you need to get a good block with the spell – cutting off the escape route of your target will allow your allies to finish the kill. This is not possible to do against heroes with reliable escape mechanisms and to kill such targets early on would require perfect chain-stuns and enough damage (something you rarely have in the early game). In that sense laning against such heroes could be very hard for a support ES. As the game progresses and your allies get more kill potential the tables tend to turn – your reliable initiation is perfect for setting up kills on these mobile heroes regardless of the fact that they don’t care about the Fissure block.

Instant disables/mini stuns: Clockwerk, Morphling, DK, Rubick, Lion

Clockwerk
Dragon knight
Rubick
Lion
Having an impact in fights is harder against heroes that could easily interrupt your casting animations.

You have a slow cast animation and heroes with instant stuns could prevent you from using your spells efficiently. The way to play around this is to initiate on them with your instant stun (Echo Slam) and follow up with your slower spells while these heroes are disabled themselves.

Heroes that could mess up your initiation: Nyx, Beastmaster, Clockwerk, Spectre, BH

Nyx
Beastmaster
Clockwerk
Spectre Portrait
Initiating favorably is hard versus heroes that could easily scout your positioning or interrupt your initiation.

Your main impact in the game is your ability to initiate at the right time to gank or win a fight. Heroes that could mess up this initiation could make the game much harder for you. These are either heroes that give very good map control and vision (this allows enemies to expect your initiation and position themselves accordingly) or heroes that could through some specific mechanic make initiating difficult (e.g. Nyx’s Carapace).

Skills

Earthshaker Fissure
Earthshaker Enchant Totem
Earthshaker Aftershock
Earthshaker FissureEcho Slam

Slams the ground with a mighty totem, creating an impassable ridge of stone while stunning and damaging enemy units along its line.

STATS

Cast Animation: 0.69+0

Cast Range: 1400

Fissure Length: 1350

Fissure Pathing Block Radius: 24

Fissure Damage/Stun Radius: 225

Damage: 110/160/210/260

Stun Duration: 1/1.25/1.5/1.75

Fissure Duration: 8

CD: 21/19/17/15

Mana: 110/130/150/170

Fissure

Mechanics:

  • Fissure doesn’t block flying units (Firefly, Hawk, Courier, etc.) as well as units with free pathing (Spin Web, Spectral Dagger, etc.)
  • Creeps will not try to walk around the Fissure, but will instead wait for it to disappear
  • Hitting units with Fissure in the center will slightly shove them to the side

Fissure has three aspects: stunning, blocking and damaging. To get the most value out of the spell you need to utilize all three at the same time in fights. The trickiest and sometimes most important part is blocking: Fissure is a spell you need to use carefully because with the blocking aspect you could actually hinder your allies rather than help them out – you need to make sure your enemies are the ones getting blocked rather than your allies.

Initiation: Fissure is a great initiation tool especially when you are standing outside of enemy vision. It has a long casting animation, but afterward it stuns instantly (no projectile). Consequently, if you are in the fog your opponents wouldn’t be able to react and would get stunned, which should give you or your teammates an opportunity to jump on the target. Moreover, because of the AoE of the spell, you can start fights with a multiple-hero Fissure stun.

Blocking heroes: Creating a physical barrier could be very powerful in ganks or fights because it will restrict the free movement of your enemies.

First, you could use Fissure for ganks in the early game - if you cut the shortest escape route of an enemy he/she will be much more vulnerable (i.e. preventing the target from running back towards his/her tower). The time needed to walk around the ridge could give your team enough time to secure the kill. To do this efficiently you need to make sure that the far end of the fissure connects with other impassible objects like trees or high ground cliffs. This way the only option of your target would be to run towards you or at some other random direction from which it is difficult to disengage.

In group fights a well-placed fissure could create problems for the enemy team:

  • If you are losing the fight, you should use Fissure to disengage;
  • If you are winning the fight, you should use Fissure to cut your opponents’ retreat path;
  • If the enemy team has melee carries, you should use Fissure to stop them from reaching their targets.

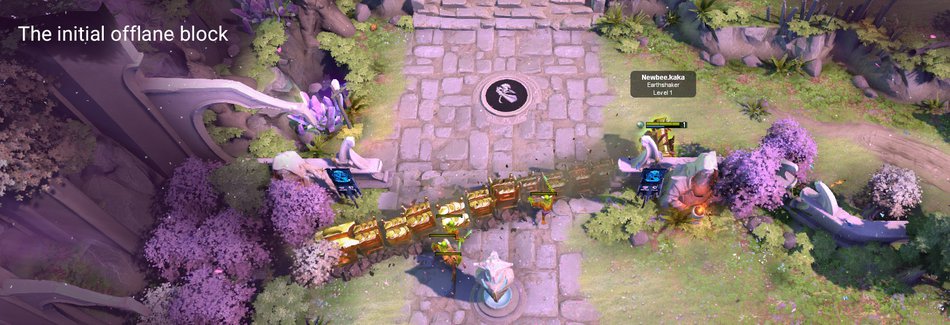
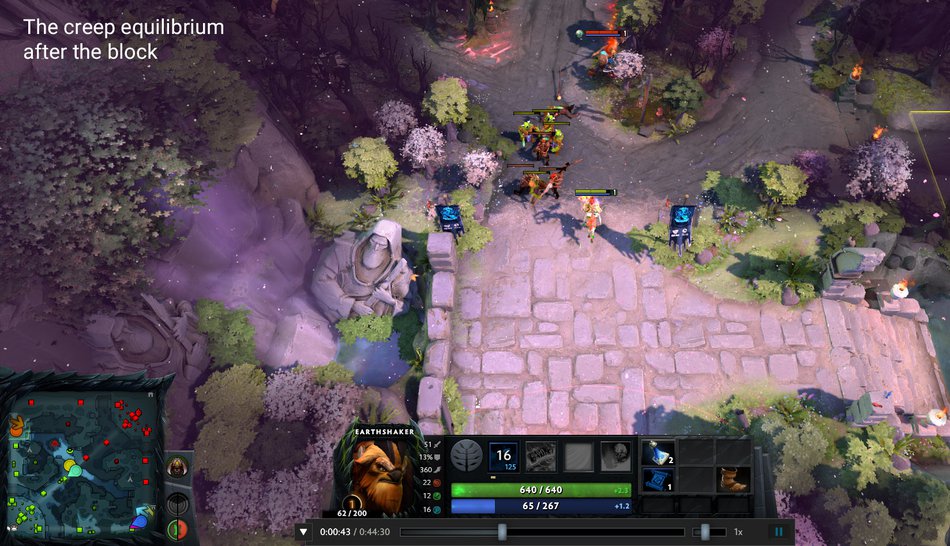
Blocking creep waves: You can use Fissure to block your lane creeps from moving forward for the 8-second duration of the ridge. To do this simply cast it in front of your own creep wave across their path in the lane. This is a useful trick for controlling the creep equilibrium especially in the offlane at the beginning of the game – the waves will meet much closer to your tower.

Later on in the game, you can use the same technique to block the enemy creep wave – this way you will delay an incoming push for 8 seconds. This is most commonly used when the enemy team wants to push your base because it is very easy to block the ramp and disallow the enemy team to reach the T3 tower. Nevertheless, the trick could be used for defending other towers as well - creeps wait for the Fissure to time out rather than walk around it and your opponents are likely to wait for their wave to tank the tower.

Predict movement of target: Even though Fissure takes effect instantly when cast, the actual casting animation is quite long. This means that you need to take it into account when aiming – click the ground where the target would be after 0.7 seconds.

Use both stun and blocking: Ideally, you want to stun/damage AND block the target. To do this you need to make sure the Fissure hits close enough to the enemy hero but on the correct side. If you simply click your target you could end up blocking him on the wrong side which will make it much easier for him to disengage. Because of this, the best practice is to target the ground next to your target on the side which you want to block.

If you care only about the stun aspect of the spell (e.g. your allies will follow-up with Blink and chain stuns), the best practice is to click your target to make sure you don’t miss the spell.

Empowers Earthshaker's totem, causing it to deal extra damage on the next attack.

STATS

Cast Animation: 0.69+0.57

Attack Damage Bonus: 100%/200%/300%/400%

Damage Bonus Duration: 14

CD: 5

Mana: 35/40/45/50

Aghanim's Scepter

Enchant Totem becomes a 900 range ground target ability, causing Earthshaker to jump in the air and land at the target spot, casting Enchant Totem there. Self-casting the ability will behave in the original form, without jumping.

Enchant Totem

Mechanics:

  • Enchant Totem buffs only the white damage (base damage + stat damage)
  • Missing an attack doesn’t waste the buff

Enchant Totem is a straightforward spell that is one of your primary sources of nuke damage. Because of its low CD and synergy with Aftershock, however, it is also a good tool to stun-lock your targets.

Use often: Enchant totem has very low CD and low mana cost which allows you to spam the spell – you can use it to last hit or deny in the lane, to harass heroes or even to farm faster.

Pre-cast Totem for two high damage hits: The duration of the buff is longer than the cooldown of the spell. This means that before initiating it is smart to pre-cast your Enchant Totem, wait for the 5 sec CD and jump afterward. This way you will be able to hit once with the bonus damage, cast Totem again and hit immediately afterward a second time. At max level, this damage alone could be enough to finish-off squishier targets.

Causes the earth to shake underfoot, adding additional damage and stuns to nearby enemy units when Earthshaker casts his abilities.

STATS

Radius: 300

Damage: 75/100/125/150

Stun Duration: 0.6/0.9/1.2/1.5

Aftershock

Mechanics:

  • Does not trigger from items
  • The stun does not stack with the stun of Fissure – the longer Fissure stun simply overrides the Aftershock. The damage stacks.
  • The effect is applied just as the cast point animation of the skill you are using finishes – for Echo Slam, this means an instant stun.

Aftershock is your main source of team fight control because it converts your Echo Slam and Enchant Totem from just nukes into potent AoE stuns. The radius of the spell isn’t too great, though (300) – because of this getting Blink Dagger or Force Staff will make it much easier to get in position to cast spells with Aftershock.

Use the AoE damage to farm: On max level Aftershock deals 125 AoE damage every time you cast a spell. This means that a Fissure + Aftershock would deal 400 AoE damage on its own and every time you use Enchant Totem you would deal an additional 125. This is very useful for flash farming creep camps and waves later on in the game if you have the mana sustain.

Shockwaves travel through the ground, damaging enemy units. Each enemy hit causes an echo to damage nearby units. Real heroes cause two echoes.

STATS

Cast Animation: 0+1.33

Initial Search Radius: 600

Echo Search Radius: 600

Echo Damage: 70/90/110

CD: 150/130/110

Mana: 145/205/265

Echo Slam

Mechanics:

  • Has instant cast point animation, but still has cast backswing
  • The initial damage is applied instantly to all units within the radius
  • The echo waves travel at a speed of 600
  • Fully affects units in the fog of war or invisible units
  • Units killed by the initial damage will still produce Echo projectiles

Best initiation tool: Because of the instant cast point animation, which provides an instant stun because of Aftershock, Echo Slam is your best initiation tool. It is impossible to dodge and can easily be used to set up for your other skills that have a longer cast animation. I.e. while your targets are stunned from Echo Slam you will be able to stun-lock with Enchant Totem and Fissure. Of course, Blink Dagger makes the spell even more potent because it allows instant Blink initiation.

Long CD: Because of the instant stun Echo Slam is ideal for initiating ganks and picking off single targets. The CD of the spell is fairly long, however, and because of this if you know a team fight is going to break out soon it might be better to save the spell and initiate ganks with Fissure instead.

Positioning inside the fight: To maximize the effect of the spell you need to use it when as many units as possible are within the 600 echo radius. This means that the spell is most potent as a counter-initiation tool – after a fight breaks out units tend to clump together.

Skill Builds

Access to farm and items is probably the most important factor that should determine your skill build with Earth Shaker. Enchant Totem and Aftershock require you to go close to your target to use. This means they are hard to utilize without a mobility item. In that sense maxing Fissure first is the best choice if you don’t have a lot of access to farm.

If you have access to resources, however, you have the choice to prioritize your other skills. The reason is that Fissure actually scales the worst with levels – you get most of the utility of the spell even on lvl 1.

You should always take Echo Slam whenever available because the nuke damage and instant stun (combined with Aftershock) are very good even at low levels.

Your first point usually goes into Fissure – the long range stun and the possibility to block could allow you to get kills from very early on. If you would be farming in a lane, however, you could take Enchant Totem first to contest last hits more efficiently.

Support ES Build
Core ES Build
Earthshaker Fissure
1
Earthshaker Enchant Totem
2
Earthshaker Fissure
3
Earthshaker Aftershock
4
Earthshaker Fissure
5
Earthshaker FissureEcho Slam
6
Earthshaker Fissure
7
Earthshaker Aftershock
8
Earthshaker Aftershock
9
Talent Icon
10
Earthshaker Aftershock
11
Earthshaker FissureEcho Slam
12
Earthshaker Enchant Totem
13
Earthshaker Enchant Totem
14
Talent Icon
15
Earthshaker Enchant Totem
16
Earthshaker FissureEcho Slam
18
Talent Icon
20
Talent Icon
25
Pros: maximum levels of control and initiation;
Cons: sub-optimal nuke damage;

You max Fissure first because you want the extra damage and stun from the spell – it will be your main initiation tool until you get a mobility item, which could be a long time. Afterward you want a value point in your other spells. You max Aftershock second because you need team fight control – as a support ES your main job would usually be to stun-lock the enemy team. Your carries would provide the damage to finish off targets.

Earthshaker Enchant Totem
1
Earthshaker Aftershock
2
Earthshaker Fissure
3
Earthshaker Enchant Totem
4
Earthshaker Enchant Totem
5
Earthshaker FissureEcho Slam
6
Earthshaker Aftershock
7
Earthshaker Enchant Totem
8
Earthshaker Aftershock
9
Talent Icon
10
Earthshaker Aftershock
11
Earthshaker FissureEcho Slam
12
Earthshaker Fissure
13
Earthshaker Fissure
14
Talent Icon
15
Earthshaker Fissure
16
Earthshaker FissureEcho Slam
18
Talent Icon
20
Talent Icon
25
Pros: very high nuke damage output, especially against single targets;
Cons: lower AoE damage and control early on;

The build is fairly open in the first few levels: if you need Fissure for an early game kill you could take it. If not, you want to have Enchant Totem on lvl 1 to contest farm more efficiently on the lane. Usually, afterward, you want a level in Aftershock for the sake of having an additional stun (useful for harassing or kill attempts).

You want to max Enchant Totem first – it gives you the most nuke damage and with a fast Blink Dagger you could easily get kills with the spell. Moreover, with higher levels of the spell, it becomes a good harassing tool (especially against melee opponents). Afterward, you should max Aftershock because with a higher level of it you can farm faster and you can stun-lock enemies for longer durations. Fissure is your last priority.

Talents

-2 sec Enchant totem CD
25
+50% Magic Resist
+400 Fissure range
20
+50 Echo Damage
+7 Armor
15
+30 MS
+250 Mana
10
+30 Damage

Lvl 10: The mana talent doesn’t provide a lot of value because your main problem as ES is not mana pool, but mana sustain. You can still get it if you want to spam your Fissure more freely, but the DMG talent might increase your impact a bit more.

Lvl 15: Depends on the game. For example, if you play against a minus armor draft you might want to take the Armor talent, but most of the games you need MS.

Lvl20: Fissure range is great, but if you play against multiple units (Broodmother, Furion) or illusions (Naga, Terrorblade) you should go for the Echo damage.

Lvl25: Enchant Totem is great late game - it gives you even more control thanks to Aftershock. Nevertheless, in case you are playing against magical oriented lineups the huge magic resistance is usually better.

Roaming Support ES Build

The focus of this build is to acquire cheap HP and mana sustain early on and to roam as much as possible without going to base.

You want to get your core Dagger ASAP to be able to initiate more efficiently. Later on you go for Eul’s to increase you’re your mobility and survivability, but other choices like Force Staff or Shadow Blade are also viable if you feel the Eul’s wouldn’t help you a lot.

If the game goes late in this example you go for Aghanim’s to increase you mobility and initiation even further. Nonetheless, this is a luxury. Sometimes you will have to buy other team utility items like Lotus or Glimmer to keep your allies alive or Shadow Blade to stay out of vision and find better initiations.

Starting Items
Boots of Speed
Clarity
Pulled Tango
Early Game
Tranquil Boots
Soul_Ring_icon
Mid Game
Blink_Dagger_icon
Euls
Late Game
Aghanim's_Scepter_icon
Lotus Orb
Boots of Speed

Boots of Speed: the “luxurious” choice for a starting item, Boots is great for any roamer, especially for a melee hero. If you need to buy other items for some reason (e.g. your other support refuses to buy all the support items), you can substitute it with Wind Lace, with the obvious drawback that it gives less MS.

Clarity

Clarity: Getting multiple Clarities at the start of the game is a great idea for a support Earthshaker – it will allow you to use your Fissure much more often until you get your Arcanes or Soul Ring, which will increase your early game impact.

Pulled Tango
Tranquil Boots

Tranquil Boots: Tranquils are good on ES especially when combined with Soul Ring – they give you the needed HP sustain. Moreover, your naturally high MS combined with the high bonus MS from Tranquils will allow you to roam around the map fast.

Soul_Ring_icon

Soul Ring: Getting Soul Ring is the cheaper alternative to Arcanes. The fact that you can get the mana sustain item much earlier is a big plus – it allows you to use your spells more liberally, which increases your early game impact.

Blink_Dagger_icon

Blink Dagger: Blink is THE core item of ES – it makes using Enchant Totem and Echo Slam in combination with Aftershock much easier and as a result increases your initiation potential and overall impact in the game a great deal.

Euls

Eul’s Scepter: The mana regen is useful for spamming your abilities more often (mostly Fissure for farming). In addition, the active Cyclone provides you with a reliable escape mechanism when combined with Blink Dagger. It could also be used to set up for your melee range spells if your Dagger is not available. In addition, you can set up for a good Fissure Block.

Aghanim's_Scepter_icon

Aghanim’s Scepter: Aghanim’s is probably the go-to luxury item for ES because of the powerful upgrade to Enchant Totem. It makes it a 900 range ground target ability and causes ES to jump in order to reach his target. This is extremely powerful since it gives you an additional mobility option on a very low CD. It can be used to initiate (although it is much slower and with a shorter range than Blink, so it’s not a good substitute), to disengage or even to move faster around the map.

Lotus Orb

Lotus Orb:  a great utility item in the late game if your team needs it. The stats are also not bad on ES.

Core ES Build

This build focuses on dominating the lane. You get a Q-Blade to make sure that you will get as many last hits as possible. You complete Power Treads to be able to use Enchant Totem more often by switching your PT to INT and to increase your stats a bit. Then you go for Soul Ring for the Mana sustain it gives (you can also get the Ring before the PTs if you have mana problems).

Afterward you complete your Blink Dagger and you are ready to join fights. The Force Staff you get after the Blink allows you to disengage after initiating to keep yourself and your allies alive. Shadow Blade is great especially for a Core ES as it makes it easier for you to find gank opportunities. Moreover, not being seen also makes it easier to jump in fights just at the right time.

In the late game, you go for Shiva’s to increase your AOE damage and more importantly – to counter the enemy right-clicking cores. The last item in the list, Octarine, is just an all-round great late game item because of the CD reduction. You can always substitute it for other choices like Hex or Refresher.

Starting Items
Stout Shield
Tangoes
Healing_Salve_icon
Mango
Iron branch
Iron branch
Early Game
Quelling Blade
Boots of Speed
Magic wand
Power treads
Soul_Ring_icon
Mid Game
Blink_Dagger_icon
Force staff
Late Game
Shadow_Blade_icon
Shiva's_Guard_icon
Octarine_Core_icon
Stout Shield
Tangoes
Healing_Salve_icon
Mango
Iron branch
Iron branch
Quelling Blade


Boots of Speed


Magic wand

Magic Wand: Wand is a great mana sustain tool to have especially if you are not going to Arcanes. Because of this, it is a common choice for a core Earthshaker, but could be useful for a support as well. If you have fast Arcanes, however, it might be better to rush the Dagger ASAP.

Power treads

Power Treads: Extra STR for tankiness and bonus damage or extra INT for mana pool and mana sustain – either way, PT’s are quite useful for ES.

Soul_Ring_icon

Soul Ring: Getting Soul Ring is the cheaper alternative to Arcanes. The fact that you can get the mana sustain item much earlier is a big plus – it allows you to use your spells more liberally, which increases your early game impact.

Blink_Dagger_icon

Blink Dagger: Blink is THE core item of ES – it makes using Enchant Totem and Echo Slam in combination with Aftershock much easier and as a result increases your initiation potential and overall impact in the game a great deal.

Force staff

Force Staff: You can use it either as an alternative for Dagger (for example if you are afraid that the enemy team could interrupt your Blink initiation with global spells such as Spectre’s Haunt) or even better – as an additional mobility item that allows you to be mobile in the fight after jumping in with Dagger. 

Shadow_Blade_icon

Shadow Blade: You can cast Enchant Totem, use Shadow Blade and hit your target for an extremely high damage first hit. Even though this is usually done in pubs as a fun build, Shadow Blade is actually a strong item on the hero. The main reason is that besides this high damage from Enchant Totem, you can use it to hide before initiating or to disengage. In that sense, in most high-level games Shadow Blade is not used as a substitute for a Dagger, but to complement it.

Shiva's_Guard_icon

Shiva’s Guard: The high armor from Shiva’s synergizes well with your high HP and makes you very tanky to physical damage. Besides, the active skill makes your initiation even stronger – it provides you with additional AoE damage and control.

Octarine_Core_icon

Octarine Core:In the very late game you can easily lock down targets for more than a 5s with Octarine because it decreases the CD of Enchant Totem and Fissure (you can even combine it with the ET CD talent). It also decreases the cooldown of your active items which can be very useful.

Other Items

Early & Mid Game
Smoke
Arcane Boots
Glimmer Cape
urnn
Veil of Discord
Medallion
Heaven's_Halberd_icon
Late Game
Black King Bar
Daedalus
Scythe of Vyse
Refresher orb
Smoke

Smoke of Deceit: A great item to have from early on if you intend to rotate and gank. It will allow you to use Fissure from great angles even if the enemy team has Observers (the Fissure range is longer than the smoke break range).

Arcane Boots

Arcane Boots: Arcanes are common Boots for ES simply because they solve his mana problems. Spamming Fissure often is mana intensive and getting fast Arcanes would help you significantly increase your impact.

Glimmer Cape

Glimmer Cape: Glimmer is strong on any support hero, but ES has an additional use of the item – he can use the invisibility before initiating with or without Dagger to make it harder for the enemy team to react. Moreover, as ES you can use Glimmer to disengage after initiating with Blink. It is in that sense a cheap substitute of Shadow Blade.

urnn

Urn of Shadows: Urn gives very good stats for ES: STR for tankiness and (synergizes well with Enchant Totem) mana sustain. Moreover, with ES you usually participate in most ganks and fights, which gives you plenty of souls and provides your whole team with HP sustain, also if the game is good you can also upgrade it to Spirit Vessel. The main decision you need to make regarding the item is whether it is worth delaying your Blink Dagger to have it.

Veil of Discord

Veil of Discord: Getting Veil after Dagger is a good idea if your team has other magic damage dealers and if your opponents tend to stay together and team-fight. It will increase the impact of your Echo Slam in fights a great deal simply by increasing its damage.

Medallion

Medallion of Courage: If you are maxing Enchant Totem in the early game a Medallion could increase your nuke potential a great deal for a low cost. Later on, the armor buff could be used to make allies that are getting focused tankier. Moreover, the stats form the item are quite useful on ES – the armor synergizes well with his high HP pool and the mana regen is useful for spamming his spells.

Heaven's_Halberd_icon

Heaven’s Halberd: The item increases your Enchant Totem damage, but even more importantly makes you very tanky to physical damage. Moreover, disarm is powerful against right-clickers who tend not to go for a BKB.

Black King Bar

Black King Bar: BKB is a safe choice because it ensures that you will be able to execute your combo and stun-lock heroes for the maximum duration (rather than get disabled by an enemy outside of your initiation range). The bonus STR is also good for tankiness and Enchant Totem damage.

Daedalus

Daedalus: Your Enchant Totem hits CAN crit, which means that by buying Daedalus you give yourself the opportunity to deal ridiculous nuke damage. The obvious drawback is that it is not reliable and if you don’t get a crit in a fight the item gives you almost no value (you very rarely continuously right-click targets).

Scythe of Vyse

Scythe of Vyse: Scythe gives you an additional source of reliable single target initiation. By chaining your disables with Hex you could stun a target for a ridiculous amount – the reason is that the additional disable from the Hex would be enough for your Enchant Totem to get off CD. Because of this, you would be able to use the stun from Enchant Totem twice in addition to the stun from Fissure, Echo Slam, and the Hex.

Refresher orb

Refresher Orb: the item not only allows you to deal a lot of damage by using your abilities twice in a fight but also allows you to provide a chain stun lock for several seconds that can potentially win a fight. A downside of the item for ES, however, is that it is very mana intensive. Since ES is a STR hero, getting Refresher early on is usually a bad choice- you won’t be able to use it. Therefore, you should get it only after you have enough INT/mana to support it.

Early Game

Farming:
Earthshaker 350px

ES has a decent attack animation and damage, so contesting last hits shouldn’t be a big problem against most heroes.


If you want to ensure a last hit/deny, it is smart to use Enchant Totem. The low CD and very low mana cost make the spell extremely spammable and if you constantly use it you will make it very hard for your opponents to deny any creeps.


Aftershock is useful for securing last hits on multiple creeps that are on low HP. The more levels you have in the spell, the easier this would become. You usually want to activate Aftershock by using Enchant Totem because of the far lower mana cost.

Fissure in combination with Aftershock deal a lot of AoE damage and could be used to clear a creep wave very fast. The problem is that Fissure is mana intensive and if you don’t have very good mana sustain it is smarter to use just Enchant Totem and to save the Fissure for kill attempts.

Harassing:

Your main tool for harassing and possibly zoning out is Enchant Totem. Even at low levels it deals significant damage and could help you get the better end of a hit exchange. When you have Aftershock it is a good idea to use Enchant Totem when an enemy hero is close to you. The stun will ensure that you land the Enchant Totem hit. For example, you can wait for a melee enemy to come close to a creep for a last hit and then you can use Enchant Totem to stun and hit.

The main problem with Enchant Totem is that it is melee range. This makes it very hard to use against ranged heroes (they can simply kite you).

Fissure is a bad harassing tool because of its mana cost and your low mana pool. Usually, you want to save the spell for kill attempts, especially in the very early laning stage.

Surviving:

Your main survivability tools are your stuns. If you see heroes ganking you, you should stun them with Fissure before they are in range to initiate and simply walk away. If they get close to you the stun from Aftershock could help you create some distance and survive, but the low duration on low levels makes this a relatively weak survivability tool. If you have some levels in Aftershock, you can also use your ultimate on nearby enemies in order to stun them and so disengage. The fact that the spell is instant might help you cast it before enemies can disable and kill you, although this is a costly survivability tool because of the huge CD.

Fissure is also very efficient for saving allies. With good positioning, you could block off your opponents and disallow them from chasing by placing a Fissure between them and the hero they are focusing.

Kill Potential:

Fissure

In the early game, your kill potential comes mainly from your ability to create a physical barrier. If you use Fissure correctly you will be able to block off an enemy hero, which should buy enough time for your teammates to finish the kill.

Two things are very important when trying to get a kill in the early game – timing and positioning:

With ES it pays off to be patient – wait for a favorable creep equilibrium, wait for the enemy hero to come in for a last hit (or to harass) and immediately block him in with a Fissure. Always try to abuse natural barriers. If you Fissure a hero in the open he will simply run in another direction. And if you Fissure a hero next to trees, for example, he will be blocked off from two sides, leaving very few options for retreat. Some areas on the map present very good fissure opportunities if you are standing at the right angle. For example, if your allies are chasing an enemy down the river and you manage to put a Fissure across his path the kill should be secured because the only escape route is towards your allies.

Enchant Totem

If you have high levels in Enchant Totem you could deal extremely high amounts of nuke damage. The tricky part is getting close enough to your target – most likely you will be able to use efficiently Enchant Totem if your allies have good disables to follow-up your Fissure initiation. Ideally, you will be able to pre-cast Totem and use it twice during the kill attempt.

Echo Slam

When you get lvl6 your kill potential grows further because of your ultimate. Of course, the ideal option is to use the spell right next to an enemy hero and a creep wave. Getting in such a position without a Dagger, however, is difficult. Because of this sometimes it is worth it to use the spell just for the initial damage and the stun from Aftershock. It has instant cast animation, which means you could chase after a target, disable it with Echo Slam and follow up with Enchant Totem/Fissure. If you use Enchant Totem first the target will most likely get out of the Aftershock stun radius because of the slow casting animation.

In that sense without a mobility item, your solo kill combo would be: Pre-cast Enchant Totem, wait at least 3 seconds, initiate with Fissure, while the target is stunned walk to it, use your ultimate, hit, cast Totem again and hit again to secure the kill. Since the Fissure stun has a short duration (especially if you are not maxing the spell), you would need to cast it from a short distance in order to have a chance to reach your target with Echo Slam.

Timings and Rotations:

With ES you could start rotating right from lvl1 – the reason is that you have your main offensive tool (Fissure) right from the start of the game. Getting a good block with Fissure could easily result in a kill provided your allies have enough damage/control.

If you are playing a farming ES, you usually want to get your Dagger first and start rotating afterward. Blink amplifies your initiation and kill potential a great deal - it is your most important timing in that sense.

It is a good idea to always carry a TP scroll in order to be able to join fights if you need to – ES is great at counter-ganking. With Fissure, you could easily allow your allies to disengage by blocking off the enemy heroes or even get counter-kills.

Having an Invisibility or Haste is also an important timing and you need to try to get a kill out of it. Those runes give you the same benefit as a Blink Dagger by letting you get in melee range easily.

Roaming Shaker

ES is very rarely played as a lane support. The reason is that he doesn’t have good tools for harassing and zoning out. Even more importantly, Fissure is most powerful when the enemy hero doesn’t expect it. Because of this staying outside of vision is very important when playing a support ES – both for ganking and for saving your allies.

Stay out of vision, search for opportunities to set up kills with Fissure
Help your farmers disengage unwanted fights (counter-gank)
Find farm by pulling or staying in empty lanes

Neither the stun nor the damage of Fissure is impressive. The physical barrier the spell forms is what actually allows you to get kills. Because of this when ganking you need to look for an opportunity to block the enemy hero from retreating. This requires you to be patient and on occasion, you need to spend some time close to the lane waiting in the fog at a good angle for a Fissure block.

If you are not patient enough you would possibly miss a good opportunity for a kill. If you are too patient, however, you could waste too much time doing nothing. This is particularly bad for ES because you actually want to get your Dagger relatively fast to be able to unlock the full potential of the hero. This means that instead of waiting near a lane for something to happen you could have spent some time pulling and farming. 

Use your game sense to predict the outcome of your gank attempt – if a kill is not likely soon you shouldn’t wait but use your time to do something else (check rune, pull). If you think a kill is likely waiting even a bit longer isn’t too bad.

Manage your mana carefully – you are useless without Fissure and you should make sure you always have mana for the spell. Every Fissure you use must count – don’t waste your mana on impossible kill attempts or just to harass with Fissure in the early laning stage.

Movement:

You need to have a very good game sense early on and make the optimal movement decisions.

Usually, you would rotate between the mid and the safe lane. In that sense your options are to pressure mid, to pressure the enemy offlaner or to pull and get farm in the jungle:

  • If the safe lane creep equilibrium is closer to your tower and the enemy offlaner moves past the River (or even better, past the side shop), this is a great opportunity to try to block him in and kill him. In order to do this, you need to make sure he doesn’t have vision on you from a jungle ward.
  • If the enemy mid laner is a squishy or immobile hero and your mid laner has good kill potential you could spend some time close to the mid lane waiting for a gank opportunity. The perfect time to initiate is when the creep equilibrium is closer to your high ground and the enemy hero comes in for a last hit – this way you could block him off from his ramp.
  • If you are afraid that your farmers are going to get pressured – e.g. your mid lane hero is likely to get ganked or your opponents are running an aggressive offlane, it is a good idea to stay close to them in order to help them disengage unwanted fights. Remember that Fissure has a very long range. While waiting near the safe lane you could stack and pull the small camp and while waiting near the mid lane you could stack jungle camps/Ancients for your allies.
  • If your allies are not getting pressured too much and you are unlikely to get easy kills on the enemy heroes (e.g. they are mobile and hard to kill, you lack the kill potential or they simply control the creep equilibrium very well) you shouldn’t waste your time but instead you should try to pull and get as much farm as possible – a fast Blink Dagger is always very valuable.
Video Example:

You usually want to start your roaming Shaker with boots. This game this is not the case because he has one more roaming support (Pudge) and Shaker needs to buy some of the support consumables.

Instead, Yapzor starts his Shaker with tangoes and clarity. Without boots your hero is very slow early on, so you have to find ways to be useful, mainly relying on your Fissure block.

Yapzor knows how to do this: first, he helps his offlaner (Tiny) and Fissure blocks the wave for him twice. With this, he secures some last hits close to the tower for Tiny and a good start for him.

Afterward, Yapzor rotates mid and pressures the mid laner (Ember) just with positioning, staying around the mid lane and always threatening him with a block. OD can set up for the fissure nicely with his Astral Imprisonment. Eventually, they manage to kill him with the help of Pudge.

At a point, Ember becomes too scared to stay in the lane and goes to the jungle, which allows Yapzor to leave mid and rotate to help top (with killing a Huskar together with the Pudge) and bottom by securing more kills for the team.

As a roaming support, it is his job to always be where action is happening – notice how he always carries a TP and is able to instantly respond and help save allies and secure kills with a Fissure.

Core Earthshaker

Get levels and farm
Attempt kills with the help of allies
Once you get your Blink Dagger rotate and search for kills
Mid or safe lane:

You are not a lane dominator even though you could do very well against melee heroes. The main reason you are in a solo lane is to get your Blink Dagger as fast as possible and to search for kills afterward.

Use your Enchant Totem to ensure you get most last hits. The mana cost of early levels is very low. Harass with Enchant Totem whenever you have the opportunity to do so – it deals heavy physical damage and you could possibly even zone out your opponent if he doesn’t have sufficient HP regen.

After you get your mana sustain item (Soul Ring, Arcanes) you could use Enchant Totem and Fissure with Aftershock to clear the creep wave and use the free time to get runes, stack/farm the jungle or even rotate for kills.

You are unlikely to get solo kills unless your opponent underestimates the damage output of Enchant Totem and makes a mistake. With the help of allies, however, you could be a serious threat to your opponent. You could initiate with Fissure to allow your allies to get in range and follow-up with disables and damage. You need to utilize Enchant Totem to secure the kill – ideally, you would be able to pre-cast it and use it twice in the kill attempt.

It is also possible that you follow up the initiation of your allies – this way you will have more time to reposition yourself and place Fissure in a way that prevents your target from retreating.

At lvl6 your kill potential grows and if possible you should try to take advantage of this. If getting a solo kill isn’t likely then you should request a rotation from your allies.

Offlane:

Playing in the offlane as ES is very simple in theory (because of the Fissure block) and quite difficult in practice because if the creep equilibrium isn’t under the tower you are a weak offlaner.

Earthshaker Block
Earthshaker Equilibrium

Your main weapon is the block from Fissure. Abuse it as much as possible to keep the creep equilibrium at your side. This will allow you to get solo XP in addition to some last hits. If you don’t do this you will have difficulty finding levels and farm because you are not great at fighting back the enemy support(s).

If you simply cannot stay in the lane because you are getting pressure too much, you can choose to roam and attempt ganks in the other lanes.

Mid & Late Game

Earthshaker immortal 350px

Unsurprisingly, the playstyle of Earthshaker is similar to that of any potent initiator and counter-initiator. Prioritize getting your Dagger. Afterward, use it to control ganks and fights for your team: either initiate on an important enemy and let your allies secure the kill or wait for the perfect opportunity to counter-initiate with a devastating Echo Slam.

Stay outside of vision, close to your allies, ready to initiate/counter-initiate fights.
Initiate ganks with the help of allies.
Farm up. If you don’t have your mobility item yet farming goes to the top of your priority list – you need Dagger ASAP for initiation.
Timings:

In terms of items you have two important timings:

First, mana sustain items: Arcane Boots; Soul Ring + Tranquil Boots, etc. - they allow you to spam your spells more often, which increases your farm rate.

Second, mobility items: Blink; Force Staff – they increase your initiation potential and allow you to be more active on the map.

All other items are luxuries and simply amplify your effectiveness rather than change your play style.

Comeback Potential:

Your play isn’t too dependent on the start you have in the game. Of course, a good start will let you get your Dagger faster which will open possibilities for you. If you have a bad start it might be worth it to find some space and time to try to farm up your Dagger. Either way, however, you role would be the same – you need to stay close to your allies ready to initiate/counter-initiate ganks or fights.

Team Fights:

Without Blink:

Assuming you don’t have your Blink Dagger yet, you need to be patient in fights. You can try to favorably initiate with Fissure and allow your allies to follow-up. Alternatively, you can wait for the fight to start and use Fissure to disable enemies or separate them from their team. Nonetheless, you should still stay at distance and should not run into the fight too early to use Echo Slam. Only after the fight has started and enemies have used most of their control spells it will be easier to run into the fight and use Echo Slam efficiently. If you run in too early you could get disabled and killed before you have used your ultimate.

If an ally has an initiation spell like Ravage, you can use it to get in range and cast your ultimate.

With Blink Dagger:

Blink makes entering the fight much easier and opens up different opportunities for you. Nonetheless, you need to carefully position yourself before the fight – ideally, you want to be in the fog of war, out of harm’s way but close enough to jump in whenever you decide to.

This positioning is important not only because you want to jump in with Blink Dagger surprisingly. It allows you to use Fissure from a good angle and possibly block heroes in a favorable way. For example, if you see the enemy initiator jumping in, you could Fissure his teammates to block them from following-up. Another possible scenario is that your teammates are already winning the fight – in such a situation you could use Fissure to block enemy heroes from retreating.

With Blink, you have the freedom to choose the exact moment of jumping in. Ideally, you want to be patient because once the fight has started enemy heroes tend to clump-up. This will allow you to counter-initiate and use Echo Slam closer to its maximum efficiency.

In some situations, however, you will see good initiation opportunities before the fight has started. If an important enemy hero is staying too far away from his teammate you could jump on him to quickly pick him off with Echo and any follow-up of your team Alternatively, especially at lower skill brackets teams sometimes forget they are facing an ES and they clump up together with their creep wave when they push – this is an ideal opportunity to initiate and even secure the fight on your own and you shouldn’t be afraid to use it.

You also need to decide how to use your Fissure. If you want the maximum impact of your initiation you want to cast it after you jump in with Echo Slam. This way you will hit your targets with the Fissure and Aftershock damage at the same time, maximizing your damage output. Sometimes, however, it is better to use Fissure from a distance to ensure you get a better block. If it is not a good time to jump into the fight, you can even use your Blink to reposition yourself in a way that helps you get a better Fissure block (in practice this usually means jumping to the side of the fight and separating heroes with Fissure). Last but not least, even if you are using Fissure just for the damage and the stun you should still think about the blocking aspect. The reason is that sometimes you could unintentionally hinder your teammates. Be careful not to block off your damage dealers from their targets.

Example:

First, notice Kaka’s positioning. He is close enough to instantly follow-up Dark Willow disable, but he is far enough not to get his Dagger cancelled by Razor.

His initiation allows his team to claim two quick kills. When the Razor buys back, his team wants to disengage. He makes this much easier by blocking the Huskar.

Pushing:

5-man pushing

The most important aspect of 5-man pushing with ES is your positioning – stay outside of vision but in a good position to counter-initiate when the enemy team decides to defend.

If you are certain that your opponents are not in position to defend you could hit the tower with Enchant Totem to help bring it down faster.

Split-Pushing

When you get your Blink Dagger and some mana sustain items you are not a bad Split Pusher. With Enchant Totem, Aftershock and Fissure you could clear creep waves very fast. Moreover, you deal significant damage to structures thanks to Enchant Totem.

The main problem for ES split-pushing is that you typically want to stay with your team to participate in tower defenses and fights. Even if your team is not in position to take a fight, generally speaking, you are a more valuable anti-pusher than split-pusher. In addition, you can no real escape mechanism, so if you get initiated when split-pushing you will likely die.

Anti-Pushing

Fissure is a great spell for anti-pushing for two reasons. First, you can block the creep wave (and possibly the enemy team) from reaching the tower in the first place. For example, if your opponents are trying to breach high ground and you use Fissure across your ramp the enemy team would not be able to climb it for 8 seconds (valuable time if you are stalling the game). Second, it deals AoE damage, stuns and has a very long range, giving you the opportunity to clear creep waves and damage enemy heroes without getting dangerously close.

Last but not least, the threat of Echo Slam counter-initiation will make the enemy team reluctant to commit to a push.

Ganking:

You need to make a decision if you want to use your ultimate. Echo Slam is a long CD spell and if you think you would be team fighting soon it is smarter not to use it for a gank. In that sense the later the game goes the better it is to conserve your ultimate (unless you are ganking a very important target like the enemy hard carry).

Without a mobility item, the most important part of ganking with ES is the Fissure initiation. Be sure to use the Blocking aspect but also make sure you hit the actual stun, since it will allow your allies to follow-up your initiation.

With a Dagger, you have more options:

Without Echo Slam:

If you don’t have your ultimate available (or you don’t want to use it) it is a smart move to hit the target with Fissure from the fog before Blinking in. This will give you the second you need to hit the enemy hero and use your Enchant Totem after Blinking in. If you jump in and try to cast Totem/Fissure afterward the target will have some time to react due to the long casting animations. You might get disabled right away or the enemy hero could simply dodge your spells with some defensive mechanism. The combo is: pre-cast Enchant Totem, wait at least 4 seconds, use Fissure, Jump in, hit, use Enchant Totem, hit again. This should be enough to secure a kill on squishier targets. For tankier heroes, you would need the help of allies.

With Echo Slam:

Since Echo Slam is instant your initiation is quite straightforward – you pre-cast your Enchant Totem, wait 3-4 seconds, jump in and instantly use Echo Slam, hit, cast Enchant Totem again, hit, Fissure. When initiating with Echo Slam it is better to use Fissure when you are next to your target to take advantage of the bonus Aftershock damage.

Map Control and Vision:

You don’t have scouting spells that give you vision. If you are playing a support, make sure you take care of Warding. Ideally, you would have an ally that helps you with that task because this will allow you to get your Dagger faster.

Using Smoke of Deceit often is a great idea with ES because it will keep you outside of enemy vision before your initiation.

Farming:

Farming is quite high on your priority list before you get your Blink Dagger and your last priority once you have it. You are an active hero and if you are in a position to do so you should try to initiate favorable fights and ganks instead of passively farming.

Even if you don’t intend to force fights it is a good idea to shadow your teammates even if it means missing on some farming opportunities. It is important that you are in position to counter-initiate whenever needed.

Mechanically, farming with ES is quite straightforward and depends mostly on your mana sustain. If you have enough of it you can spam Fissure and Enchant Totem to clear creep waves and camps. Stay close to the creep wave/jungle camp when using both spells so that creeps get hit by the Aftershock damage. Since the majority of your damage is AoE (Fissure and Aftershock) you benefit from stacking. Use Enchant Totem to finish off the big creeps.