Alchemist Guide by Xcalibur
Artist: katzeimsack
  • Guide Navigation
  • HOME
  • ABOUT
  • DRAFTING
  • SKILLS & BUILDS
  • ITEMS & BUILDS
  • EARLY GAME
  • MID & LATE GAME
Author:
Xcalibur & Co.
Date: 12/2018
Tags:
text
Alchemist
Builds
Tactics
Analysis

Welcome

Welcome to Xcalibur's Book of the Alchemist, a hero guide part of the Book of Dota series!

Here you will find all the information you need to learn to play Alch on a high level – from drafting and builds to the optimal playstyle in different lanes and situations. We hope you’ll enjoy this guide and find it useful!

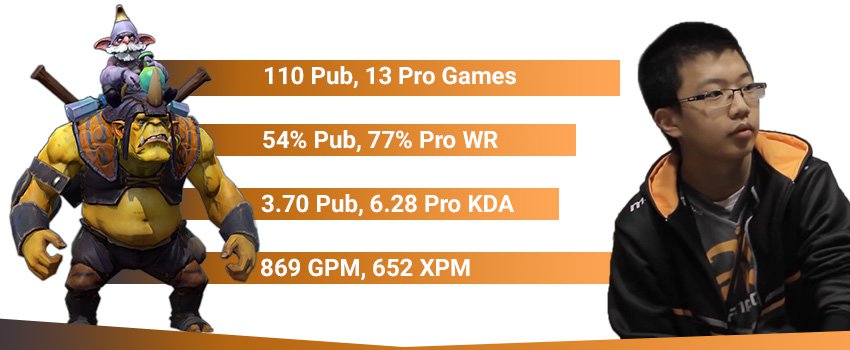
Xcalibur Alch Stats
TL;DR:

Draft: Pick Alchemist in the later stages of the picking phase – there are numerous counters you’d want to avoid. Ideally, pick him in games where you wouldn’t be pressured too much.

Laning: Go mid or possibly in the safe lane – wherever you think you’ll get the easiest access to farm.Prioritize last hits and staying alive. In the later laning stage start out-pushing the wave and stacking and farming the jungle with Acid Spray.

Mid & Late: Finish your core items as fast as possible by farming the jungle and split-pushing. Once you have a significant item advantage (ideally in the mid game) use it to siege the enemy base together with your team and finish the game.

Authors

Steve "Xcalibur" Ye
Endorsement & Info

Xcalibur is one of the biggest pub-stars in the history of Dota - he has claimed the number 1 spot on the EU leaderboard numerous times and before the reset, he peaked at over 9 000 MMR.

His incredible success in pubs made him one of the hottest stand-ins in the pro scene and later on allowed him to play for major Dota teams like Fnatic.

Nikolay "CTOMAHEH1" Kalchev
Info & Editing

CTOMAHEH1 started his pro career as a support in Basically Unknown together with Mind Control. Since then he has consistently been playing on the European T2 scene, most recently on Unchained Esports. 

His highest placement on the EU ladder is top 100 - he plays all roles (mainly support), which is untypical for high-ranking players and shows his great versatility and understanding of the game.

Martin "BRING IT ON" Slavov
Writing & Info

Martin has lots of experience writing about Dota and he is no pushover in the actual game - a Divine III player, Martin plays mid and carry heroes on a very high level.

He has been playing Dota since Guinsoo's Dota Allstars (more than 12 years) and he loves thinking about new builds and strategies.

Kyril "MrNiceGuy" Kotashev
PM & Editing

Esports and gaming enthusiast since forever and founder of Dotahaven.

Has been playing Dota since 2005 (5.84). An Ancient I player in Dota 2.

Steel wins battles, gold wins wars

Alchemist has been around since forever, had his ups and downs and definitely saw competitive play in some patches. The hero is unique in the way he farms and how his insane farming is compensated by other weaknesses.

Alch is a great hero for climbing out of low MMR tiers if that is your goal. By out-farming everyone on the map, you can consistently secure wins by yourself. In higher MMR tiers, however, his bad laning stage and need for free space on the map means you are more reliant on your teammates.

Alch Loadout
Stats
Level 1
Level 15
Level 25
STR
25
Very High
54
Low
75
High
AGI
16
Medium
32
Low
44
Very Low
INT
25
Very High
50
Medium
68
Medium
Attack
49‒58
High
78‒87
High
99‒108
Medium
Health
762
High
1424
Medium
1896
Low
Armor
1.56
Low
4.2
Very Low
6.1
Very Low
Magic Resistance
26%
High
29%
High
30%
High
Mana
375
High
675
Medium
891
Medium
Movement Speed
297
Medium
299
Medium
301
Medium
STRENGTHS

MAJOR:

Fastest farmer in the game: Alchemist is by far the fastest farming hero in the game. While heroes like Anti-Mage, Medusa, Luna could reach 900-1000 GPM with a godlike game, Alchemist can achieve that without really breaking a sweat.

Can stack and farm fast in the jungle: Acid Spray can be used to stack from far away, to stack 2 camps at once or to stack ancients from the low ground.

Tanky in the mid game: The ultimate combined with a decent gold lead allows him to be pretty much untouchable if not focused by multiple heroes.

MINOR:

Versatile builds: There’s more than one way to build him, allowing you to become a farming machine, tanky Radiance carrier or a physical damage carry. You can farm enemy camps with Radiance/Manta illusions, split push and fight with an early Radiance or different items.

Can boost his teammates with Aghanim Scepters: This could be a huge factor for supports who have good upgrades like AA, Witch Doctor, Rubick or carries and offlaners who need different items but have good upgrades.

Juicy bounty runes give him x2.5 gold

Fun and unique hero

WEAKNESSES

MAJOR:

Horrible stats: Even though he starts with a respectable HP pool of 700, stats-wise Alchemist is one of the weakest heroes in the game. Lowest STR gain out of all strength heroes, low agility gain resulting in low armor as well. From this weakness, we can deduct the second one being…

Needs a gold lead to be effective: Alchemist is really item dependent as his stats don’t allow him to compete with the other carries in terms of damage, armor and attack speed (although his ultimate gives him some boost), so he needs to compensate that with items.

Not really useful in the early game: Generally, all the hero does in the early game is farm. Even if you do have the good intention of helping your team, you really need 1-2 core items before you can do anything.

MINOR:

A lot of nightmare matchups: AA being on the top of the list as he blocks our ultimate regeneration, Spirit Vessel also slows regeneration with 70%. There’s also a lot of heroes who destroy him on the mid lane or abuse his low armor later on. More on that later.

Susceptible to ganks early on: Being a melee hero with low armor, he’s easy to kill before lvl 6.

Heavily reliable on his ultimate: Much like other heroes with transformations (like DK, Terrorblade, Sven, Lycan), Alchemist is no exception.

Unreliable stun without setup: Most of the times, you’ll need a teammate to set you up or a Dagger/Shadow Blade.

Replays

Na’Vi vs Mega-Lada, Mars Dota 2 League

Match ID: 3795721743
Replay:

Lil plays the unconventional position 4 Alchemist. Initially he starts by roaming, primarily helping out his SK in the offlane. He gets a Medallion to increase the damage of his physical damage Concoction, which helps him secure a couple of kills. Afterward he gets a Dagger to increase his initiation potential. After the laning stage he starts stacking camps and farming them, which gives him a quick Aghanim’s that he gives to his Luna. On the 20th minute mark with the Agh’s she has almost double the net worth of the enemy position 1, which makes Na’Vi almost impossible to stop in pushes.

Lil gets a Battle Fury and continues stacking and farming in order to catch up in farm – he even doesn’t join his team for a few skirmishes. This allows him to overtake the enemy pos. 1 in net worth and allows him to easily push the enemy base with his team.

Team Empire vs PENTA Sports, D2CL Season 7

Match ID: 3530134395
Replay

Fn! Plays Alch mid and manages to reach 1090 GPM in 39 minutes. Notice how Empire’s entire draft benefits a lot from Aghanim’s upgrades, in case the game is long and Alch starts giving Scepters to his teammates. In this case he gives an Agh to his very farmed Void to improve his initiation (he is the only initiator on the team) and help them finish the game.

Fnatic vs Execration, AMD Sapphire Dota Pit

Match ID: 3530134395
Replay

EternaLEnVy plays a very impactful game on Alch, managing to deal the most hero and tower damage on his team by a large margin. Because the game goes late (62 minutes), he gets 9-slotted (two items to exchange from the backpack and an eaten Moonshard) and buys three Scepters for his teammates.

Drafting

Alchemist is usually good in 4 protect 1 strategies where you focus on helping him in the laning stage, saving him from ganks or making stacks. You want to have teammates with stuns or protective spells and low farm dependence.

As we already mentioned, Alch relies on a gold lead in order to crush his enemies. You can easily get 6 slotted in 30-35 minutes with an average game and then push the enemies whose carry only has 3-4 items.

It is important to be able to finish the games before the enemies catch up on items as Alch is not that strong against carries with equal farm. The hero has the potential to scale into the late game, especially with the base attack time reduction talent at lvl 25, however, it’s not a good idea to wait that long to finish the game. This is why you want to pick Alch in a team that can push or siege well or can execute good team fights. 

Positions
  • 1st Position Mid Lane

Mid is the preferred lane as it allows us to get to lvl 6 sooner to survive ganks and farm faster. Mid lane also has another huge advantage – it gives quick access to both ancient camps and to a few jungle camps to stack and farm.

  • 1st Position Safe Lane

Not nearly as good as the mid lane, we're only mentioning it in case you get an impossible matchup in the mid lane like Razor, Huskar or Ursa who will never allow you to touch a creep.

  • 4th Position Roaming

If you really want to, you can make it work by maxing and roaming, collecting bounty runes and eventually giving an Aghanim Scepter to a teammate. After you pull a Scepter to a teammate, you’re pretty much a -1 hero, so you need to try to catch-up in farm. Your flash farming capabilities of the hero allow you to do so if you have the space. Speaking of space, a pos. 4 Alchemist is good with a pushing lineup that leaves you a lot of free space on the map to farm. If your cores are also flash-farming most of the time you wouldn’t have the space and time to catch-up and reach your full potential. 

Synergy

Good friends to have are:

Strong lane supports:

Ogre Magi Portrait
Winter Wyvern Portrait
Skywrath Mage Portrait
Bane Portrait
Jakiro Portrait
Shadow Shaman

A lot of heroes can work here, all they need to do is zone or harass the enemy, so you can get last hits without taking damage. 

Keep you alive in fights later on:

Omniknight portrait
Oracle Portrait
Winter Wyvern Portrait
Abaddon Portrait
Shadow Demon Portrait

We’re looking at heroes like Omniknight, Oracle, Winter Wyvern, Abaddon, Shadow Demon (he also creates some scary Radiance illusions) – this is pretty self-explanatory, you are the big gun, you have a huge gold lead, you want someone to watch your back in case the enemies decide to blow everything on you.  

Strong team fighters:

Magnus Portrait
Axe Portrait
Earthshaker Portrait
Tidehunter Portrait
Puck Portrait
Underlord Portrait

Those heroes prevent the enemies from grouping around you or/and often soak up a lot of damage as well. And any damage that they take is damage that you won’t take, so you can continue your rampage.

Counters

Strong Against:

Heroes with summons:

Enigma Portrait
Nature's Prophet Portrait
Broodmother Portrait
Undying Portrait

Alchemist is not a strong counter to any particular hero. However, he is pretty great against heroes with summons, as he takes extra gold for any enemy unit slain. In particular, the low HP minions of Enigma, Nature’s Prophet, Undying (the tombstone zombies give bonus gold), Broodmother are pretty sweet to farm with your Radiance or Battle Fury.

Cores that take a long time to come online:

Spectre Portrait
Arc warden
Phantom Lancer
Naga siren
Anti mage
Tinker

Alch is also good against passive teams with slower cores. If the enemy team takes a long time to come online, in the mid game you will have a timing to push their base before your enemies can fight.

Lineups that lack enough nuke damage:

Tidehunter Portrait
Winter Wyvern Portrait
Abaddon Portrait
Treant Protector
Magnus Portrait
Underlord Portrait

Thanks to the very high HP regen from his ultimate and to his ability to get expensive survivability items very fast, lineups that lack sufficient damage output could have a big problem killing Alch in fights, especially during his mid-late game timing (when he has most of his items, while the enemy cores are still poor).

Weak Against:

There are tons of heroes who are pretty strong against Alchemist, so you’d better wait with your pick and check for the following:

Ancient Apparition Portrait

He has his own tier – His ultimate blocks your regeneration entirely, which is a huge part of your survivability mechanism. Also a nightmare for Armlet users.

Spirit Vessel

A simmilar effect, although quite a lot weaker, could be achieved with the item Spirit Vessel, as it blocks a big percentage of your regeneration.

Heroes with high burst damage early on (physical and magical):

Templar Assassin
Clinkz Portrait
Lifestealer Portrait
Ursa Portrait
Shadow Fiend Portrait
Dark Willow Portrait
Huskar Portrait
Slark Portrait
Tiny
Monkey king

Anything that’s capable of dealing 1000-1500 burst damage. You will need to be cautious around heroes like those or build specifically items against them like Halberd, Manta, etc. 

Heroes that reduce armor heavily:

Templar Assassin
Slardar Portrait
Dazzle Portrait
Desolator Icon
Solar Crest Icon

You have below average armor: armor reduction heroes combined with high physical damage is one of the most effective ways to kill Alch.

Heroes with long disables:

Bane Portrait
Disruptor Portrait
Faceless Void Portrait
Magnus Portrait

As is the case for all melee carries, heroes with good control can reduce your fight impact. One good side of Alchemist against these heroes is that thanks to the regeneration from your ult, you are hard to bring down in the duration of a single disable, so such heroes usually aren’t too bad to play against. 

Skills

Acid Spray
Unstable Concoction
Greevi's Greed Icon
Chemical Rage Icon

Sprays high-pressure acid across a target area. Enemy units who step across the contaminated terrain take damage per second and have their armor reduced.

STATS

Cast Animation: 0.2+0.7

Cast Range: 900

Radius: 400/475/550/625

Damage per Second: 15/20/25/30

Armor Reduction: 4/5/6/7

Duration: 16

CD: 22
Mana: 
130/140/150/160

Acid Spray

Mechanics:

  • 900 cast range – this is pretty huge.
  • You can cancel the casting animation after 0.2 seconds (if you wait for the whole animation, it’s 0.7s)

Uses and tips:

Spamming on the lane to harass/zone the enemy - This is our main lane control mechanism. It is not enough to pose a real threat to the enemy (unless he takes the creeps’ agro, then he will know real pain), but it creates space for you to last-hit.

Stacking jungle camps - Damage starts 1 second after you cast the skill, so you’ll need to learn the stacking timers of all camps (in case you don’t already know them) and use Spray 1 second before that. You can stack one camp with your hero and one camp with the spray at the same time.

Farming jungle - Obvious use, just make sure you use it on the edge of one camp and draw the attention of another one as well if possible – that way you will be able to deal damage to both of them with one spray cast.

Alchemist brews up an unstable concoction that he can throw at an enemy hero, to stun and deal damage in an area around the explosion. The longer the concoction brews, the more damage it deals and the longer the stun. After 5 seconds, the brew reaches its maximum damage and stun time. However, after 5.5 seconds, the concoction will explode on Alchemist himself if not thrown.

STATS

Cast Animation: 0+0

Concoction Radius: 200

Maximum Brew Time: 5

Maximum Throw Time: 5.5

Minimum Damage: 0

Maximum Damage: 160/240/320/400

Maximum Stun Duration: 1.75/2.5/3.25/4

CD: 22/20/18/16 

Mana: 120

Unstable Concoction

Mechanics:

  • 0 cast animation on both casting and throwing the concoction
  • 200 area of effect – you can stun/damage multiple heroes
  • Stunning yourself also stuns enemies around you (in the 200 aoe)
  • Maximum damage and stun time is reached after 5 seconds (you have 5.5s to throw it)
  • You can deny yourself with it
  • Damage is physical, so it is increased by any armor reduction items

Tips:

The ability is pretty hard to use as the enemies can see you brewing it. This is why it’s always advisable to use it with a setup stun from a teammate or with Dagger/Shadow Blade.

Make sure you’re in a safe spot in case you can’t throw it on time – this is very important as smarter enemies will always try to juke you in the trees and wait for you to stun yourself.

Don’t be greedy – throwing it on 4 seconds is almost the same as 5. Channel for the maximum time only if you’re 100% sure the enemy doesn’t suspect anything or is disabled by a teammate already.

Alchemist synthesizes additional gold from his enemies and bounty runes. With each kill, Alchemist earns base bonus gold and extra bonus gold. If Alchemist kills another unit which yields gold within the next 40 seconds, an additional instance of Extra Bonus Gold is added to the total. Additionally, causes bounty runes to yield more gold.

STATS

Base Gold Bonus: 4

Extra Gold Bonus per Stack: 4

Gold Bonus Cap: 20/24/28/32

Stack Duration: 40

Bounty Rune Multiplier: 2/2.5/3/3.5

Greevil's Greed

Mechanics:

  • All stacks work fully independently from each other. They last 40 seconds each and do not refresh each other – we’ve seen people wasting time, thinking that 1 creep per 40 seconds will keep their stacks, while in reality, every second you waste is important (time = money).
  • Alchemist himself has to last hit to gain a stack – also worth mentioning because Manta illusions don’t gain stacks and don’t contribute to your stack.
  • Gold earned through Greevil's Greed is unreliable and affected by the Buyback gold earn penalty.
  • Bounty runes give 2/2.5/3/3.5x
  • Creeps’ size doesn’t matter, they all give the same gold from Greevil’s Greed. Will talk more about it later.

Alchemist causes his Ogre to enter a chemically induced rage, reducing base attack cooldown and increasing movement speed and regeneration.

STATS

Cast Animation: 0+0

Transformation Time: 0.35

Base Attack Time: 1.3/1.15/1

Health Regen Bonus: 40/55/70

Mana Regen Bonus: 3/7.5/12

Move Speed Bonus: 40/50/60

Rage Duration: 25

CD: 55
Mana: 50/100/150

Aghanim's Scepter

Alchemist melts down Aghanim's Scepter to grant an allied hero all Aghanim's Scepter upgrades.

Chemical Rage

Mechanics:

  • Disjoints projectiles upon cast – meaning you can dodge things like Venge stun, Sven stun, Tinker rockets, etc.
  • Mana regeneration items are not percentage based anymore – this is a recent change, for example, a Sage’s Mask used to give +50% regeneration which was a huge deal while you’re in Chemical Rage form. Now it only grants +0.5 mana/sec in both forms. This means you need different items to sustain mana. We’ll cover that later.
  • The base attack time with Lvl 3 Chemical Rage is the lowest BAT possible in the game. Lower BAT means your attack speed items are more effective and your maximum attack speed is capped much higher.
  • Chemical Rage has 30 seconds downtime (cooldown after the expiration of the form) and 16 seconds with Octarine Core.

Tips:

Chemical Rage is what sustains you while farming in the jungle and almost negates the Armlet health loss, allowing you to use it almost all the time.

Make sure you’re not in a bad position where you can get ganked when Chemical Rage is down. During that time you want to farm jungle or send Manta illusions from afar. 

Skill Builds

Farming Build
Fighting Build
Greevi's Greed Icon
1
Acid Spray
2
Acid Spray
3
Greevi's Greed Icon
4
Acid Spray
5
Chemical Rage Icon
6
Greevi's Greed Icon
7
Greevi's Greed Icon
8
Acid Spray
9
Talent Icon
10
Unstable Concoction
11
Chemical Rage Icon
12
Unstable Concoction
13
Unstable Concoction
14
Talent Icon
15
Unstable Concoction
16
Chemical Rage Icon
18
Talent Icon
20
Talent Icon
25
Pros: insane farming speed;
Cons: you can’t help the other lanes at all;

This is the most commonly used build. You can always swap the leveling of Acid Spray and Greevil’s Greed. For example, you’re having a great lane, no one is bothering you – feel free to max Greevil’s Greed to maximize your farm. And on the contrary, your lane sucks, you’ll need to enter jungle sooner than expected – max the Acid Spray. Or 3 points in each for a more balanced build.

At level 1 you want Greevil’s Greed to take a rune and boost your starting budget, bring more regen to the lane or build faster items. Even if you’re not able to take a rune, your last-hit will probably not be contested at level 1 with Quelling Blade anyway.

One point in Concoction is optional, however, you will rarely have kill potential that early.

Greevi's Greed Icon
1
Acid Spray
2
Acid Spray
3
Unstable Concoction
4
Acid Spray
5
Chemical Rage Icon
6
Acid Spray
7
Unstable Concoction
8
Unstable Concoction
9
Unstable Concoction
10
Talent Icon
11
Chemical Rage Icon
12
Greevi's Greed Icon
13
Greevi's Greed Icon
14
Talent Icon
15
Greevi's Greed Icon
16
Chemical Rage Icon
18
Talent Icon
20
Talent Icon
25
Pros: you can fight early on and you scale better into the late game (thanks to the talents we choose with this build);
Cons: if your game doesn’t start well, your comeback potential will be smaller;

The skill build here revolves around maxing Acid Spray and Unstable Concoction with 1 or 2 points in Greevil’s Greed. Once again you can tweak the build if you feel you need one skill more than the other early on.

This build is more uncommon than the farming one because it’s not utilizing the biggest advantage of the hero – his farming potential. However, it can still work and pro players have proven that a couple of times in patches where the hero was top tier.

Talents

+30 Chemical Rage Regeneration
25
-0.2 Chemical Rage Base Attack Time
+400 Unstable Concoction Damage
20
+30% Cleave
+50 Damage
15
+400 Health
-8s Unstable Concoction Cooldown
10
+25 Attack Speed

Level 10: The Concoction cooldown is very good if you intend to invest more points in the spell earlier and it is especially good if your allies have sources of armor reduction. The attack speed, however, is more versatile and if you expect to farm and push towers most of the time – get the AS.

Level 15: You usually take the health for the farming build, the damage for the fighting build. The damage is huge for Alchemist as the later the game goes the faster you will attack, which means the effectiveness of this talent will increase. Because of that, +50 damage is a huge buff percentage wise. The health, however, is often necessary to survive the nukes of the enemy team.

Level 20: The cleave is better for more passive games and especially good if you need to catch-up and split-push. For fast-paced games where you are ahead, the damage could make a difference in fights, especially if you have the CD talent. Bear in mind, however, that in the late game when enemies have Lotus, Linkens and BKBs, Concoction is not very reliable.

Level 25: The regen for a Radiance build, the BAT for a right-click builds. The reason is that the regen talent allows you to siege towers and finish the game as fast as possible. If you expect the game to be very long, get the BAT even with Radiance as you might have to go right-click items eventually. The BAT talent greatly improves pretty much everything the hero builds – Bashes, MKB, Mjollnir and overal DPS.

Farming & Split-Pushing Build

This build emphasizes on items that maximize your farming potential (Radiance, BoTs, Manta) and allow you to push out the waves and split-push very easily. Survivability items make you into a better front-line tank and allow you to push towers and finish the game (Manta, Octarine, Shiva’s Guard).

Later on, you can replace Armlet with something more useful. The options are many, you can build Halberd, Hex, Mjollnir, Linken, Nullifier – whatever you or your team needs.

Starting Items
Stout Shield
Quelling Blade
Healing_Salve_icon
Pulled Tango
Early Game
Boots of Speed
Soul_Ring_icon
Magic Stick
Armlet_of_Mordiggian_(Active)_icon
Mid Game:
Radiance
Boots_of_Travel_1_icon
Manta_Style_icon
Late Game
Octarine_Core_icon
Shiva's_Guard_icon
Stout Shield
Quelling Blade
Healing_Salve_icon
Pulled Tango

Ask your teammates to pool you some of those if you're going mid.

Boots of Speed
Soul_Ring_icon

Soul Ring: You can get a Bottle, but Soul Ring is usually the better option. Bottle has been nerfed and you usually don’t want to go for runes early on: stacking or farming the jungle when you have spare time is more efficient. Clearing even 1 neutral camp gives you more gold than a bounty rune in the first 15-20 minutes and later on your ultimate mitigates the lost health from this item. 

Magic Stick
Armlet_of_Mordiggian_(Active)_icon

Armlet: The item is absolutely insane on this hero, makes you unkillable while in Chemical Rage, allows you to farm jungle faster, gives armor when activated (which Alchemist desperately needs early on) and you can man-fight enemies with it if needed. 

Radiance

Radiance provides insane farming speed and if you manage to get it early on, you can contribute to team fights as well. 

Boots_of_Travel_1_icon

Boots of Travel: simply the best pair of boots and Alchemist can afford the best.

Manta_Style_icon

Manta: mainly because of the Radiance. Sending illusions to farm the more dangerous lanes/camps can scout enemies, take their farm and improve your farm. Worth mentioning is that this build (with Manta + BoTs) makes you pretty fast, which allows you to farm faster and be more mobile in team fights. 

Octarine_Core_icon

Octarine Core: reduces the cooldown of Manta (meaning more farm) and also reduces Chemical Rage’s downtime to 16 seconds. 

Shiva's_Guard_icon

Shiva’s Guard: better than Assault Cuirass as a defensive item (you want to be an unkillable siege engine) because it provides attack speed slow aura and the aoe active slow is good to have as well as it helps you stick to your enemies. 

Fighting Build

This build is a very good alternative to the traditional Radiance + Manta split-pushing Alchemist. The item choices boost your farm equally well but make you better at dealing physical damage in fights instead of split-pushing.

Starting Items
Stout Shield
Quelling Blade
Healing_Salve_icon
Pulled Tango
Early Game
Boots of Speed
Soul_Ring_icon
Battle_Fury_icon
Boots_of_Travel_1_icon
Mid Game
Shadow_Blade_icon
Sange_and_Yasha_new
Late Game
Mjollnir_icon
Abyssal_Blade_icon
Stout Shield
Quelling Blade
Healing_Salve_icon
Pulled Tango

Ask your teammates to pool you some of those if you're going mid.

Boots of Speed
Soul_Ring_icon

Soul Ring: You can get a Bottle, but Soul Ring is usually the better option. Bottle has been nerfed and you usually don’t want to go for runes early on: stacking or farming the jungle when you have spare time is more efficient. Clearing even 1 neutral camp gives you more gold than a bounty rune in the first 15-20 minutes and later on your ultimate mitigates the lost health from this item. 

Battle_Fury_icon

Battle Fury: Despite building a fighting Alchemist, Battle Fury is even a better farming item than Radiance. If you try maxing Greevil’s Greed with this build, you will be able to achieve the best farming speed possible. As I said, tweaking the skill build is absolutely possible depending on your early game.

Boots_of_Travel_1_icon

Boots of Travel: simply the best pair of boots and Alchemist can afford the best.

Shadow_Blade_icon

Dagger/Shadow Blade is for stun set up. Worth mentioning is that the Blink Dagger boosts your farming speed as well. Shadow Blade offers you undetected movement through enemy wards (if they don’t have sentries of course) and overall better damage per second in fights. 

Sange_and_Yasha_new

S&Y: a cost-efficient source of stats and the passive could help you stick to your targets.

Mjollnir_icon

Mjollnir: combined with your insane BAT, Mjollnir is one of your best DPS options. It also increases your farming speed further.

Abyssal_Blade_icon

Abyssal Blade: with lvl 3 Chemical Rage and especially the 25 level talent the synergy is insane.

Other Items

Mid Game
Solar Crest Icon
Heaven's_Halberd_icon
Blink_Dagger_icon
Late Game
Monkey_King_Bar_icon
Bloodthorn_icon
Black King Bar
Assault_Cuirass_icon
Aghanim's_Scepter_icon
Solar Crest Icon

Medallion/Crest is generally pretty good with Spray and Concoction, killing Roshan or just using it as an additional source of survivability vs heavy physical damage dealers.  

Heaven's_Halberd_icon

Halberd is another way to deal with heavy physical damage dealers.

Blink_Dagger_icon

Blink Dagger: It’s really good in some games, as it allows you to farm faster, to set up your stun, to move faster so you can evade ganks, etc. 

Monkey_King_Bar_icon

MKB is a great tool against evasion/miss mechanics.

Bloodthorn_icon

Bloodthorn: a great DPS choice for the late game, especially against elusive enemies - you already have a stun to proc Linken’s and to guarantee the silance.

Black King Bar

BKB:  don’t hesitate to build it against strong nukers. You can build it in the mid game as well. 

Assault_Cuirass_icon

AC: combines survivability against physical damage enemies and good DPS. Nonetheless, Shiva provides more survivability and Mjollnir is much better for DPS, so you see it more rarely. 

Aghanim's_Scepter_icon

Aghanim's: Once you're six slotted, start building Aghs for everyone on your team. Start from the heroes with the strongest Agh upgrades, ofc. It is possible to build an Agh earlier in the game if your strategy involves giving it as fast as possible to another hero, but this is risky since it will slow down your own item development.

Early Game

Alch 350px

Bearing in mind Alch is the fastest farming hero in the game, it probably comes as no surprise that as core Alch your sole focus should be on getting as much farm as possible. Acid Spray is your key skill in the lane: it deals damage to your opponent, which makes it easier to get last hits without getting constantly harassed. Later on, when you have more levels in it, it will push out the wave pretty fast. You can use this free time to stack the nearby jungle camps. In the later laning stage you can farm them with Acid Spray and your ultimate for sustain.

Farming:

All you want on the laning stage is to farm, get as many last hits as possible. Getting the last-hit shouldn’t be hard with Quelling Blade + Spray.

Against harder matchups, you’d want to max the Spray as it increases the area of effect as well the damage and armor reduction. If you feel your lane is too hard, don’t risk dying, go take a bounty rune, stack a camp and wait patiently for levels. You can also call for help from your supports – if they can give you an edge in the early laning stage when you are the weakest, you will usually be fine later on when you have more levels in Acid Spray and your ultimate for survivability.

As already mentioned, use Acid Spray to zone your opponent. Place it on the edge of the creep wave so the rest of it can be on the enemy side of the lane.

Kill Potential:

The hero has close to 0 kill potential without Concoction and most of the time you would want to leave it for later in order to maximize your farming sped. Getting one point in it early, however, is definitely possible when your allies have good kill potential. Try to follow-up their initiation with it. If you start charging it too early you might give away the kill attempt – your opponent is likely to instantly start running away.

Position 1, Mid Lane:

Start by blocking your creep wave as best as you can - playing on the enemy high ground is a nightmare, so it’s important to have a good block. Ask for a ward as well so you can see incoming ganks. 

The really hard matchups for you are Razor, Huskar, Ursa, SF, Clinkz, Viper. Against those, you’d want to stack or farm the jungle before lvl 6 as they can go for a kill after harassing you a bit. Against the other mid matchups, you should be fine unless you get ganked.

Usually, when the enemy sees an Alchemist, they want to kill him early on. If you see the enemy supports missing, stay on your high ground where you can see them coming with your ward vision even if they’re smoked. The hard part of the game is the time before you get your Armlet (6-9 min). After that, you become pretty much unkillable with Chemical Rage unless the enemy team is really far ahead.

So in conclusion, your priorities on the lane are:

Last hitting, later on pushing out the wave;
Avoiding ganks;
Stacking and farming the jungle;
Video Example:

The Alchemist is left to take the rune uncontested and the Lich is blocking his creep wave. The block is not perfect as the creeps end up on the enemy high ground, but he’s up against a Shadow Fiend and his 3 armor + Stout Shield is enough to withstand harassment at level 1.

  • At 01:00 we see he plants a tree with the Iron Branch and eats it with a Tango for double regen – pretty nice thing to do if you expect heavy harass from the opponent.

  • At 01:40 we observe the usage of the Acid Spray when the enemy has the creeps’ agro. He doesn’t take that much damage as there were only 2 creeps hitting him for a short time, but this is an example of how your defense against harassment works – you use Acid Spray on top of the creep wave and the enemy hero and if he decides to hit you, the creeps focus him, he has reduced armor and takes a lot of damage. He also levels Acid Spray at level 3 for better zoning.

  • At 02:30 you can see how he pushes the wave with Acid Spray and then instantly goes back to block his next creep wave so that they meet in the middle again.

  • At 02:50 we can observe a perfect example of the zoning Acid Spray we mentioned earlier.

  • A nice technique at 03:40 for any mid hero – if the enemy pushes your wave, hold the creeps outside of your tower’s range. That way the next waves will start fighting on your high ground. This is very important as that allows you to use Spray for zoning even better.

  • His first items are Soul Ring and Boots which allow him to spam Acid Spray on every wave. Take a note of the tree he cuts at 04:40 – that allows you to later stack the camp easier and faster.

SF usually has the advantage in this matchup as he has more attack damage after taking a few souls and a triple Shadowraze is rather easy to execute on a melee hero. However, we see that the Alchemist received a tiny bit of help from his teammates, so he managed to stay in the lane without losing farm until level 6. Later on, he starts clearing the waves with Acid Spray and stacking/farming the jungle, which concludes the laning stage for him. 

Mid & Late Game

Alch Immortal 350px

If everything goes well on the laning stage, you should be looking at a pretty fast Radiance timing like 13-15 min with travels 1-2 mins later.


If you feel your team is doing ok, you can try to take a fight. You can teleport with Travels and win the fight with your Armlet & Radiance - you'll deal very high damage and will be hard to kill at this point. Unlike other carries, you reach your peak faster and a 15 min Armlet/Radiance Alchemist is no joke if the enemies don’t have that much farm.


If you feel the game is even or not in your favor, better keep farming until you are ahead in items.

Farm your core items (Armlet, Radiance, Travels, Manta);
Help your team if they find a good fight;
Siege the enemy base with your team once you have a significant item advantage;
Split-push;
Comeback Potential:

It’s all easy while you’re ahead, so what happens if you’re losing and playing from behind?

Cut the waves with Manta illusions, don’t farm on the dangerous spots, get as tanky as possible. Once you’ve pretty much 5-6 slotted, you can start pulling Aghanim Scepters to your teammates as well. In a game from behind, you still want to farm more than the opponent. If you’re not dying you can be earning more gold than an opponent with a good game who is taking towers and farming everywhere and use your advantage, later on, to try to come-back. 

Team Fights:

In team fights, you usually want to tank for your teammates by going in first and sending your illusions further ahead to disable enemies’ Blink daggers with Radiance. You want to create chaos, to force them to change their positioning and your team to follow you up. Even if you are not that far ahead in terms of farm, you still want to use that playstyle if you have a hero like Magnus, Enigma, Earthshaker who can punish the opponents if they try to focus everything on you.

If you, however, feel that you’re not strong enough and the enemies’ carry/mid is pretty farmed, you want to wait for another initiator to start the fight. It’s all about how much damage you can tank. Even if you’re not landing hits, you’re dealing damage with Radiance and Spray, so even running around the opponents are doing something, especially if their cores are melee heroes who need to chase you.

If you’re using the fighting build, you want to initiate with Blind/Shadow Blade stun and to focus a key hero or to wait for your teammates to initiate if you can’t find a good opportunity. 

Notice how Fn stands in the front lines of the fight because he knows he can take a lot of punishment and even if he dies – he has Aegis. With the help of his team, he slowly whittles down the enemy heroes with his Radiance and wins the fight. They even try to re-initiate on him when he’s alone, but they underestimate how tanky he is with the item lead that he has. This gives him the opportunity to threaten the enemy T4 towers from very early on (nonetheless, he backs off because dying will give the enemy team a lot of gold).

In the following minutes of the video you can see how he farms very efficiently with Alch. He farms the safe spots (pushed-in waves and jungle camps) with the hero, while pushing-out the waves with his Manta Illusions (e.g. min 05.50).

Pushing:

5-man Pushing:

Alch is great at sieging the enemy base for two main reasons:

First, his ultimate gives him a lot of sustain, which means it’s hard to push him back just with anti-push spells. Second, he is likely to have a massive item lead in the mid-late game. When he hits this timing, he might simply be too tanky to push back.

Alch’s most powerful timing is when he’s close to full slotted, while the enemy carry still misses important items (usually between 25-35 minutes). When you hit that timing, you should try to get Aegis and break the enemy base.

Simply activate your ultimate and start hitting the enemy tower while your allies are standing behind you ready to jump if the enemy team commits to a fight. You can use your Manta illusions to scout the positioning of the enemy team and even mess-up Blink Dagger initiations.

Back off just before your ult is down. Wait for it to come online again before you continue pushing, because your opponents will try to use this timing window to start the fight.

Split-Pushing

After getting your Manta you can start sending illusions to the more important spots on the map – enemy jungle, hard lane, etc. A little tip here: Try to farm the lanes with illusions and the jungle with the hero – your illusions don’t get bonus gold so the jungle creeps don’t give you that much gold and it’s also safer. With Manta, you can send your illusions to cut the waves in case the enemy team is pushing. 

Ganking:

If you have a Blink/Shadow Blade you can try to gank heroes. You’d probably need a teammate unless you’re really far ahead though. Don’t waste too much time in gank attempts: the opportunity cost is greater for you than for any other hero because of the huge amounts of gold you earn from killing creeps.

In some games, you might want to join ganks with your team in order to secure yourself more space to farm (e.g. if you have nowhere safe on the map to go to farm)

Map Control & Vision:

As we already mentioned, you want to be sending your illusions to farm the more dangerous parts of the map. That gives you vision and pushes the enemy waves, so you force enemies to defend. If lanes are pushing and no one is going to defend/farm, they’re probably grouping up for a gank/fight. 

Farming:

Considering that every second word in the guide is “farm”, “last hit”, “jungle” or “stack”, there’s not much to add here. We will only point out that you should take into consideration what your team needs as well. If you’re the only hero farming on the map, that’s not good, no matter how farmed you get. If you’re winning you won’t see a difference, but if you’re playing from behind and your teammates also need some core items. You can let them farm the easy spots on the map (safe lane, your jungle, etc) while you farm with Manta illusions the enemy side of the map and depending on the vision you have, to use your hero to farm jungle.

There are limited resources on the map and if you’re smart, you will be farming in a way that distributes the resources better between your teammates and you. If your teammates are hard to kill and can split push well, they can go farm the hard lane. If they’re slow and squishy, they won’t be able to do that, so you’ll need to think about their farm as well.