Shadow Fiend Guide by Qojqva
Artist: Graff
Author:
Qojqva & Co.
Date: 12/2018
Tags:
text
video
Shadow Fiend
Builds
Tactics
Analysis

Welcome

Welcome to Qojqva's Book of the Shadow Fiend, a hero guide part of the Book of Dota series!

Here you will find all the information you need to learn to play SF on a high level – from drafting and builds to the optimal playstyle in different lanes and situations. We hope you’ll enjoy this guide and find it useful!

qojqva shadow fiend stats
TL;DR:

Draft: Picking SF in the early stages of the draft is not terrible, as he is hard to counter. Your biggest problem are very active roaming supports on the enemy team. If they pick heroes like that you might want to go to the safe lane or to request support on the mid lane. Other than that SF is flexible and you can adjust your builds and play style to the situation.

Early: Maximize farm – prioritize your own gold and XP gain over shutting down your lane opponent. Initially try to last hit and deny as much as possible, but afterwards focus on pushing out the wave and stacking and farming the jungle.

Mid & Late: Never stop farming, but try to move with your team. Once you have your first core items you can start fighting efficiently and taking objectives. Since you are quite flexible, your late game plan is very situational – you can even split-push if you cannot win fights with your team.

Authors

Max "qojqva" Bröcker
Endorsement & Info

Qojqva is one of the very few old-school core players who have been able to consistently stay at the top of the game and to maintain their peak mechanical skill.

He has competed on legendary teams like MYM,  mousesports, Team Liquid, Team Tinker, Escape, NiP, and Alliance.

Nikolay "CTOMAHEH1" Kalchev
Info & Editing

CTOMAHEH1 started his pro career as a support in Basically Unknown together with Mind Control. Since then he has consistently been playing on the European T2 scene, most recently on Unchained Esports. 

His highest placement on the EU ladder is top 100 - he plays all roles (mainly support), which is untypical for high-ranking players and shows his great versatility and understanding of the game.

Kyril "MrNiceGuy" Kotashev
PM, Writing & Editing

Esports and gaming enthusiast since forever and founder of Dotahaven.

Has been playing Dota since 2005 (5.84). An Ancient I player in Dota 2.

Your soul is mine!

Shadow Fiend is one of the highest damage dealers in the game, one of the fastest flash farmers and, on top of that, a very strong laner. At the same time, he has exceptionally poor survivability. Even though he has huge potential to take over games and crush his opponents, he is one of the easier heroes to stop by pressuring. Because of this when you play SF you don’t have a big margin for error. Making the right decisions consistently will make the difference between feeding and owning.

Shadow Fiend is a carry hero that is usually played as a solo, mostly in the mid but can work in the safe lane. Thanks to his laning strength he will most likely be able to get all the farm he needs in addition to interrupting the development of his lane opponent. Thanks to the versatility of his item builds he fits various strategies and is not a tactically narrow hero.

Shadow Fiend Loadout
Stats
Level 1
Level 15
Level 25
STR
16
Very Low
48
Low
71
Low
AGI
20
High
60
Very High
89
Very High
INT
18
Medium
46
Medium
66
Medium
Attack
35-41
Very Low
75-81
Very Low
104-110
Very Low
Armor
4
High
12.12
Very High
17.92
Very High
Resistance
25
Medium
27
Medium
29
Medium
HP
488
Very Low
1067
Low
1481
Low
MP
291
Medium
627
Medium
867
Medium
MS
313
Very High
321
Very High
327
Very High
STRENGHTS

MAJOR

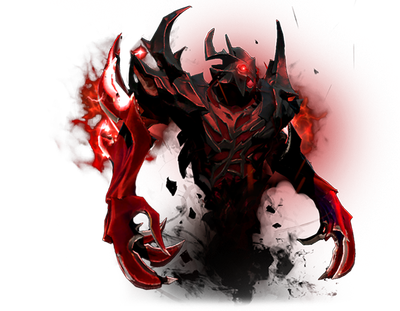
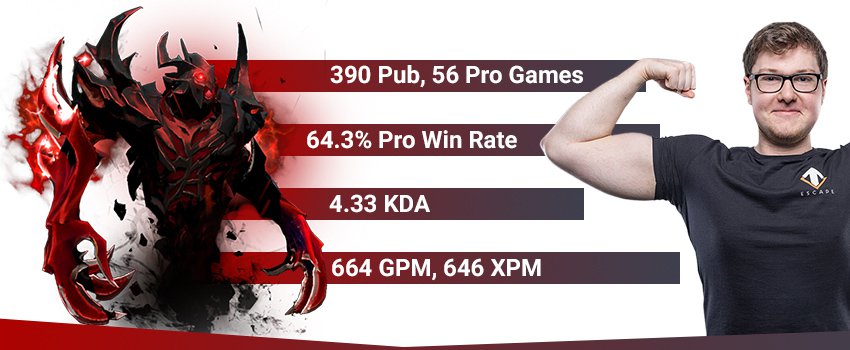
Damage Dealer: Virtually every skill of the hero revolves around dealing damage. One of your two passives increases the damage of your attacks, while the other reduces armor.  Your four active skills give you incredible nuking potential. With your maxed ultimate you could theoretically deal more than 2k magical damage to a target in melee range, while the hitting all three Razes deals over 1k.

Strong Laning Presence: If you manage to steal some souls with Necromastery it will be relatively easy to dominate the last-hit war in the lane because of the high damage you deal with every hit. In addition, your Shadowraze is one of the best nukes for lane control – it allows you to easily take last hits, harass or push out the wave in seconds.

Flash Farmer: Shadowraze is one of the fastest and most cost-efficient spells for killing-off waves or camps. Using all three Razes is usually enough to kill even large camp stacks. With the use of this skill and the help of some mana sustain you are one of the fastest farmers in the early and mid game. Moreover, your high damage (Necromastery) and armor reduction (Presence) help you kill creeps at a fast pace even when you don’t have mana (or when your targets are magic immune).

MINOR

Armor Reduction:  The armor reduction aura allows SF to have synergy with other physical damage dealers. It also makes him a viable part of armor reduction strategies.

AoE Presence: Thanks to his ultimate and partly to Shadowraze SF has AoE presence which makes him a good team fight carry. It is worth keeping in mind that his ultimate provides some useful utility - it slows and reduces the damage of all enemies caught in the AoE (which is very large).

Versatile Carry: SF is quite versatile especially in terms of item builds. This means that you can play him as a magical damage semi-carry or a typical physical damage carry. Either way, this versatility allows him to be useful in various strategies.

WEAKNESSES

MAJOR

Very Low Survivability: SF is, hands down, one of the least survivable heroes in the game. He has low HP, low armor for an AGI hero and no escape mechanism/disable to disengage unwanted fights. What you rely on to stay alive is your map awareness and flawless positioning, at least until you get items that will provide other options.

Your low survivability costs you. SF is a momentum based carry and dying is very costly not only because he loses gold and time, but because he loses half of his Necromastery souls. Once you respawn, your ultimate and right-clicks will be weaker, which means you will need some space and time to recover. 

MINOR

Momentum-based CarryWith SF you usually need a good start in order to get an item advantage and to snowball. Getting constantly pressured especially in the early game could shut down your development. Even though it is possible to recover by flash-farming, until you get a couple of defensive items you will be very vulnerable to ganks.

Replays

EG vs COL, Epicenter XL Qualifiers

Match ID: 3737869130

Replay:

Limp has a demolishing performance on SF, who is one of his signature heroes.He manages to finish the game 6 levels ahead of the highest lvl hero on the enemy team – Sumail’s Omni Knight.

The mid lane is by no means easy – he is playing against Tinker with a roaming Earth Spirit. Nonetheless, with the help of his Rubick, he has a great start and never stops snowballing.

Navi vs Gambit, DAC 2018 Qualifier

Match ID: 3727874831

Replay:

A very exciting comeback by Na’Vi against Gambit – they were at a point playing from a 16k gold deficit and were two lanes of rax down. Dendi is playing position 2 Shadow Fiend and goes for the magical DPS/Utility build.

After Na’Vi manage to hold their last set of Rax thanks to their great team fight potential, the pick-offs that the Blink + Hex SF provides swing the game back in their favor.

Drafting

Over the years SF has become one of the heroes symbolizing the professional Dota scene, specifically the best mid players.

When you pick SF you want to keep two things in mind – you want to maximize the impact of his damage potential and minimize the impact of his squishiness.

Because of his strong laning presence, flash farming capabilities and carry potential SF is a snowball hero and he is very hard to stop once he gets momentum. Making sure that his development is not capped prematurely is vital if you want to include him in your draft.

Since SF is a greedy pick (he needs some time and resources invested in him to start paying off), it is a good idea to secure the early game when you want to include him in your strategy. You can do this with some active early game picks which create free space on the map for him to flash farm uninterruptedly and become a game-dictating hero in the mid and late stages.

The other way to approach drafting him is to punish the passive and greedy picks of your opponents – if they are unable to apply pressure, SF is likely to be able to outfarm them and make the mid game stages harder for the enemy team. Once he has some core items he can start applying a lot of pressure – he can gank with Eul’s and SB/Blink or even force early fights with some stat items and BKB.

SF is quite tactically versatile. His main contribution to the game is lots of damage, which every strategy can make use: to win team fights; to farm faster; to take objectives faster etc.

Lanes

Solo Mid Shadow Fiend

The mid lane is the most common for SF mostly because of his strength in 1v1 situations. He is able to win his lane against most heroes and outright crush weaker solo laners. This could force opponents to invest time trying to help out their mid laner in order not to lose the laning stage very hard.

In terms of lane dominance, SF works a bit differently than most other strong 1v1 heroes. He is weak early on, but as he gains more souls and higher levels in Raze he is able to take over the lane very convincingly against any hero. In that sense, the lane opponents that can create the most problems for an SF are heroes that are very dominant laners from lvl 1. For example, with some good creep equilibrium control, a QoP can heavily harass and out-last hit the SF, slowing down his development considerably. If the SF gets some help in the early levels, however, he should do fine later on.

Make sure SF is not going to get constantly ganked. This means picking him when the enemy supports (or even cores) are not particularly strong gankers and if needed to actively protect him in the mid lane.

Against heroes that hit a timing to be able to gank (like Clock or Storm), it might be a good idea to rotate into the jungle rather than stay alone in the lane when they hit that timing. One of SF’s biggest strengths in the mid lane is his ability to almost instantly clear the creep wave with Razas and to go farm the jungle. This increases his GPM, but equally importantly it leaves him less exposed to ganks.

Safe Lane Shadow Fiend

In most games, you want to use SF’s laning strength and allow him to dominate a 1v1 situation. However, in some games, your opponents challenge the SF pick with aggressive counter-picks which apply pressure and gank the SF early on. Putting him mid in that case would be very risky. It is a safer decision to play him like a traditional hard carry and protect him with a support. 

The good thing about SF in a defensive lane is that because of his laning strength he can usually win against the enemy offlaner on his own once he gets a few levels and creeps/denies to increase his damage. This means that your supports have the freedom to rotate and help out in other lanes. Moreover, with a good disable from the support SF has very high kill potential in the lane thanks to his Razes.

Synergy

Good friends to have are:

Minus Armor: Slardar, Dazzle, Bristleback, Weaver, Tidehunter, Elder Titan

Slardar Portrait
Dazzle Portrait
Bristle Portrait
Weaver
Tidehunter Portrait
Elder titan
Picking heroes that reduce the armor of opponents in combination with SF is a great idea if you want to boost your team’s physical damage output.

Stacking minus armor from different skills is a good idea with Shadow Fiend’s minus armor aura. Doing so will increase SF’s damage (and that of all other physical damage dealers in the team) even further to a point where it will become incredibly hard for your opponents to take an open fight.

AoE Control: Tide, Magnus, Puck, Sand King, Enigma, Dark Seer, Treant

Tidehunter Portrait
Magnus Portrait
Puck Portrait
Sand King
Enigma Portrait
Dark Seer
Treant Protector
If you have AoE control on your team it will be much easier for you to have an impact in fights – both from your ultimate and your attacks.

SF has synergy with such heroes because:

  1. He is a right-click hero and needs to be able to stick to his targets to deal damage. Since he doesn’t have any good control spells, usually it is up to his team to provide him with the space to auto attack freely in fights.
  2. Requiem of Souls has huge damage potential but at the same time is very hard to land. If your teammates are able to hold your opponents in one place until you finish channeling your ult, you could win team fights very easily. Requiem is a good spell for team fight wombo-combos.

Defensive Heroes: Treant, Dazzle, Abaddon, Omni Knight, Shadow Demon

Treant Protector
Dazzle Portrait
Abbadon
Omniknight portrait
Shadow Demon Portrait
Heroes that can keep SF alive through fights make him much more difficult to counter.

Since you are a potent but squishy damage dealer, the enemy team will usually try to focus you in engagements. Heroes that can help you survive enemy initiation and keep you alive throughout the fight can greatly increase your impact. They compensate for your major weakness – the low survivability.

Clockwerk

Clock deserves a special mention because by denying his Cogs on lvl1 (before the lane creeps spawn), SF can attain a lot of souls before the start of the laning stage. This will give a laning advantage right from the start. Moreover, SF and Clock have decent synergy later on as well – the control Clock provides helps SF deal damage on his targets. Moreover, Clock is a strong SF counter and by taking him you ensure the enemy team isn’t going to use it against you. 

Draft SF with Clock to get souls before the laning stage starts.

Counters

Weak Against:

Disables through BKB: Beastmaster, Bane Elemental, Bat Rider, Doom

Beastmaster
Bane Portrait
Batrider
Doom
You could have a hard time fighting if there are disables that go through magic immunity on the enemy team.

Because of his squishiness, Shadow Fiend relies heavily on his BKB to keep himself alive in fights. Heroes that can disable through magic immunity can cause him serious problems – not only would he be unable to deal damage but he will be a very easy target to focus down and kill.

Pressure & ganks: TA, Tiny, Lina, Clockwerk, Night Stalker, Beast Master, Nyx Assassin, Bounty Hunter

Templar Assassin
Tiny
Lina
Clockwerk
Beastmaster
Night Stalker
Nyx
Bounty Hunter
It is hard playing SF against strong gankers in the early and mid-game stages before you have your core defensive items.

Especially before you get your BKB, you are very vulnerable to strong hero killers. Playing around this problem is possible – you can stick close to your team and not allow such heroes to catch you out by yourself or farm in places where enemies don’t have vision (in the jungle). Yet, this is difficult since you want to flash farm around the map, particularly before you get your core items (BKB).

Instant Disables: Shadow Shaman, Lion, Rubick, Scythe of Vyse

Shadow Shaman
Lion
Rubick
Scythe of Vyse
Playing against instant disables could make it harder for you to survive the enemy initiation as it will not allow you to use your defensive items in time.

Because of your squishiness most of the game you try to avoid being initiated by the enemy team. If your opponents have instant disables, however, you might not even get a chance to use your defensive items; staying alive might become harder even when the game is in its later stages and you have your survivability items.

Strong Against:

Melee heroes with low armor: Undying, Alchemist, Naix, Wraith King, Lycan, Centaur

Undying Portrait
Alchemist hero icon
Lifestealer Portrait
Wraith King
Picking SF could make fights very hard for slow melee heroes with low armor.

Even though SF is a ranged carry, thanks to his huge damage potential he plays as a man-fight hero. Heroes which need to be in melee range to have an impact have trouble reaching SF: he does very high attack damage but in addition, his ultimate does more damage the closer the enemy heroes are to SF. This problem is most notable for slow heroes with low armor (countered directly by his armor reduction aura and high attack damage), usually melee STR carries.

Summons: Brood, Meepo, Lycan, PL

Broodmother Portrait
Meepo
Lycan
Phantom Lancer
The reason is simple - he has lots of AoE damage.

Picking SF against mass units is a great idea – he can clear them very easily with his Razes or even kill them in a fight when he uses his ultimate.

Squishy Heroes: CM, Ancient Apparition, Io, Sniper, Drow Ranger, Weaver

Crystal Maiden
Ancient Apparition Portrait
IO Wisp
Sniper
Drow Ranger
Weaver
Thanks to his very high nuke damage and high attack damage squishy targets have a hard time staying alive against SF.

Thanks to his very high DPS output SF is able to kill off squishy heroes very fast. Since he has no lockdown, however, to allow him to do this you need to combine him with heroes with disables to set up for him. Alternatively, you can get a Eul`s and simply one-shot these heroes with your ultimate.

Skills

Shadow Fiend Raze
Shadow Fiend Necromastery
Shadow Fiend Presence of the Dark Lord
Shadow Fiend Requiem of Souls

Shadow Fiend razes the ground directly in front of him, dealing damage to enemy units in the area. Adds a stacking damage amplifier on the target that causes the enemy to take bonus Shadow Raze damage per stack.

STATS

Cast Animation: 0.55+0

Distance: 200/450/700

Radius: 250

Base Damage: 90/160/230/300

Damage Increase per Stack: 50/60/70/80

Stack Duration: 8

CD: 10

Mana: 90

Shadowraze
  • The more Shadow Razes you land consecutively, the more total damage you deal
  • The duration of the Shadow Raze debuff is pretty long, so you can try to “refresh” it every once in a while on your lane opponent in order to harass him more efficiently

Aiming:

Even though it is a single ability, Shadowraze gives you three separate nukes with individual cooldowns. Each nuke hits a predetermined range in front of the hero (SF casts Razes in the direction he is facing). Because of the 250 radius, the short Raze hits at 0-450 range, the medium at 200-700 and the long one at 450-950.

You need to position your hero when you want to land a Raze. The easiest thing to do is to click attack at your target – this way the hero will automatically face it. Generally, you want to start off with the medium, attack for as long as possible and finish the kill with the long-range one – it can reach further than your attacks.

The attack-command aiming tactic has one flow – if there is some obstacle between your hero and the target the hero will try to walk around the obstacle to reach the opponent. This means that you will not be facing the opponent until you can actually attack him. So, in such situations (e.g. you are standing on a low ground, your target is on a high ground) you need to click the ground in front of your own hero in the direction of your target so that the SF is facing the right direction instead of trying to walk around (e.g. towards a ramp). If you are very close to the ramp, clicking in front of SF on the high ground will cause the hero to automatically walk around to go the ramp. To solve this you can step back and then make one step forward to face in the right direction. 

Flash Farming:

Because of the three separate cooldowns and the low mana cost Raze is one of the best nukes in the game to flash-farm. The problem is your mana pool – try to switch to INT, drink Clarities, etc. to manage your mana and sustain your farming with Razes. Stacking camps will maximize your farming speed.

Shadow Fiend steals the soul from units he kills, gaining bonus damage. If the killed unit is a hero, he gains 12 souls. On death, he releases half of them from bondage.

STATS

Max Souls: 12/20/28/36

Soul Gain per Hero Kill: 12

Soul Gain per Non-Hero Kill: 1

Attack Damage Bonus per Soul: 2

Soul Loss on Death: 50%

Aghanim's Scepter

Increases max souls.

Necromastery

Necromastery is a quite straight-forward passive – for every last hit you gain 2 extra damage and there is a maximum cap on the damage gain (“souls collected”).  Bear in mind that denies give souls as well. This makes it more important to deny creeps in the lane than for most heroes. Dying will make you lose half of the souls collected.

Laning:

Necromastery and Shadowraze are the two spells thanks to which you are a dominant laner. Since you have a low base damage, you rely heavily on the Necromastery bonus damage to be able to win the last hit war against your opponent. You don’t start with souls, however – you need to gain them through last hits. Because of this, it might be a good idea to use as many Razes as possible for last hits until you get sufficient Necromastery damage and are able to comfortable out-last-hit your opponent.

In the early laning stage, your prime focus is to get last hits, collect souls and to increase your attack damage. In order to get more souls early on, you can kill jungle creeps near your lane. For example, if you are laning mid and you are level 3 you can go to the jungle camp, stack it once and then farm it up with Razes to get a lot of souls. When you get sufficient damage and it becomes easier to last hit and deny every creep you can put more effort into harassing and zoning out with your Necromastery attacks or Shadow Razes.

Fighting:

Necromastery is a direct influence on your efficiency in fights. Not only does it increase your attack damage, but the number of souls collected is related to the damage your ultimate deals. Because of this, it is quite important to make sure you have the maximum possible number of souls before you enter a fight. Your first job after dying is to replenish the souls.

Shadow Fiend's presence reduces the armor of nearby enemies.

STATS

Radius: 900

Armor Reduction: 3/4/5/6

Presence of the Dark Lord

Besides the name, there is nothing complicated in SF’s aura. Since the radius is larger than the hero’s attack range, you usually don’t have to think about this skill in fights.

Your aura is the skill that creates synergy between you and other physical damage dealers or other armor reduction heroes. If you manage to bring down the armor of the enemy team close to zero (with other minus armor items and skills) the impact of your Necromastery attacks will increase by a lot.

Shadow Fiend gathers his captured souls to release them as lines of demonic energy. Units near Shadow Fiend when the souls are released can be damaged by several lines of energy. Any unit damaged by Requiem of Souls will have its movement speed and attack damage reduced. Lines of energy are created for every 2 souls captured through Necromastery. Requiem of Souls is automatically cast whenever Shadow Fiend dies, regardless of its cooldown.

STATS

Cast Animation: 1.67+0.77

Lines Distance: 1000

Lines Starting Width: 125

Lines End Width: 425

Souls Required per Line: 2

Damage per Line on Release: 80/120/160

Attack Damage Reduction: 50%

Debuff Duration: 5

CD: 120/110/100

Mana: 150/175/200

Aghanim's Scepter

Increases Necromastery Max Souls and causes Requiem of Souls to return back to Shadow Fiend. The wave back to Shadow Fiend deals less damage, but heals Shadow Fiend for all the damage it dealt.

Requiem of Souls

The most important mechanical aspect of the spell you need to bear in mind is that it ISN’T a channeling spell. It simply has a very long cast animation (cast point) – similarly to NP’s Teleportation. This means that you can stop the spell with the Stop command without getting it in cooldown. If the animation gets interrupted by a stun you will also not get it on CD – a useful trait that allows you to retry failed Requiem attempts.

Nuke Damage: Mechanically, the damage that Requiem could deal depends on three things – the level of the spell, the number of souls you have and the distance between you and your opponent. The shorter the distance, the more damage you will deal as more souls will hit the target. On melee range you deal maximum damage (in the best case you are on top of the target because of Shadow Blade or Euls).

Shadow Blade setup: Another way to ensure you can land high-damage Requiems is by buying a Shadow Blade or Eul`s. With SB you will stay invisible for the majority of the 1.67-second cast point,  without giving your opponents time to react. The no-collision mechanic of Shadow Blade allows you to easily walk to your desired target and get on top of it for maximum damage.

Eul`s setup: With Eul`s, you can position yourself right below the disabled target and start channeling your ultimate, gives almost no time to react and stop the channeling. You have to time your Requiem very well, though – the disable of Eul’s is longer than the channeling time and you can miss-time it and deal 0 damage

Use the fog: a good way to cast high damage Requiems is by using the fog of war. If an enemy is walking towards a high ground ramp and has no vision on top of it where you are standing, you can start channeling the Requiem so that it hits exactly when the opponent gets on top of the ramp. The lack of vision will prevent him/her from reacting and will allow you to land a very efficient ult.

Utility: Although the AoE nuke damage is the main function of the spell, it has other utility. It slows the MS of all heroes it hits by 25% and it reduces their base and stat damage (white damage) by 50% for 5 seconds. Those two effects make it a good idea to start a fight with a Requiem – even if you don’t manage to take advantage of the full nuking potential, the slow and minus damage will not allow your opponents to fight back efficiently and could give your team a timing window to win the fight.

Use the death requiem: in desperate situations when you are about to die, it might be a good idea to try to cast a Requiem just before your death. This way your attackers will tank two consecutive Requiems (one dealing half damage) which might be enough to get you a counter-kill on squishier targets, especially if they are killing you with melee attacks or spells.

Skill Builds

Shadow Fiend is relatively inflexible in terms of skill builds. Shadowraze and Necromastery are the early game tools you use to dominate the laning stage, so you need levels in the two as fast as possible. Presence, on the other hand, is more efficient in the mid and late game, when you start dealing heavy physical damage. 

A decision you need to make is when to take your first point in Requiem. In terms of damage potential, the skill becomes useful when you get the maximum number of souls, for which Necromastery needs to be max level first. If you take Requiem earlier you are unlikely to use it, while if you skip it the earlier level in Necro could help you out in the lane – you will farm faster since you have higher damage.

Standard Skill Build
Shadow Fiend Necromastery
1
Shadow Fiend Raze
2
Shadow Fiend Raze
3
Shadow Fiend Necromastery
4
Shadow Fiend Raze
5
Shadow Fiend Necromastery
6
Shadow Fiend Raze
7
Shadow Fiend Necromastery
8
Shadow Fiend Requiem of Souls
9
Talent Icon
10
Shadow Fiend Presence of the Dark Lord
11
Shadow Fiend Requiem of Souls
12
Shadow Fiend Presence of the Dark Lord
13
Shadow Fiend Presence of the Dark Lord
14
Talent Icon
15
Shadow Fiend Presence of the Dark Lord
16
Shadow Fiend Requiem of Souls
18
Talent Icon
20
Talent Icon
25
Pros: maximum nuking, harassing and flash-farming potential from Razes; high attack damage during the laning phase;
Cons: delayed ultimate;

The skill you need at lvl1 is Necromastery because you want to start getting bonus damage on your attacks right away. You might want to take a point in Raze at lvl1 in the case of a starting rune fight or opportunity to kill, but most of the games you want to start with Necromastery.

Afterward, you want to max Shadowraze – it will help you last hit (and take souls), harass in the lane and it will allow you to start flash-farming as soon as possible. Necromastery is maxed second. Requiem is taken after Necromastery is maxed. Presence of the Dark Lord is maxed last because it is your most late-game oriented spell.

Talents

40% CD reduction

25

-5 Presence Aura

+150 Shadow Raze damage
20

+2 Damage per Necromastery

+30 Movement Speed

15
Presence Aura affects building
+20 Attack Speed
10

+8 Spell Amplification

lvl10: The choice is pretty simple – Spell Amp. If you’re going for a magical damage build, AS – for physical damage.

Lvl15: You always want the MS talent, doesn’t matter if you go for a magical or a physical build. The only case when you want the Aura talent is if you are dominating the game, you want to finish it early and you have allies with pushing potential (Lycan, Rhasta, Lone Druid, etc.).

Lvl20: Another choice that depends on your build. Shadowraze damage for magical and +2 Damage per Necromastery for physical.

Lvl25: The whopping 40% CD reduction is almost always the best choice. It not only decreasing your spell CDs but the CDs of your items too (BKB for example). Take the armor reduction only if you have almost exclusively items without active abilities and if you have gone for the physical damage build.

Item Builds

For SF there are three types of items that work very well – items solving his survivability issues, items increasing his damage potential and items increasing his mobility. The last type increases both his damage output potential through better positioning (especially important for the ultimate) and his survivability by giving him an escape mechanism.

Physical Damage Build

An aggressive SF build revolving around pickoffs early on and maximizing the DPS output of the hero later on. Wraith Bands, Treads and Drum's are your early game cheap stat items, which will allow you to be more aggressive in fights. You want to get SB - it increases your right-click damage and allows you to find pick offs and position yourself for good Requiems. Afterward, you need some survivability item (usually BKB) and you can go for your late game DPS choices (Butterfly, Assault, Satanic, Daedalus, MKB). 

Starting items
Wraith Band
Faerie Fire
Pulled Tango
Pulled Tango
Early Game
Wraith Band
Magic wand
Power Treads Agility
Drums
Mid Game
Shadow_Blade_icon
Black King Bar
Butterfly
Late Game
Daedalus
Satanic
Wraith Band
Faerie Fire
Pulled Tango
Pulled Tango
Wraith Band
Magic wand

Magic Wand: A cheap source of stats and burst mana and HP recovery, it is a good purchase against spammers. SF benefits from the mana burst since more mana allows him to cast more Razes, and the heal makes him more survivable.

Power Treads Agility

Power Treads are the regular boots of choice for SF for three reasons:

  1. The bonus stats (STR) makes you tankier in the early stages of the game and harder to nuke down.
  2. Tread switching (putting them on INT when you cast Razes) can help you manage your mana more efficiently
  3. The AS increases his right-click DPS the most.

Drums

Drums of Endurance: Drums are a very well rounded item which gives you the raw HP and movement speed you need to be more survivable. It's possible to skip it if you want to get Shadow Blade faster.

Shadow_Blade_icon

Shadow Blade: SB is an alternative to Blink Dagger; you can use the invisibility to position yourself for a perfect Requiem of Souls (the no-collision allows you to use the spell on top of your target for max damage). It is a more aggressive choice since it increases your DPS, however, it is less reliable for initiation (countered by true sight). Moreover, you need more time to get in position for Requiem because you need to walk the distance. Shadow Blade, like Blink, helps you farm faster – therefore it is not a pure initiation or survivability item but also a somewhat greedy pickup when taken before the BKB. 

Black King Bar

Black King Bar: BKB is a must have item for almost all Shadow Fiend games. It partially solves your survivability issues – makes it harder to focus you with spells, disable you or nuke you down. In addition, it gives you some STR for bonus HP which is always useful to have. 

BKB also makes it easier for you to fight – you can attack freely without being disabled and you can channel your ultimate without getting interrupted by a spell (unless the disable goes through immunity, ofc).

Consider at what stage to get your BKB. Usually, you want to buy it as your first big item because it allows you to fight more efficiently. If you are snowballing, however, you may go for a more greedy build. Get items that help you farm faster (e.g. Yasha) or items that allow you to fight more aggressively (e.g. your mobility item, either Blink Dagger or Shadow Blade).


Butterfly

Butterfly: If you want a mix of survivability and DPS potential then Butterfly is a very good item on SF, as on most AGI carries. The AS increase boosts your DPS and the bonus AGI works very well with Manta – it increases the DPS of the illusions.

Daedalus

Daedalus: Daedalus will give you the highest increase in DPS (very high critical strike damage thanks to your high damage and minus armor). If you have your survivability covered, the crits will make it very hard for enemy carries to man-fight you.

Satanic

Satanic: Because of your high damage Satanic will allow you to recover your lost HP very fast. In addition, it increases your raw HP and survivability.

Magical Damage Build

The main focus of this build is to give yourself a lot of utility and initiation potential – you can start ganks or team-fights much more easily, which allows you to be active around the map from early on. Treads, Wand and Clarities can solve your mana problems in the early game, before Eul `s. You can use the Blink into Eul into Requiem combo to take solo kills. Later on, when you get your BKB, you can start fights in that manner. The high mana sustain and MS from Eul’s also allow you to flash-farm very efficiently with Razes. In the late game, you go for whichever item fit the game best, but the “core” pickups you want are Octarine and Hex since they synergize amazingly well with your other items and CD reduction talent. You don’t need to rush them – to use them with maximum efficiency, you need your lvl25 talent, which means you usually can build another late game item before them (Aghanims, Shiva’s, Linken’s, etc.).

Starting items
Wraith Band
Faerie Fire
Pulled Tango
Pulled Tango
Early Game
Wraith Band
Magic wand
Boots of Speed
Euls
Mid Game
Blink_Dagger_icon
Black King Bar
Boots_of_Travel_1_icon
Late Game
Aghanim's_Scepter_icon
Octarine_Core_icon
Scythe of Vyse
Wraith Band
Faerie Fire
Pulled Tango
Pulled Tango
Wraith Band
Magic wand

Magic Wand: A cheap source of stats and burst mana and HP recovery, it is a good purchase against spammers. SF benefits from the mana burst since more mana allows him to cast more Razes, and the heal makes him more survivable.

Boots of Speed
Euls

Eul’s Scepter: The mana sustain is useful for flash-farming with Razes, and the MS is useful for disengaging, chasing or simply moving around the map faster. The main utility from the item comes from the Cyclone, though. You can use it both offensively or defensively: The skill could allow you to survive when enemies are focusing you (either by making yourself immune or by running away after disabling the most dangerous enemy). Moreover, you can use Cyclone to setup for max-damage Requiem of Souls – the disable (2.5s) is longer than your Requiem cast animation (1.67s), which means that when timed right you can hit your target with the spell just as it lands from Cyclone. This is very useful for ganking or for starting team fights favorably. 

Blink_Dagger_icon

Blink Dagger: Blink Dagger allows you to position yourself more favorably to cast high-damage Requiem of Souls and hit Razes more easily. You can also farm faster by blinking between jungle camps and lanes. With the help of Dagger, you can tackle solo pick-offs – Blink into a few Razes can usually get squishy heroes killed before they can react. Lastly, the item helps fast-reaction players a way to survive ganks – you can blink out before enemies can initiate on you. You can dodge certain projectile disables as well.

Black King Bar

Black King Bar: BKB is a must have item for almost all Shadow Fiend games. It partially solves your survivability issues – makes it harder to focus you with spells, disable you or nuke you down. In addition, it gives you some STR for bonus HP which is always useful to have. 

BKB also makes it easier for you to fight – you can attack freely without being disabled and you can channel your ultimate without getting interrupted by a spell (unless the disable goes through immunity, ofc).

Consider at what stage to get your BKB. Usually, you want to buy it as your first big item because it allows you to fight more efficiently. If you are snowballing, however, you may go for a more greedy build. Get items that help you farm faster (e.g. Yasha) or items that allow you to fight more aggressively (e.g. your mobility item, either Blink Dagger or Shadow Blade).


Boots_of_Travel_1_icon

BoTs: Travels are the best late game boots for SF. Thanks to your CD reduction talent, you can split push extremely efficiently.

Aghanim's_Scepter_icon

Aghanim’s Scepter: Agh’s makes your ultimate much stronger, which is a good thing if you are going for a magical damage build. A cool trick you can do in the very late game when you need the item slot is to keep your Agh’s in your backpack instead of selling it – you will retain the additional souls.

Octarine_Core_icon

Octarine: One of the best late game items for the magical damage SF, very good synergy with your lvl25 CD reduction talent and provides a decent heal from your magical nukes.

Scythe of Vyse

Hex: Scythe is always good late game, but with the CD reduction talent you can cast it two or even three times in a single fight.

Other Items

Early/Mid Game
Hand of Midas
Yasha
Sange_and_Yasha_new
Linken's Sphere
Desolator Icon
Late Game
Manta_Style_icon
Monkey_King_Bar_icon
Assault_Cuirass_icon
Skadi
Shiva's_Guard_icon
Refresher orb
Hand of Midas

Hand of Midas: If your laning stage is going well you can increase your GPM even further. It is a very greedy choice, though, since it will leave you squishy and vulnerable for longer.

Yasha

Yasha: Providing a solid DPS increase for any AGI hero, Yasha helps you farm faster. It gives some survivability in the form of MS which is useful for SF. Apart from the survivability aspect, the higher MS also makes it harder for enemies to kite you in fights. Yasha is a smart item to get, especially if you are going for Manta or S&Y.

Sange_and_Yasha_new

Sange and Yasha: S&Y simply gives very good stats that you can use if you intend to focus on fighting in the mid game. You are a very fast farmer and in the late game, you are likely to have to substitute the S&Y, which means that the ability to disassemble it and built Manta and Silver Edge is very valuable.

Linken's Sphere

Linken’s Sphere: Linken’s can be a substitute for your BKB versus powerful direct disables that go through BKB (Beastmaster’s Roar, Fiend’s Grip, Lasso). Even though it doesn’t offer much in terms of damage, the stats give you survivability and the mana Regen allows you to flash farm using Razes more often.

Desolator Icon

Desolator: The minus armor stacks with your aura, which makes Desolator very cost efficient on SF. It is the go-to DPS choice especially if there are other armor reduction heroes in your team, but bear in mind that getting it wouldn’t allow you to get life steal, which is often much more important.

Manta_Style_icon

Manta Style: The MS and active ability help in staying alive in fights, the stats are useful and the DPS potential of the two illusions is not bad, especially with Diffusal and other AGI items. You can use the illusions to split push. Manta is most useful when you want to counter silences and some other negative buffs.

Monkey_King_Bar_icon

MKB: If you need to counter any source of evasion/miss chance MKB is a good substitute of Daedalus or Desolator in terms of raw DPS potential.

Assault_Cuirass_icon

Assault Cuirass: If you want to exploit armor reduction and there isn’t another carry on the team that can get AC, you can go for it. It increases your survivability, especially if you have stat items that increase your HP pool, but more importantly, it magnifies your DPS potential substantially. The minus armor aura stacks with your own and the AS increase works very well with the bonus damage from Necromastery.

Skadi

Eye of Skadi: Skadi gives you good stats for survivability and a very useful slow-on-attack which allows you to stick to your targets. The freezing attacks stack with lifesteal, which makes Skadi and Satanic a very powerful item combo on SF.

Shiva's_Guard_icon

Shiva`s Guard: Shiva`s is very situational, depending on the heroes you are playing against. Get it if they have strong physical damage or a lot of summoned units or illusions that you want to slow down and kill.

Refresher orb

Refresher: Not the best item for SF since you have CD reduction Talents and low cooldowns on your spells anyway, but it can be good in fights combined with Agh's.

Early Game

Shadow Fiend 350px

SF usually goes in the mid lane as a solo in order to get XP/farm and shut down his opponent using his lane dominance. Even if he doesn't dominate the lane, he is a flash farmer and can use his Razes to push out the creep wave and stack and farm the nearby jungle camps. Raze also has a very good kill potential. This means that with rotations from your supports it is possible to get kills on your lane opponent.

Farming:

Winning the last hit war in the lane is very easy for SF if he manages to get to a point where he has very high attack damage because of Necromastery. The tricky part is getting to that point – initially, he has very low base damage.

When you get sufficient attack damage versus most heroes you can easily out-last hit and out-deny them. Using Shadowraze to get last hits is always an option, however, if you want to control the creep equilibrium it might be a good idea to last hit primarily with your attacks.

Later in the laning stage, you usually want to start pushing out the wave with Razes. This will give you free time: usually, you use it by farming the closest camps to your lane. You can use Clarities to sustain your mana and increase your farming speed.

Harassing:

Passive Harass: High damage attacks because of Necromastery.
Active Harass: High damage nukes – Raze. The debuff lingers for 8 seconds. Sometimes it’s a good idea to refresh it with a different Raze (the one you used will still be on CD), especially if you want to attempt a kill afterwards. I.e. you can go; long range to harass; medium after 5-6 sec to refresh duration; long range again when it’s off CD to attempt a kill (or simply to harass again).

If your opponent is harassing you, you need to fight back. Because of your high damage, you have the tools to get the better end of the exchange – use both Razes and attacks. The smartest thing to do is to fight back with the medium range Raze and attacks. This way your other Razes will be free – in case the enemy commits and comes closer, you can use the short one. If the enemy tries to run away you can use the long one. This way you will not let your opponent drive you away from the creep wave and you will always be in position to successfully contest last hits. Additionally, if you keep him/her on below-max HP it will be easier for your supports to rotate and gank successfully.

In theory zoning out is possible by standing between the creep waves and your opponent, however, it is quite risky – if you get initiated in this position by a rotating support you will most probably die. Since you are a carry and for you it is more important to secure your own development rather than stop the one of your opponents, it is generally better to stay at a safe position and concentrate on denying and last hitting. If you manage to deny most of your creeps your opponent will already be getting very little out of the lane.

To put it briefly, with SF you shouldn’t try to pressure your opponent too much – your goal in the lane is to take all last hits and denies, so you should harass only when the positioning of your opponent allows it. If your opponent pressures you, however, you need to stand your ground and fight back.

Kill Potential:

Even though you have a very high kill potential with SF it is quite hard to capitalize on it. The reason for this is that you don’t have control – you have very high damage, but when your opponent decides to walk away you don’t have a way to stop him/her. Hence it is very hard to take solo kills if your opponents don’t make mistakes. Consequently, it is generally better to play more defensively. You should concentrate on denying, last hitting and harassing without overcommitting. If you take too many risks they might not pay out while at the same time you might get in trouble.

Nonetheless, enemies quite often underestimate the nuke potential you have once you get a higher level of Razes (usually at level 5). Against ranged heroes, with two long-ranged Razes, you can deal a lot of damage – this nuke burst might catch squishier targets off-guard and score you a kill. If you face melee opponents and they walk towards you, you can do the full triple Raze combo starting with the longest one. In that sense even though you are not proactively searching for kills it is important to capitalize on the mistakes of your opponents.

With the help of your allies (mainly through disables) taking advantage of your damage is much easier because you can land your Razes much more easily.  If a support is ganking your lane or attempting a kill, it is important to try to follow up on the disable. Land as many Shadowrazes as possible and finish the kill with attacks. It might be a good idea to save the long-range Shadowraze in case the target walks out of your attack range.

Nevertheless, with SF you shouldn’t play proactively in the early laning stage – concentrate on winning the lane through last hits and follow up on the actions of your allies.

Rotations and Timings:

In terms of levels your timings in the laning stage are set by Shadowraze and Necromastery – the more points you get in each skill the better you are at last hitting, flash farming, harassing and even killing.

Rotating to help out other lanes is usually not something you would want to do early on. Putting yourself at risk before you have your core items might make the game harder for you. Instead, you need to stay in the lane and control it for as long as possible.

If the lane becomes dangerous (strong gankers on the enemy team are missing) you could rotate to your own jungle, where you can flash farm using Razes.

If the enemy mid laner is rotating and is missing in your lane, you have a good push potential – use Razes to clear out the waves and start hitting the tower. However, this is a risky move if you don’t see where the enemy supports are. If you do, you should pressure the tower. If you don’t, better push the wave with Razes and go to the jungle to farm up there.

If you are rushing a Shadow Blade you could rotate to another lane with it because it is important for timing – it will allow you to get in position for a kill with the help of your allies. Your opponents are unlikely to have Sentry Wards to counter your rotation since they don’t know that your SB is ready. The same applies for Eul`s: if you have Eul`s you can try to rotate and set up for a solo kill with Requiem.

Pushing:

You don’t do anything too unique in terms of pushing, however, your potential to instantly clear the creep wave with Razes and your high attack damage which you can use on the tower actually make you a strong early game pusher.

If your opponent has rotated out of the lane in the laning stage you can easily pressure the tower by nuking the creeps as fast as possible and hitting the tower. If you are afraid of ganks and don’t want to overextend you can simply nuke enemy creep wave and rotate into the jungle - your own creeps will still do damage to the undefended tower.

If you are pushing with your allies and your opponents are not defending you can intercept the incoming enemy creep wave and nuke it down with 2/3 razes. This way your own creeps will continue attacking the tower uninterrupted, speeding up the push a bit.

Solo Mid SF

You are a strong laner, however, you shouldn’t get carried away and try to shut down your opponent too much (with harassing, zoning out and being aggressive). You are first and foremost a carry and you should worry mostly about your own farm, levels and safety. Dominating the lane comes as a consequence – getting as many last hits as possible will increase your damage and allow you to deny more and harass more efficiently.

Get all possible last hits;
Out-push the wave and farm the jungle;
Harass without over-committing, don’t take unnecessary risks;
Surviving:

You are a squishy hero so you should position yourself more defensively. Try to control the creep equilibrium so that it is closer to your tower and you can stay on your high ground, having vision of potential gank rotations. If the creep equilibrium is not in your favor and especially if heroes are missing on the map you should nuke down the enemy creep wave with Razes. This way you will take the last hits faster and spend less time in a vulnerable position. The enemy tower will also kill off your own creep wave and reset the creep equilibrium. If you cannot see where enemies supports are, even going in to nuke down the creep wave might be risky - they might be ganking you in this very moment. It is safer to go to the woods and farm up creeps there; with the help of Razes you can quickly clear out some jungle camps.

Lane Control:

The tricky part of SF is to get to your higher damage, i.e., to get the initial last hits. To do so, you need to make sure that the creep equilibrium favors you – try to do a good block at the start. The closer the creeps are to your tower, the harder it will be for the enemy to deny them.

The creep block is quite important for SF – if your supports don’t block for you, you shouldn’t go for the bounty rune but you should prioritize blocking your creeps instead.

After you get some damage from Necromastery you should be able to farm efficiently only with your attacks. Shadowraze, though, opens some opportunities for you.

Nuking the wave and farming jungle:

When you nuke the enemy creep wave down very fast you have some free time on your hands. The safe way to use it is to go to the closest camp and either farm it. This is easier to do on the Radiant side since the creep camps are very close to you, but it is possible on Dire as well.

In order to maximize your farm, you would want to do this relatively often. When you have three levels in Raze you should push out the waves and use Clarities or Bottle to restore your mana and rotate between the lane and the nearby neutral camps: wave-camp-wave-camp. This should give you ~180 additional GPM, helping you out-farm the enemy core. If your supports have prepared some stacks for you, this effect could amplify greatly.

Once you start flash-farming really fast, you will likely be able to clear two creep camps in-between waves. This will give you the opportunity to rotate between the mid lane camps and offlane camps – wave, mid camps, wave, off camps. To be fast enough in these rotations you also need some MS items, usually upgraded Boots + Drums or Eul.

Contesting the rune after clearing the wave with SF is only a good idea if you know where the enemy supports are. You can easily die if they catch you on the rune spot.

Video Example:

CTOMAHEH1 starts with Wraith Band (upgrade to Aquila) and Branches (upgrade to Wand) for maximum starting damage. He gets Necromastery lvl and with the help of his support (Bara is not even trying to kill Invoker, just secures SF damage) SF gets some early free souls.

There is one key point in the laning stage - at 2:20 when SF sees that Tuskar is waiting for him in the mid lane, he pushes the wave as quick as possible (using 2 Razes) and goes to the jungle. There he clears one medium camp and stacks the big camp for later.

By doing this, even if he misses some lane creeps, he is safe from the enemy roamer. After lvl5, Aquilla and some Clarities, SF pushes the wave all the time and farms the jungle.

After getting Eul`s he rotates top to push the tower and even manages to kill Huskar twice, starting his mid game very favorably.

Safe Lane SF

In a defensive lane Nevermore functions quite like a traditional carry. Yet, because of his laning strength, he is likely to be able to handle the 1v1 situation against the enemy offlaner once he gets some levels and last-hits to increase his damage. This gives freedom to the supports to rotate out of the lane and help out the rest of the team.

Get as much farm as possible.
Harass and zone-out the offlaner, attempt kills.
Creep Equilibrium:

Unlike in a 1v1 situation, in a 2v1 you are likely to have uncontested access to creeps in the first few minutes of the game. This will allow you to easily get souls for your Necromastery despite your low base damage. What this means is that you can afford not to use Shadowraze to help in last hits, which in turn will let you preserve the creep equilibrium more easily and save your mana for harass or kill attempts. With control from your support you can easily threaten a kill by hitting all three Razes.

Maximize Farm:

In the later laning stage with a few levels into Shadowraze, you have the option to do something similar as in the middle lane. You can use Razes to kill the creep wave as fast as possible and go to the closest camps (the large and small pull camps) either to farm with more Razes or to stack so that you can farm it later.

When you are pushing the wave you are giving access to farm to the enemy offlaner, so this tactic is a tradeoff. If your supports are in the lane, it is better to control the equilibrium and let them stack the camp. If you are alone and the offlaner can reach the wave anyway, you should attempt to push out the wave and farm the jungle. You will give farm to the offlaner (you will not be there to try to deny creeps), but you will get more than him from the stacking and farming.

You can use this tactic also as a defensive mechanism. If the lane is pushed out and you don’t feel safe, you can instead farm in the jungle - you are harder to gank when you are out of vision.

Mid & Late Game

shadow fiend immortal

Shadow Fiend is a fairly flexible carry. This means that he is tactically versatile and there isn’t “one right way” to play him in the mid and late stages. You have the choice to apply pressure by taking objectives, forcing fights and even ganking OR to play more passively, flash-farm and take it to the later stages. Which playstyle you are going to choose depends on the game you are playing (which team is in what position, etc.), on the strategy of your team and the capabilities of your lineup.


Because of the versatility of the hero, the priorities in the later stages of the game are not very clear-cut. Nevertheless, as SF scales very well into the late game and flash farms very fast an appropriate thing to prioritize is your own development.

Flash farm, get ahead in net worth.
Get objectives and force fights if you know you can win them.
Gank if you have the right items.
Split-push if you cannot fight directly.
Timings:

In terms of levels, your first timings are connected to your Shadowraze. Once you get it at lvl3 or 4, and ideally level 5 you can start flash farming the jungle. The other important checkpoints are synched with your ultimate –a higher level of it (especially when you have Eul`s) increases your team fight and solo kill potential greatly.

Eul`s/Shadow Blade and Blink Dagger open up opportunities for you to be active. The Blink goes hand in hand with the BKB and increases your team fight potential (especially ultimate wombo-combos), while Shadow Blade and Eul’s are very useful for pickoffs. 

Try to make use of these items as soon as you get them – rotate to other lanes and try to get pickoffs with the help of the positioning of the items (useful for Requiem or Razes). The idea is that your enemies will not be aware of your newly picked item and might very well catch them by surprise.  Don’t overstay your welcome – forcing full-on 5 on 5 engagements is a very bad idea without BKB. You are a slow hero and it is hard for you to disengage.

Comeback Potential:

If the laning stage went very well for you and you got a really fast core item you can pressure your opponents. In what way depends on your team lineup, strategy and even your item choices. With a fast SB/Eul`s it would be smartest to try to gank, while with a BKB you can force team fights and take objectives (towers, Roshan). SF is a snowball carry that can fight efficiently even without luxury items and because of this once you get an advantage the best option is to pressure your opponents. When you take map control it would be much harder for the enemy team to stall the game and reach the later stages.

Since SF is a snowball hero, however, he will not be too efficient in fights if he is behind in items – he needs items to be survivable enough.

If the laning stage went poorly you need to catch up. To do this you would want to flash farm as much as possible in the jungle while your team is hopefully successful in avoiding big fights. Keep in mind that you are a fast catch-up hero – even after a bad laning stage, you can catch up quickly. You can ask your supports to stack camps or you can do this yourself to get back into the game.  Once you get your core items (BKB or SB/Blink/Eul`s) it is usually best to attempt a Smoke Gank – you need to regain map control so that you can start flash farming even more efficiently.

Sometimes it is not a good idea to take fights, however, even when you get these items. In that case, continue flash farming and split-pushing whenever possible until you are certain you have the required items to take a fight.

Pushing:
  • Split-Pushing

You can split push quite fast thanks to your Razes and high attack damage, yet this activity is quite risky because of your vulnerability to ganks. Therefore it is smart to do it only if you have some escape mechanism (Blink Dagger, Shadow Blade). You should push out the wave and damage the tower and when a dangerous enemy hero goes missing on the map you should back off immediately using the Blink or SB. The safest way to push out the wave is to send your Manta Illusions forward.

  • 5-man Pushing

There are two ways to push as five – if there is a farmed tanky hero in your team you should leave that hero in the front lines and stay at a safe distance. When the enemy team initiates on your ally you will be able to counter initiate with a very devastating Requiem, especially if you’re equipped with a Blink BKB.

If there is no farmed tank in your team you should be the one staying in front of your allies and hitting the tower. Make sure that you have a plan for how you are going to survive the initiation though. Your allies should be ready to counter-initiate and buy you time to click your BKB and Requiem and start hitting people. Consider doing this kind of push (especially base push) when you have an Aegis.

Vision:

You are not a support so you shouldn’t worry about warding and dewarding too much. If you suspect that the enemy team has a ward somewhere you need to tell your allies. Your only tool for giving vision is pushing waves quick and forcing rotations, which will give vision to you and your team.

Ganking:

You don’t have control, so in ganks, you are the person that follows up the initiation of an ally. Wait until the target is disabled and then use your spells (multiple Razes or a Requiem) into right clicks. Your raw damage potential should be enough to secure the kill until the disable ends.

In the late game your right clicks might do more damage than your Razes – if this is the case don’t lose time using your spell, just save the long-range Raze to finish the kill if the target exits your attack range.

You also need to think about the use of Requiem. If it is an important target to pick-off it is always worth it to commit your ult. If you are ganking a support or another very squishy target, however, you should be able to save the ultimate for a team fight.

Don’t overextend and chase opponents – if you get counter initiated you would easily die. Just attempt a kill and if it doesn’t work out simply back off and continue farming.

Team Fights:

In a team fight, you generally have a wide variety of choices. You are a glass cannon type of hero and your behavior should account for this: stay behind your fat allies and focus down the prime targets (you kill off even tanky heroes fast). Yet, your Ult gives you an opportunity to be part of the initiation; in addition, if you are the most farmed hero on your team you could become the front line hero for the lack of a better one. If you can catch many people around you with your ult, you should cast your Requiem at the start of the fight to not only damage opponents but also to reduce their damage and slow them.

  • With other good initiators:

The best option is to stay behind initially and then follow up the initiation of your allies. If you have a Blink and BKB you can do this with a very well positioned ult. Without a positioning item, it is better to move forward and land multiple Razes and save the ultimate in case enemy heroes start moving towards you.

After the initiation, you need to start attacking as much as possible. Even though you want to focus the prime target, of course, you want to do it if it the closest one to you. If not, then you should attack another target. It takes time to reposition yourself and you do very high damage, so every second you are not attacking is lost potential. You need to do as much damage as possible and if your opponents run away on low HP it is the task of your allies to pick them off or secure the kill with a disable.

Na'Vi demonstrate the devastating team fight combo potential of SF - Naga sets up his ultimate with Sleep into Hammer and the follow-up disable of Ravage secures the three kills.

  • Without other good initiators:

If you don’t have good initiators and you have good initiation items (Blink BKB or Eul`s) you can be the first one to start the fight with a Requiem. To do this, however, you need to be certain that you will survive – you are going to get focused after the initiation so your allies will have to create space and allow you to fight back. When you are jumping in it is generally a good plan to start with Eul`s combo and burst down one target. If you manage to nuke that hero before it has the chance to fight back, your team will have a 5v4 situation and a much easier fight.

  • Desperate situations:

If you are about to die it is important to try to get off a Requiem. The secondary one (the death effect) could swing the fight in favor of your team. You need to decide if this is the best option, though. If you have few souls and you have good damage items you might have a higher impact by simply hitting until you die.

Farming:

Because of your very high attack damage and minus armor farming is pretty straightforward for you: for groups of creeps use multiple Razes to bring them down, for tanky (or simply too few creeps) use your attacks. If you have the opportunity it is always nice to stack a camp and farm it with Razes.

Nevertheless, don’t lose too much time doing so. For the 10 second you would waste waiting for the stack timing you would otherwise finish off an additional camp – the best way to increase your GPM is to have yours supports stack camps and Ancients while you are simply moving from camp to camp and killing creeps.