Naga Siren Guide by Qojqva
Artist: Toasty
Author:
Qojqva & Co.
Date: 03/2018
Tags:
text
Naga Siren
Builds
Tactics
Analysis

Welcome

Welcome to Qojqva's Book of the Naga Siren, a hero guide part of the Book of Dota series!

Here you will find all the information you need to learn to play Naga on a high level – from drafting and builds to the optimal playstyle in different lanes and situations. We hope you’ll enjoy this guide and find it useful!

Qojqva Naga Siren
TL;DR:

Draft: You can pick Naga Siren early on because she is extremely versatile and you reveal very little to the enemy team. Ideally, you want to create team fight combos with her ult, but even this is not mandatory because if that’s not the case, you can simply use the ult defensively.

Early Game: Pick the lane in which you will be able to have the most impact early on and go there to apply pressure. Roam and try to find kills in the lanes where your allies have the highest kill potential. 

Mid & Late Game: 

Support: Walk with your teammates (especially your farming cores) and be in position to save them with ult. Scout with your illusions. Use your ultimate to dominate Roshan engagements and claim an advantage in this way.

Core: If you are playing as a core get your core items ASAP and start out-pushing all lanes and participating in fights. Your illusions can deal deceptively high AoE damage when focusing a hero down.

Authors

Max "qojqva" Bröcker
Endorsement & Info

Qojqva is one of the very few old-school core players who have been able to consistently stay at the top of the game and to maintain their peak mechanical skill.

He has competed on legendary teams like MYM,  mousesports, Team Liquid, Team Tinker, Escape, NiP, and Alliance.

Nikolay "CTOMAHEH1" Kalchev
Info & Editing

CTOMAHEH1 started his pro career as a support in Basically Unknown together with Mind Control. Since then he has consistently been playing on the European T2 scene, most recently on Unchained Esports. 

His highest placement on the EU ladder is top 100 - he plays all roles (mainly support), which is untypical for high-ranking players and shows his great versatility and understanding of the game.

Kyril "MrNiceGuy" Kotashev
PM, Writing & Editing

Esports and gaming enthusiast since forever and founder of Dotahaven.

Has been playing Dota since 2005 (5.84). An Ancient I player in Dota 2.

I sing the Siren song of war!

Naga Siren is a very versatile hero, able to adopt multiple roles and playstyles. She is usually played as a pos. 4 support because her ultimate is the best in the game for saving your team and disengaging unwanted fights. She can also be played as a pos. 1 carry, because she scales very well with items and she is a great split-pusher.

Naga is pretty versatile in the laning stage as well. She has great stats, which allows her to participate in offensive lanes or simply roam.

Because of this versatility a Naga pick reveals very little about your strategy and can be useful almost any draft, especially as a support.

Naga Loadout
Stats
Level 1
Level 15
Level 25
STR
21
Medium
60
High
88
High
AGI
22
High
66
Very High
98
Very High
INT
21
High
49
Medium
69
Medium
Attack
44-46
Very Low
88-90
Medium
120-122
Medium
Armor
7.2
Very High
16.16
Very High
22.56
Very High
Resistance
26
Medium
28
Medium
30
Medium
HP
596
Medium
1301
High
1805
High
MP
327
High
663
Medium
903
Medium
MS
319
Very High
327
Very High
334
Very High
STRENGTHS

MAJOR

Strong Laner:
Naga has high armor which means she is not susceptible to passive harass, high movement speed, which means she can chase or run away from unwanted fights, good control, which can setup kills (or save allies) and a spammable nuke to help in fighting or last hitting

Control:
Naga is the only hero in the game that has the power to outright stop a team fight. Her ultimate, if used correctly, could allow her to avoid all unfavorable engagements and save herself and (all) her allies. In addition, it could be used to set up favorable fights by getting all your allies in optimal positions, while your opponents are under the spell’s effect. Ensnare is also a decent single-target disable.

MINOR

Versatile:
Naga can be played both as a support and as a carry and in both positions she is a very versatile laner, which makes it very hard for the enemy team to counter a Naga Pick. 

Strong Split-pusher:
If played as a core Naga is a good split-pusher mainly because of her illusions, which not only do physical damage like regular illusions but also can make use of Rip Tide. They do AoE magical damage and apply a minus armor debuff on enemy units, meaning they can clear creep waves on their own pretty fast when Naga has some levels and items to make her illusions strong.

WEAKNESSES

MAJOR

Reliant on her ultimate:
Her ult is the main reason she is played as support and it has a very long CD and a small range on low levels, which makes it hard to use effectively and often you will not have it when you need it.

Item Dependent as a Carry:
Naga doesn’t naturally deal much damage, which means she needs to hit a certain level of farm to become a threat on her own to the enemy team. Furthermore, she needs a certain core of items to start flash farming, and until she hits that point, she farms much slower.

MINOR

Level Dependent:
Especially as a carry, she needs to gain levels fast because she needs most of her spells at maximum level to start split-pushing, farming or even fighting effectively. Even as a support more levels in her ult increase her effectiveness a lot.

Mana Problems:
Naga is fairly mana dependent for an AGI hero as all of her spells cost mana and usually when playing with her, you need to use them often. As a result, because of her low mana pool, she will frequently run out of mana and needs to counter this problem with her item choices.

Replays

Na’Vi vs Team Spirit, GESC: Thailand

Match ID: 3809140344
Replay

Lil plays a pos. 4 roaming Naga Siren. Na’Vi goes for the classical Naga + Disruptor combo and amplifies it with Underlord, who can make it even stronger by casting his Fire Storm and Pit of Malice just before Naga cancels her ultimate.

Lil roams a lot in the early game and controls the runes. He also manages to take two kills on the enemy Witch Doctor, demonstrating Naga’s strength in the laning stage. He goes for the standard Meteor Hammer build to make his ultimate combo even stronger. Later on he builds Solar Crest to increase the survivability of his cores versus the right clicks of Drow, Viper and NP as well as WD’s ult. In the late game he buys Radiance to be able to push out the waves and deal more damage in fights as well as a blink to initiate/counter-initiate with his ult instantly.

Drafting

Naga Siren is very versatile; nevertheless, you should consider what your game plan for the hero is before you start the game. A hard carry Naga Siren plays in a very different way compared to a support Naga Siren, so you should accommodate that difference in your expectations.

As a support, in team strategies, Naga Siren is drafted for two main reasons. The first one is her laning potential - she can dominate lanes against particular heroes. She provides both a spammable AoE nuke that reduces armor and a disable. Moreover, she is very hard to bring down because of her high stats (MS, Armor). The second reason is her ultimate - it can be used to set up strong team fight combos (e.g. Enigma BH) or to save allies in unfavorable engagements.

Generally, with a support Naga you want to create strong combos (laning/gank combos and team fight combos). Nevertheless, if your main reason to pick her up is to counter a BKB carry, she can be useful without those.

As a carry, Naga Siren is picked up because of her ability to apply a lot of pressure on the lanes and in early-mid game fights. Her illusions combined with Rip Tide make her a versatile core good at both fighting and farming.

Support Naga Siren:

As a support, Naga Siren is very versatile and could realistically be picked early into the draft in any game (of course, it is a good idea to build a good team fight combo with around her ultimate).

In an offensive lane the hero is used as a fight initiator as she is fast and has a very reliable disable. Moreover, she is survivable (speed and armor) and can deal good damage with her AoE nuke which makes physical attacks of allies more powerful thanks to the armor reduction. She is a great support in fights in the lane and she is hard to punish with attacks.

In a defensive lane she can make use of pulls to get some farm and XP or even more commonly – to roam and gank. With Ensnare she can easily set up kills (with the appropriate allies with kill potential) in the mid or the safe lane.

Carry Naga Siren:

It is important to remember that Naga is not only farm but very XP dependent, so she benefits the most from the lane when her supports stay outside of the XP range because they are pulling or ganking.

Her disable and nuke mean that she is good at controlling the offlaner. With the help of the supports, she can setup kills by latching with Ensnare. This laning potential means that even if you get challenged with an offensive lane you will be in a position to fight (although ideally you want to avoid this situation because you are level dependent and don’t want to share the lane XP two or three-way).

Playing Naga mid is also possible, but you need to pick the situation very carefully. Thanks to her illusions and high armor she can do well in the lane against weak mid heroes, but she can lose the lane hard against heroes with good spammable nukes (especially AoE). 

Substitutes:

Meepo

Meepo: Works a bit like a carry Naga because you can use the multiple Meepos to teleport around the map and outpush and back-creep multiple lanes while also farming the jungle. The big difference is that with Meepo you can do this very effectively (because of Poof), but you risk much more because if one Meepo gets ganked you die. Naga doesn’t really care if her illusion dies.

Chaos Knight

CK: CK is another illusion carry who is good at fighting in the mid game. The main difference between the two is that CK has more single target nuke damage (and longer CD illusions), which makes him a bit better at hero hunting. Naga has more AoE nuke damage and team fight control, which makes her better at farming, pressuring the lanes and contributing to team fights. Both heroes are contered by AoE control and damage.

Synergy

Naga has good synergy with plenty of heroes, so you have a large pool to pick from if you want to build a combo. Most importantly you have to think about her ultimate as it is a unique mechanic in the game and you can use it in different creative ways.

Good friends to have are:

Spells the effectiveness of which rises during the sleep time: Undying, Tinker, Dazzle

Undying Portrait
Tinker
Heroes that can use the 7 seconds of disable that Song of the Siren provides could easily swing a fight in your favor and are a good idea to combine with Naga.

Your ult will keep all enemies in a very large radius in one place for a very long time. Even though they are invulnerable for that period, there are certain spells that can be very useful for that duration. A Tinker can recast March of the Machines multiple times (with Rearm) so that when you remove the Song, your enemies will immediately start taking serious damage. The zombies that Undying’s Tombstone spawn stack while your ult is on, which means that when you remove it, your opponents will be severely slowed and will take good damage.

Heroes that can use the setup of Song of the Siren: Enigma, Shadow Fiend, MK, Gyro, Jakiro, Void, Disruptor

Enigma Portrait
Shadow Fiend Portrait
Monkey king
Gyro
Jakiro Portrait
Faceless Void Portrait
Disruptor Portrait
Your ultimate is a great setup tool for hard to land spells requiring great positioning and timing.

Song of the Siren keeps enemy heroes in one place for a long time, which gives time to your allies to position themselves and use their spells in the most efficient way possible. This is valuable with heroes who need some time for their spells to take effect (Shadow Fiend, Gyro). For example, a Shadow Fiend can position himself close to an important target (or targets) and start casting his ultimate. Just before it goes off, you need to remove the Song.

Your ult is also useful with heroes who can cast the spells in an optimal position before the Song is over (Enigma, Jakiro, Disruptor). An Enigma or a Jakiro can cast their spells on as many targets as possible just before you remove the Sleep, which will ensure a multiple-hero disable (Black Hole, Ice Path, Kinetic Field) and damage (Maledict, Macro Pyre, Static Storm).

Heroes that can use the setup from Ensnare: Lesh, Lina, Mirana, Kunkka, KotL

Leshrac
Lina
Mirana
Kunkka
Keeper of the Light
Heroes that need enemies to stay in one place to hit their spells could benefit a lot from your Ensnare and are usually very good lane or ganking partners.

Heroes with hard to aim abilities can benefit a lot from your Ensnare as it keeps heroes in one place for a long time. With good timing, such combos can lead to a very long lockdown and big single target kill potential.

Dazzle Portrait

Dazzle:

A special mention should go to Dazzle because he has multiple synergies with Naga. His Healing Wave could be used as a very powerful nuke when cast on Naga’s illusions when they are near an enemy target. This is even easier when the target doesn’t move thanks to Ensnare. In addition, the Healing Wave does physical damage, which means that it gets amplified by the minus armor of Rip Tide.

His ultimate also synergizes with Naga as it gives another source of minus armor, making the enemy team very susceptible to any physical damage.

When playing a Naga (especially a farming Naga), you should consider Dazzle as he is an amazing lane partner for her and synergizes well with her into the late game.

Counters

Strong Against:

Counter to initiators: Void, Beast Master, Bane, Enigma, Magnus

Faceless Void Portrait
Beastmaster
Bane Portrait
Enigma Portrait
Magnus Portrait
A Naga support is one of the best counters to AoE team fight initiators.

Song of the Siren is absolutely amazing for saving your whole team after the initiation of the enemy team. It is even possible to use it to counter-initiate effectively and turn the fight. This is most valuable when the enemy team has big AoE initiation spells like e.g. Void’s Chrono. Of course, Naga needs to has great positioning to be able to do this consistently.

Cores with weak AoE: Clinkz, Chaos Knight, Ursa, Brood, WK, Ench, TA, Lycan, Visage

Clinkz Portrait
Chaos Knight
Ursa Portrait
Broodmother Portrait
Wraith King
Enchantress
Templar Assassin
Lycan
Visage
To fight Naga you need to get rid of her illusions. If the enemy team consists of heroes who have trouble doing so, a farming Naga Siren could be impossible to deal with in the later stages of the game.

When the Naga is a farmer, her illusions tend to become very problematic as they become tanky, deal damage and constantly push into the enemy waves and towers. This means that the enemy team needs to deal with them constantly. Killing the illusions one by one, however, takes time and is not very efficient. Carries without AoE not only struggle to push the illusions back but in fights, they have problems killing them off, which means that they can get overwhelmed and killed themselves. Supports who have no good anti-push spell (Spammable AoE nuke) can’t deal with the pushing illusions either. Things get worse when such supports don’t have escape mechanism/AoE disable as if they are out of position later in the game they can die to the illusions without the Naga even being there.

Weak Against:

Naga, especially as a support, doesn’t have real hard counters and can be useful in most situations. It’s worth mentioning that a support Naga shines in 5-man fights (to initiate, counter initiate or help her team disengage). If the enemy team is playing a split-pushing strategy, using her ultimate will be harder.

As a carry, however, she has trouble against the same heroes as most Illusion carries:

AOE control & DPS: Leshrac, Gyrocopter, Magnus, Kunkka, OD, Ember, ES, Medusa, Sand King, Timber

Leshrac
Gyro
Magnus Portrait
Kunkka
Outworld Devourer
Ember Portrait
Earthshaker Portrait
Medusa
Sand King
Timbersaw
If the enemy team has very strong AoE potential, you could have big problems with a farming Naga.

Heroes with very good AoE DPS or AoE control could make your illusions useless in fights (by killing them very quickly), and without them, you are usually not in a position to man-fight farmed carries.

Strong Anti-Push: Keeper of the Light, Lina, WR, Lion

Keeper of the Light
Lina
Windranger
Lion
Strong anti-push might diminish your pushing potential a great deal as you rely on multiple fragile units to push out the lanes and deal damage to towers.

Heroes with very strong AoE nukes can easily kill off your illusions, especially early in the game, which will be a problem for you as you want to push out the lanes with them and flash farm. Lion kills your illusions instantly with Mana Drain and Hex even in the late game.

Skills

Naga Mirror Image
Naga Ensnare
Naga Rip Tide
Naga Song of the Siren

Creates multiple images of Naga Siren under her control.

STATS

Cast Animation: 0.65+0

Split Time: 0.3

Number of Illusions: 3

Illusion Damage Dealt: 25%/30%/35%/40%

Illusion Damage Taken: 475%/450%/425%/400%

Illusion Duration: 30

CD: 45/40/35/30

Mana: 70/85/100/115

Mirror Image

Mirror Image is one of your most versatile spells as you can use it to farm, to get away or to fight. 

Since you get all four illusions at lvl1, even just 1 point in the skill can give you good utility. The damage dealt and damage taken is calculated in percentages, so the more farm and levels you have, the stronger your illusions will be. This is why usually it is not smart to max your illusions before you get a good level of resources. Finally, remember that Mirror Image illusions scale the same way as all illusions in Dota - they receive your base damage and damage from stats (AGI), but they don’t receive any pure damage bonus from items (the green damage in your stats).

Defensive Use:

Defensively Mirror Image gives you a couple of tricks: when cast, it makes you invulnerable for 0.5 3 seconds (similarly to Manta Style), so you can dodge projectiles with it. If you are trying to escape an engagement and your opponents don’t have AoE spells, the smartest thing is to control the illusions together with your hero so that you don’t give away which one is the real target. Provided your opponents have good AoE, however, you need to try to separate individual illusions (and the hero) as fast as possible so that some AoE damage doesn’t reveal the real target right away. Whenever two or three individual Nagas are running in different directions, your opponents will be confused which one to follow. (Don’s separate the real Naga first; you’ll give away which one is the hero.)

Running away with the hero while trying to block with your illusions is also an option, although, it is usually hard to do.

The final defensive tactic is to bait the enemy heroes to believe one of your illusions is the real hero. This is most easily done when you select an illusion and run with it separately, while you run with your hero and your other two illusions in another direction. Since it is much easier to select and control the hero, commonly the movements of a single Naga which are different to the movements of the other three will give away the real hero. Nevertheless, you can use this to your advantage and get an illusion to tank the important spells of your opponents.

Offensive Use:

Offensively, illusions are your main source of damage (they are the spell that scales best with items). Each does 40% of your damage, so three illusions + the hero will be able to deal almost 2.5x your damage, which is a lot if you are decently farmed.

The simplest way to fight with your illusions is to control them together with your hero and focus one target. This will give you the biggest chance to nuke your target down, but leaves you vulnerable to AoE damag and disables.

The other option is to separate the illusions and send them to different targets (or even to the same target but from different angles). This way you will be much less susceptible to AoE, but your DPS output will be lower.

Interrupts the target and traps them in place, preventing movement or blinking.

STATS

Cast Animation: 0.6+0.5

Cast Range: 650

Duration: 2/3/4/5

CD: 14

Mana: 70/80/90/100

Ensnare

Ensnare is a very straightforward single-target disable.

Since Ensnare is targeted and therefore reliable, you can use it to set up other harder to land spells your allies have. However, it is possible to disjoint it like most projectiles (e.g. with a Blink ability), so try to think if your opponent would have such a possibility.

Ensnare disables movement; nevertheless, heroes can still cast spells through it (with some exceptions, e.g. Antimage’s Blink). It stops channeling spells when it hits, although such spells can still be used through it. This means that it might be a good idea to save it in a team fight for this occasion if you know your enemies have important channeling spells (e.g. Black Hole) rather than use it on a target simply to stop it from moving.

Ensnare can be broken by invulnerability spells (e.g. Brewmaster’s ultimate Primal Spirit, Omnislash, Supernova) and is dispellable (by e.g. Purge, Aphotic Shield).

The Naga Siren and her images have a chance on attack to hit all nearby units with a damaging wave of water that lowers armor for 4 seconds.

STATS

Proc Chance: 17%

Radius: 300

Damage: 30/40/50/60

Armor Reduction: 2/4/6/8 (Talent 8/10/12/14)

Duration: 4

Rip Tide

Rip Tide is your main source of damage. Although the damage of a single instance is low, each illusion has a chance to proc Rip Tide, which means the procs quickly add up and your AOE nuke damage is deceptively high (albeit unreliable). This makes it a versatile spell. Great for:

  • farming camps, out-pushing lanes, and split-pushing with illusions
  • harassing in the lane (great versus short-range heroes)
  • kill attempts  - focusing a single target with Ensnare and your illusions

Remember that Rip Tide is used not only for the damage but for the armor reduction, which becomes even more important later on in the game when you have items and are able to deal substantial physical damage.

All enemies in range of the Naga Siren are put into a magical stasis where they cannot act or be attacked. Using Song of the Siren again will end the duration early.

STATS

Cast Animation: 1+0.3

Radius: 1000/1200/1400

Duration: 7

CD: 160/120/80

Mana: 150/175/200

Aghanim's Scepter

Song of the Siren regenerates all nearby allies for 10% of their health per second.

Song of the Siren

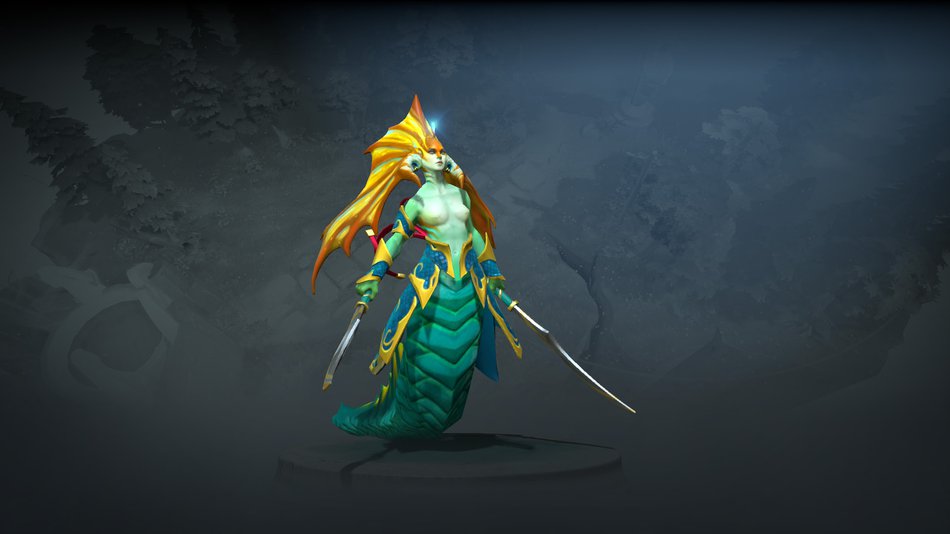
Song of the Siren is your in-game “pause” button, which affects only your enemies. This is quite strong; however, at the same time, if misused, it might be the cause of serious blunders, so you should think when and how you use it very carefully and also quite quickly, as you might miss a perfect opportunity.

Defensive Use:

The most straightforward way to use Song is to disengage - you can literally stop a fight and walk away from it if you wish to do so. You can do this to save yourself, save an ally or prevent a fight from happening in the first place. Remember that the Song works around you, so if you run (or TP) away before your allies do, they will be in danger once again (your opponents will wake up). Therefore, it is a good practice to wait for your allies to get away and run or TP away last. Don't forget to cast your TP at least 3 seconds before the Song ends; otherwise, you might get disabled by an enemy who has just woken up from your ult.

When enemy units (towers included) are under the effect of Song, they are fully disabled but also invulnerable at the same time. This means that you could end up saving your enemies from some powerful damage spell your allies have cast (e.g. Invoker Meteor, Macro Pyre, etc. will not do any damage to the targets that are sleeping in their AoE). This, sometimes, is unavoidable if you want to save someone’s life. Nevertheless, in most situations, you should take care not to do this. If you are using voice chat with your allies, you should say you are casting the spell before you do it so that your allies know not to use important spells just before that moment.

When you use the spell to disengage, it is vital not only to look at your HP but at the HP of your allies. Whenever you are a support, a priority should be to save your cores, most importantly the farmed carries. Saving yourself just after the fight is lost and your cores are dead isn’t a good outcome at all as casting it a bit sooner might have prevented your team’s important heroes from dying.

Initiation:

The other common use is to initiate with the spell. If you catch enemy heroes close to each other, it is smart to hit the Song button right away as you will buy time for your teammates with AoE spells to position themselves for a powerful combination. Your ultimate comes with an off button, so when your allies are in position, you can simply turn off the spell to allow the combo to take effect (just before or just after the spell of your ally, depending on what it is - e.g. just after Black Hole or just before Ravage).

The Song AoE follows you around, so if you have a mobility item (e.g. Force Staff), you can cast your ult and use it afterward to move in range very fast and not allow your opponents to react. Even without such items, however, it is usually easy to catch all enemies because of the huge AoE.

When initiating a fight, while the ult is still running you can use the time to cast your Mirror Image, move your illusions next to separate targets and prepare yourself to cast Rip Tide just as the Song ends.

Remember that you don't always have to start a big team fight with Song. You can use it for pickoffs - if heroes are running away from you, you can use Song to disable them, catch up and kill them off with your allies. After a favorable team fight, you can use this tactic to finish off low-hp stragglers.

Finally, be careful what fight you are starting. If you use Song to initiate, and you clump up to deal damage, when you turn it off, an enemy might catch you with a powerful AoE before you catch him/her. Try not to clump up around such dangerous targets - Tide, Enigma, Magnus, etc. BKB might also render some of your combos useless, so always try to consider which enemy will be able to click BKB just as the Song ends.

Skill Builds

Naga Siren has very flexible skill builds as all of her skills are useful in different situations from early on. Getting at least 1 point in each is the safe choice, however, farming Sirens often ignore Ensnare wholly in order to be able to invest more points into Mirror Image and Rip Tide are the hero’s flash-farming tools.

Your 1st point usually goes into Rip Tide – the damage is useful for early fights or last hitting. Nonetheless, saving your skill until you need it is the best choice since Ensnare could net your team a first blood in an early fight (if your allies have damage but lack control) and the Images are very useful in most 1v1 scenarios.

Skipping your ultimate in favor of other skills is possible if you want to accelerate your farm even further. Getting it whenever available, however, is the safer choice since it’s your main and most reliable survivability spell: as long as you have it with a TP scroll you are almost impossible to kill early on.

Support Naga Build
Core Naga Build
Naga Rip Tide
1
Naga Ensnare
2
Naga Rip Tide
3
Naga Mirror Image
4
Naga Rip Tide
5
Naga Song of the Siren
6
Naga Rip Tide
7
Naga Ensnare
8
Naga Ensnare
9
Talent Icon
10
Naga Ensnare
11
Naga Song of the Siren
12
Naga Mirror Image
13
Naga Mirror Image
14
Talent Icon
15
Naga Mirror Image
16
Naga Song of the Siren
18
Talent Icon
20
Talent Icon
25
Pros: maximum control; decent damage;
Cons: lower farming potential;

This skill build will allow you to be most efficient in fighting and ganking as it will give you the most control and decent damage early on.

Mirror Image gives you much less utility than to a farming Naga, and therefore, it is your spell of least importance - its main utility is enabling you to proc Rip Tide from a distance. Taking a fast level in Mirror Image (e.g. at lvl4) will give you a defensive mechanism and will allow you to hit Rip Tides without overextending with the hero, but it is possible to skip the spell, especially if you don’t think you need your mana to spam your other two skills instead.

You can make plays with illusions (deny runes, body-block, etc.). Your Illusions are theoretically more valuable than one extra second of disable; however, the problem with doing this every time is your mana pool. Until you get your Arcane Boots or Soul Ring, as a support Naga you will not have enough mana to sustain all your spells, and you will very rarely be able to afford Arcanes or Soul ring at lvl4. Therefore, get this point in illusions only if you really need them.

Getting more levels in Ensnare than in Rip Tide is possible provided you have allies who can deal lots of damage but need the target to stay in one place. Which skill to get at lvl1 could also be decided based on the situation - whether you need the disable or the extra damage.

Naga Mirror Image
1
Naga Rip Tide
2
Naga Rip Tide
3
Naga Mirror Image
4
Naga Rip Tide
5
Naga Mirror Image
6
Naga Mirror Image
7
Naga Rip Tide
8
Naga Song of the Siren
9
Talent Icon
10
Naga Ensnare
11
Naga Song of the Siren
12
Naga Ensnare
13
Naga Ensnare
14
Talent Icon
15
Naga Ensnare
16
Naga Song of the Siren
18
Talent Icon
20
Talent Icon
25
Pros: maximum flash-farming potential;
Cons: bad control; bad survivability;

The goal of this build is to simultaneously max your two farming skills as fast as possible in order to maximize your GPM. The obvious drawback is that you don't have your control skills early on. Nonetheless, if your allies have enough control, with maxed illusions and Rip Tide you have high kill potential. If not, getting one value point in Ensnare is the safer choice.

Talents

-6 Rip Tide Armor
25
30% Evasion
+1 Mirror Image illusion
20
-5 Ensnare CD

+14 Strength

15

+12 Agility

+10% Mirror Image damage
10
+25 MS

Lvl10: You can take the 10% if you are playing core Naga, for support Naga MS is better.

Lvl15: Naga has a very low HP pool, so STR could be very valuable for some additional survivability. If you don't need the HP, the AGI will increase your DPS a bit.

Lvl20: Mirror Image great for Core Naga. As a support, you always should go for the CD reduction.

Lvl25: Evasion Talent combined with Radiance could be amazing for you and your illusions. For a support – the armor reduction is usually better.

Items & Builds

For a farming Naga, the basic philosophy behind your item choices is that you want as many stats items as possibe because your illusions inherit the damage and tankiness.

A support Naga’s item choices are focused more on the team. You usually get Meteor Hammer (for the Song Combo) in addition to some traditional defensive support items (Crest, Force, Lotus, etc.). However, it is possible to transition into a core if you are having a great game and if you have space on the map.

Diffusal Build:

The Diffusal build is standard on a core Naga because of the amazing synergy the item has with Illusions. The burn increases your single target damage a lot, and the slow increases your kill potential - it allows your illusions to auto-attack your target for longer.

Don't skip cheap stat items (Wraith Bands, Wand, Treads) in favor of getting DIffusal + Manta faster. You need the stats to fight efficiently in the early game.

After Diffusal, you usually want to go for stat heavy items to increase the DPS of your illusions further and to make them tankier. Manta, Heart, and Butterfly are the standard choices. Luxury items afterward should be chosen based on the situation.

Starting Items
Stout Shield
Tangoes
Healing_Salve_icon
Early Game
Quelling Blade
Wraith Band
Wraith Band
Magic wand
Power Treads Agility
Diffusal Blade
Mid Game
Manta_Style_icon
Heart
Late Game
Butterfly
Bloodthorn_icon
Stout Shield
Tangoes
Healing_Salve_icon
Quelling Blade

Quelling Blade: For a farming Naga, a Quelling will help a lot in last hitting since the hero has low base damage.

Wraith Band
Wraith Band
Magic wand
Power Treads Agility

Power Treads: the STR can make you a and your illusions a bit tanker when needed. Switching to INT can be useful for sustaining your mana when casting your illusions.

Diffusal Blade

Diffusal Blade: the faster you get it, the more dangerous you will be for your enemies. Withe Ensnare + the active it will be almost impossible for a single enemy to escape you, and with the mana burn your illusions will deal very decent damage.

Manta_Style_icon

Manta Style: more illusions means more damage from the Diffusal. The stats are also great for your illusions. Last but not least, it gives you a very valuable defensive mechanism. The dispell can save you from silences.

Heart

Heart: your biggest weakness is that your illusions are vulnerable to AoE damage and disables. HoT is the biggest boost of survivability you can get for your illusions. With it, your illusions should survive the initial barrage of AoE nukes and continue fighting.

Butterfly

Butterfly: the best way to increase the DPS of your illusions. Combined with your high armor, the evasion will make you extremely hard to bring down with physical damage, which makes it a great choice versus most carries.

Bloodthorn_icon

Bloodthorn is one of the best offensive late-game items on Naga - even though it doesn't give great stats, the DPS increase and the silence from the active will help you focus down enemy cores.

Radiance Build:

The Radiance build is somewhat of a remnant from before 7.20. With the passive Rip Tide, Naga is usually player much more aggressively nowadays, which is in conflict with the Radiance build, who usually needs to be played more greedily and passively.

Nonetheless, Radiance is still amazing on Illusion heroes and if you think the game requires you to avoid fights, you can go for this play-style. Bear in mind that a split-pushing Radiance Naga is less vulnerable to AoE nukes and disables because you will slit-up your illusions much more not only to farm, but also in fights.

Last but not least, in this example we built Radiance ASAP to start flash farming. It is possible, however, to go for Radiance after Diffusal + Manta and to transition to split-pushing and flash farming in the mid-late game rather than to do it right away.

Starting items
Stout Shield
Tangoes
Healing_Salve_icon
Mango
Early Game
Quelling Blade
Wraith Band
Boots of Speed
Magic wand
Wraith Band
Mid Game
Radiance
Boots_of_Travel_1_icon
Manta_Style_icon
Late Game
Octarine_Core_icon
Heart
Butterfly
Stout Shield
Tangoes
Healing_Salve_icon
Mango
Quelling Blade

Quelling Blade: For a farming Naga, a Quelling will help a lot in last hitting since the hero has low base damage.

Wraith Band
Boots of Speed
Magic wand

Magic Wand: Wand could give you the needed mana for one more spell, enough to secure a kill or to let you cast your ultimate and get away from a fight. It's situational for the Radiance build - if enemies aren't pressuring you, you can skip it to get your mana sustain items faster.

Wraith Band
Radiance

Radiance: The sole reason Radiance is so good on your hero is that your illusions carry the Radiance Burn aura which helps you flash farm much faster because it provides AoE damage. When combined with the AoE of Rip Tide, you can clear creeps very quickly at multiple places at once. In addition, later on in the game, you will have the opportunity to back-creep only with illusions because when they are tanky enough, even one or two will be able to clear a whole creep wave, which will make pushing the lanes out for your opponents problematic.

Boots_of_Travel_1_icon

Boots of Travel: BoTs are quite strong on a farming Naga as they will allow you to move faster between lanes (and the base) - they are hands down the best boots whenever you want to split-push a lot. You will be able to choose the best location to push and get there as quickly as possible. In addition, even though they aren't very cheap, if you are able to get them early in the game, you will save quite a lot of money on TP scrolls as you are split-pushing and constantly TPing between lanes. Therefore, BoTs are the greediest option, but they are a very good investment, and provided you are able to get them fast enough, they will definitely pay out.
Upgrading your BoTs to lvl2 is a good idea even before you run out of slots. The reason is that if you are constantly away from your team to split-push, it will give you the ability to join them instantly when they start fighting. In that sense, if your team wants to force offensive fights away from your towers, getting a lvl2 BoTs is actually quite important.

Manta_Style_icon

Manta Style: Manta is good with all illusion heroes; however, Naga is a special case since the Manta illusions transfer Rip Tide as well. Consequently, Manta will make you an even stronger split-pusher/flash farmer once you have other good farming items (Radiance).

Octarine_Core_icon

Octarine Core: Getting an Octarine after your Radiance and BoTs is actually a good idea. Even though the item doesn’t increase your carry potential it makes you much better in what you are doing most of the time – farming and split-pushing. The extra HP makes your illusions stronger and the mana pool is important for spamming your abilities. Most of all, the 25% CD reduction is invaluable for your Illusions and ultimate. In that sense, the item makes you more survivable and even increases your GPM, which allows you to scale into the late game faster.

Heart

Heart of Tarrasque: A heart will make you and your illusions much, much harder to kill. This is very useful as the harder your illusions are to stop, the stronger your split-push is and the more resources your opponents need to invest in dealing with your illusions (which is not rewarding for them as they don’t earn gold or XP). Usually, you want to get it after your Radiance so that the more time your illusions survive for, the more Burn damage they deal.

Butterfly

Butterfly: Butter is a very cost-efficient DPS item for you as you get a lot of AGI (which gives you DMG and AS), and your illusions inherit it and become stronger. Nevertheless, it is a luxury item for you, and you should go for it after you have your cores and some fatness items (because of your high armor, HP items give you a lot of EHP). Remember that if you have good overall EHP (because of fatness items and good base armor), Butterfly will increase it even more because of the evasion chance (keep in mind the illusions inherit the evasion as well).

Support Naga Build:

The suggested build is suitable for a support Naga and emphasizes team-oriented items.  You get the usual Meteor Hammer that makes your Sleep combo even more powerful and then you invest in a defensive support item. In this case you get Solar Crest because it also has a great offensive use (the minus armor stacks with the minus armor from your Rip Tide). Nonetheless, you can choose other support items like Force or Glimmer if you have to. In the late game you get Aghanim’s for the heal and a Lotus Orb for single target saves. If you are using your ultimate to initiate rather than counter-initiate, then it is usually better to get a Blink rather than an Aghanim (if you initiate you will not be able to use it to heal your team).

Starting items
Stout Shield
Tangoes
Orb of Venom
Early Game
Magic wand
Arcane Boots
urnn
Mid Game
Meteor Hammer
Spirit Vessel
Solar Crest Icon
Late Game
Aghanim's_Scepter_icon
Lotus Orb
Stout Shield
Tangoes
Orb of Venom

Orb of Venom: Allows you to trade hits even better.

Magic wand

Magic Wand: Wand could give you the needed mana for one more spell, enough to secure a kill or to let you cast your ultimate and get away from a fight.

Arcane Boots

Arcane Boots: Arcanes are the traditional go-to boots both for a support Naga simply because the hero needs the mana to be able to use spells as often as possible. A great benefit is the ability to disassemble the boots and invest in Octarine and BoTs later on or even to upgrade them to Guardians for a dedicated utility Naga.

urnn

Urn of Shadows: If no one else is getting an Urn, you should get one. You make good use of the stats and mana regen.

Meteor Hammer

Meteor Hammer: Gives great stats for support Naga (HP, Mana, HP regen and mana regen). Meteor Hammer has several usages. First, you can combo Meteor Hammer with your Ensnare, throwing ensnare and 2 sec before the end of it, start casting Meteor Hammer. Second, channeling ultimate and by the end of it start using the Meteor Hammer.

Spirit Vessel

Spirit Vessel: Upgrading to Spirit Vessel can be very useful sometimes against healers like Ench, Omni, etc.

Solar Crest Icon

Solar Crest: Solar is a good item if you are facing physical DPS carries because it directly counters them. With good defensive positioning, you should be able to use the active on your allies that are getting focused.

Aghanim's_Scepter_icon

Aghanim’s Scepter: With Agh’s Song of the Siren regenerates you and nearby allies by 10% of maximum HP per second fur up to 7 seconds, which adds up to a total of 70% of maximum HP. This gives your ultimate great utility in team fights, even though in theory it is a bit better than in practice. Agh’s on Naga is extremely potent if your opponents deal continuous AoE damage (Bristleback, Leshrac, etc.) because you can heal up your whole team and reset the fight. However, against nukers more often than not one target will get low extremely fast while the others will be still on high HP - in such situations, it wouldn’t give you a lot of utility to cast your ultimate just for the heal. Nonetheless, Agh’s is the go-to late game item for a dedicated support Naga simply because it gives the most utility.

Lotus Orb

Lotus Orb: A great late game item for a support Naga, as it can be used to save a single ally. You don’t want to blow your ultimate every time a single hero is in trouble, and Lotus allows you to save it for more critical situations.

Other Items

Early Game
Infused Raindrop
Tranquil Boots
Soul_Ring_icon
Drums
Mid & Late Game
Force staff
Glimmer Cape
Pipe
Yasha
Yasha
Heaven's_Halberd_icon
Blink_Dagger_icon
Skadi
Infused Raindrop

Raindrops: Raindrops are great for Naga for two reasons – first, they give her mana regen in the early game, especially when combined with other mana regen items like RoA. Second, they give her survivability against magic damage nukes, which are the easiest way to kill a high armor and low HP pool AGI carry.

Tranquil Boots

Tranquil Boots: Great boots for a support Naga when combined with Soul Ring as an alternative to Arcanes.

Soul_Ring_icon

Soul Ring: Great alternative to Arcanes for a support Naga when combined with Tranquils.

Drums

Drums: a cost-efficient stat item which is great when combined with other such items like Bands, Treads, Diffusal, etc. It makes you tankier and helps you fight early. It's optional because with Naga you have too many small items, but in case you are facing more nuke damage in the early game, it's usually worth it to invest in Drums.

Force staff

Force Staff (Support): If no other support is getting a Force, you should go for it. It will give you intelligence for more mana and mobility for some clutch initiations with Ensnare or Song of the Siren. If another support is getting it, you usually want to skip it.

Glimmer Cape

Glimmer Cape (Support): Standart support item, you can save teammates with it.

Pipe

Pipe (Support): if you feel that your team needs Magic Resistance you can build a Pipe. You have high armor but low HP pool, which means Hood/Pipe will increase your survivability against magic nukes a great deal.

Yasha

Yasha (Carry): Yasha is one of your most cost-efficient DPS boosts as it gives you damage, attack speed and movement speed. You can always use it in Manta later in the game.

Yasha

Yasha (Керри) - Yasha один из самых эффективных бустов урона, так как он дает вам скорость атаки, передвижения и сам урон. Вы можете использовать его для Manta позже в игре.

Heaven's_Halberd_icon

Heaven’s Halberd (Support): Halberd is generally the best item for a support Naga to make you tankier as besides a lot of survivability on you and your illusions (evasion, HP), you get the disarm, which could be very useful in countering physical DPS heroes.

Blink_Dagger_icon

Blink Dagger (Support): On a support Naga a Song + Blink initiation can easily catch the whole enemy team and setup for amazing team fight combos.

Skadi

Skadi: an additional source of stats that benefit your illusions. The attack modifier is also very useful as it helps you stick to your target and get more Rip Tide procs.

Early Game

Naga 350px

As a carry your goal is to pressure your lane opponents while getting your core stat items. Once you have more levels in Rip Tide and your illusions you can start pushing-out the lane and flash-farming the jungles.


As a support, your goal is to use your great stats to pressure the lanes and even set up kills with Ensnare and Rip Tide. Usually, you want either to be a part of an offensive lane to pressure the enemy farmer or to roam the map and gank with Ensnare.

Farming (for core Naga):

The base attack damage of Naga is quite low for a melee hero which may be a problem for contesting last hits.

Mirror Image is the spell that can help you at last hitting. At lvl1 your illusions deal 25% each, which means that if you hit with all three illusions and your hero, you will hit with similar damage as if you had a DD rune, which is very powerful for contesting last hits. The main problem is the squishiness of the illusions early on - just a few auto attacks can kill them. Since they have quite a long duration (30 seconds), you don’t want to lose them to harass right away. Therefore, it is smart to come in range of the creeps just for a last-hit and back off straightaway afterward. The long duration means that you can have illusions with you almost 80% of the time if you don’t lose them.

With a couple of levels in your Illusions and Rip Tide, you can auto-attack the wave and out-push it pretty fast. This will make it hard for your opponent to contest and will give you free time to farm the nearby jungle camps.

Harassing:

You are a melee hero with a short range nuke, so harassing might seem hard, but you are fast with great stats and you usually can afford to chase down enemy heroes and trade hits with them. The Rip Tide will do some decent damage and the minus armor will make your attacks hurt more. At the same time, your high armor (and ideally Stout Shield) will make you very tanky - you will suffer very little damage from passive harass.

Because of this, passive harass is one of your main strengths both as a core and as a support and finding favorable right-click trades is your main way of winning the lanes.

Magic damage is much more dangerous for you as your high armor doesn’t help you, and your low HP pool might be a problem. As a result, it is a good idea to avoid exchanging harass with heroes that have very good nuking potential. Nevertheless, if things go bad, you can always Ensnare and run away.

Kill Potential:

You are a very good setup hero, and you can bring some decent damage to the table with Illusions + Rip Tide, but you need at least one other hero with you who can deal substantial damage to be a serious threat to your opponents on early levels.

With another hero you can have a very strong kill combo - you can initiate with Ensnare and follow up with Rip Tide right-clicks. Then your ally can join in to use whatever spells he/she has to deal the maximum possible damage, and the auto attacks of both of you usually will be enough to finish the kill (the minus armor debuff from Rip Tide means that physical attacks will deal greater damage).

As a core, you could get a point into Ensnare to set up for your allies if they are powerful gankers. Your high levels of Illusions and Rip Tide means you can deal substantial magic nuke damage with some luck on your side.

Early Game Rotations:

Ganking:

You get most of your kill potential at lvl2. However, provided you have a partner that can deal lots of damage at lvl1, you can start ganking from the very beginning of the game (you have the significant 2 seconds disable with lvl1 Ensnare). The opposite situation is also viable – in case your partner has very good early game disable at lvl1, lvl1 Rip Tide could do significant damage and could help you get a kill, especially if there are three heroes focusing the target with right-clicks because of the armor reduction. Otherwise, spend your time in the lane until lvl2 and start ganking afterward.

Although Ensnare could be used from relatively far away, the projectile is rather slow, which means that if your opponent sees you and starts running away, he will be able to walk for a while before he gets disabled. As a result, it is very important to have the element of surprise on your side. Even if you manage to cast Ensnare, in case your target reaches the range of his tower, you are unlikely to be able to finish the kill off. Therefore, try to initiate from the fog of war or use Smoke of Deceit to be able to get in closer.

Counter Ganking:

Before level six, the best thing you can do to help an ally that is being ganked is an Ensnare, which is a single target disable. Bear in mind that the disabled enemy can still use spells, so often Ensnare on one ganker will prove insufficient to save an ally. Nevertheless, if you think it might be enough, you should definitely teleport to help (as a support Naga).

After level six, you have your ultimate, and you can not only save single gank targets but save multiple allies from the whole enemy team if need be. So, especially as a support Naga, if you see such an opportunity, you need to try to teleport and use Song. Be careful, however, because lvl1 Song has a very short range and a very long CD, so ideally you want to be in position to help before the enemy initiation happens.

Support Naga

The semi-support position in the lane suits Naga Siren better as she is a great roamer and usually wants to leave the lane earlier rather than later. Nonetheless, she is great at fighting and pushing back enemy heroes and she needs lvl2 to have both her disable and nuke for kill attempts.

In case the enemy farmer is a melee hero, she could do the job of a babysitter very efficiently as well as she can afford to trade harass with most melee heroes thanks to her high armor and armor reduction. In such situations a pos. 5 Naga is also not a bad choice.

Harass your lane opponents and create space for your core
Get some levels and start roaming and ganking
Control the runes and ward while doing so
Video Example:

Aui on Naga decides to help his offlaner (Bat Rider).

In the lane, he is trading hits with the enemy heroes, which gives space to the Bat to get last hits. As soon as Naga gets 200 gold she goes for Magic Stick which is great in an aggro dual lanes, especially against Undying.

He controls the runes, which allows his Bat to get some solo XP.

A point in Ensnare secures him easy kills on enemy supports with the help of Bat Rider – it allows the bat to catch up to the enemies with Firefly and with some Sticky Napalm stacks on top he starts dealing a lot of damage.

Core Naga

For a farming Naga, the playstyle in the lane depends mainly on your lane partner. Whenever you have potent kill combo, you should be aggressive and dominant in the lane. In case you don’t, you should be passive and you should focus on getting as many last hits as possible. Remember that your ultimate goal is to have a farmed carry Naga, and even if you are aggressive, you are doing it to create space to last-hit as much as possible.

With a couple of levels in your Illusions and Rip Tide, you have more options. If you are playing against melee opponent(s), you can position yourself aggressively and attempt zoning out. If not possible, you can simply out-push the waves as fast as possible and get some additional farm in the jungle.

Ensure you get last hits
Kill if you have the potential and opportunity

To determine your play style you need to consider a couple of factors: how good is your kill combo, how squishy are your lane opponents and how much nuke potential your opponents have. Generally, if those factors are in your favor, you should be aggressive.

Lane Combos:

Because you are a melee hero, your partner should ideally be a ranged one. Provided you are a farmer, ranged supports with high nuke damage work best. If you are a support, on the other hand, carries with good physical damage output work best (because of your minus armor). Ideally, those heroes will be ranged as well.

Examples for Naga Carry: Leshrac, Dazzle, ET

Leshrac
Dazzle Portrait
Elder titan

Examples for Naga Support: Weaver, Gyrocopter, Monkey King, Underlord

Weaver
Gyro
Monkey king
Underlord Portrait

Mid & Late Game

Naga Siren Effigy 350px

Naga Siren is quite a versatile hero and playing her usually involves some choice of what you want to do.


Generally speaking, when you play her as a support, you are a team-oriented 5-man hero. As a carry, you have a choice between playing actively with your team (if you have the fight advantage) or out-pushing a lane while also farming the jungle to maximize your resource growth.

Priorities for Carry Naga:

With a core Naga you want to abuse your sustained AoE damage and illusions to constantly put pressure on the enemy lanes. Out-push them safely (only with your illusions if needed) and occupy and farm the jungle. You are survivable (especially when you have your ultimate), so it is a viable strategy to occupy the enemy jungle and safe lane and farm and out-push them. This will create safe space for your teammates to occupy.

When you have the fight advantage, don't be afraid to join your teammates and 5-man. If you have good team-fight combos you can use your ultimate to set up favorable fights for your team.

Out-push and pressure the lanes, flash-farm the jungle
Join fights at the right moment; either fight if you can afford it or help your allies to stall/disengage
Priorities for Support Naga:

As a support, you are a 5-man hero. You want to stick to your team so that you are always in the right place when your ultimate is needed. You can use it to initiate favorable fights with some combo, disengage unfavorable fights and save allies. It goes without saying that you need to providing vision with wards or/and your illusions.

Stick to your team and initiate/disengage with your ult
Help in warding and dewarding, scout with your illusion
Initiate ganks when there is such an opportunity but always with backup
Timings:

Support:

As a support, your most important timing is when you get your ultimate (or a higher level of it). This opens many opportunities for you. If you have good wombo-combos, you can initiate favorable fights. If not, you can always stick to your teammates to save them by disengaging unfavorable fights.

Even though it is not directly connected to your hero, as a support Naga, Roshan timings should always be on your mind. With your Song, you are one of the strongest heroes in the game to contest or take Roshan, so try to keep in mind if it is available and try to always have your ult up in case you decide to take it or contest it. If you have any suspicion on whether the enemy team is doing Rosh (heroes missing from the map), you need to use your illusions to scout it out – don’t let the enemy team sneak a Rosh kill without giving you an opportunity to contest it. Roshan fights are a big opportunity for a team with Naga to gain an advantage.

Carry:

As a carry, your first timing is usually Diffusal. It increases your kill potential a lot and can help you to start playing more aggressively.

A second timing is when you get a big survivability item. It will allow you to send illusions even to lanes where opponents are staying. In case your illusions are tanky, they will cause serious problems to some of your opponents (e.g. the supports) and will cost them a lot of time and resources to deal with, while you are farming in another place. This way you are not only using the map well and pushing out the lanes, but forcing your opponents on the defensive and creating some space for your team. The supports will have to kill off the illusions and probably even go back to base to heal up instead of using their time more productively - gank, ward, deward, etc.

Comeback Potential:

Support:

Your behavior after a good or a bad laning stage as a support doesn’t change in any way. The only difference would be your behavior in fights - if you are relatively farmed, you can enter fights with your hero, try to contribute with some damage and be close to your allies for a Pipe/Solar Chrest or something of that sort. If you are very poor, however, it might be smarter to stay at a safe distance and use only your illusions to cast Rip Tide, waiting for a good opportunity to ult.

Carry:

If things don’t go as planned, you need to do all you can to stall the game. Going for a Radiance build to split-push & back-creep could be a great choice. If you are playing from behind, it will be much harder to take direct fights with the traditional Diffusal + Manta build.

The general plan is to relieve the pressure your opponents are applying by avoiding fights, stalling pushes and pushing out the lanes, which will allow you to reach the late game, where you are at your strongest.

Team Fights:

Ultimate:

As Naga Siren, the most important thing you want to consider is how to use your ult.

The first option is to initiate with it. This is most useful when you have more levels of the spell, good AoE team fight spells and disables that can use the setup of your ult. If you don’t have such spells, initiating with your ult might not even be to your advantage but to the advantage of your opponents, so do it when you are certain something good will come out of it.

In this example Lil sets up Disruptor’s Static Storm and Kinetic Field combo while also stunning the Omni and Drow with Meteor Hammer, which helps his team kill them without letting them have any impact in the fight.

The second option is to save it for a potential disengage - if the fight goes wrong, you can save some important allies. Generally, this is the worst option as you make use of your ult only if the situation is bad. Nevertheless, if you are winning the fight, you can still cast ult to catch heroes that are running away (especially if you have mobility items like Force Staff or Blink Dagger) - the initiation range of the Song is quite big.

Illusions & Rip Tide:

You are vulnerable to AoE disables and damage, so you need to actively think how to avoid getting your illusions neutralized. E.g. you might have to wait patiently for your opponents to use important AoE spells before you enter the fight.

Once the fight starts, it is optimal to send your illusions to squishy supports as they might have serious problems dealing with them whilst using your Ensnare to control an important carry. If your opponents don’t have good AoE potential, you can keep your illusions together to focus down the hero you have Ensnared as fast as possible. Priority for Ensnare goes to melee heroes, as the net might help a lot in kiting them and preventing them from having an impact in the fight.

Pushing:

Split-Pushing:

When split-pushing with Naga Siren, you have a few options. You can leave your hero farming in the jungle and send one (or two) illusions to the closest two lanes.

The second option is to farm the jungle (or a pushed-in lane) and push out another lane with all your (three or five with manta) illusions. This will push the lane much faster and will likely force your opponents to react in some way. They will send somebody to defend as otherwise you will be able to damage the tower with illusions, while still being away from danger with your hero.

The third option is to push out a lane with your illusions AND hero. This is especially useful when you have BoTs so that you can TP to some relatively pushed out lane and threaten the tower. This is the kind of split-pushing which is most likely to force a reaction from your opponents, but at the same time, the most dangerous kind as your hero is also aggressively positioned. When doing this, always pay attention to the map and be ready to cast your ult very quickly. You will ideally be able to TP away to another lane and continue farming, but if your TP or BoTs are on CD, you can still run away. The range of the Song, especially at 18, is very high, and you will have a serious start, which means your opponents are unlikely to catch up to you.

The last option is to back-creep waves with illusions. This means intercepting incoming waves not on the spot of the creep equilibrium but somewhere closer to the enemy base. For example, if you are standing at the area of the enemy tier 2 mid tower (when it is down), at the 15th/45th second, you can cast your Images and send one/two to each of the three lanes. This way when the enemy creeps spawn, your illusions will intercept them and with the help of Rip Tide, kill them off. This is a great way to stall the game and prevent your opponents from applying pressure; however, you need to be careful as while you are doing this, you are deep in enemy territory, and you are very likely to get ganked. So, try to follow dangerous heroes on the map and run away as fast as possible if you don't see them, and in addition, always be prepared to cast your ult to save yourself.

5-man Pushing:

For normal pushing, the most risk-free way to push it is to send all your illusions while staying safely outside initiation range yourself. You can repeat this action on CD, and eventually force your opponents to do something about it (take an unfavorable fight) or lose their tower from chip damage. This is usually very slow, but in the super late game your Illusiosn will be strong enough to do it.

If enemy heroes are dead, of course, the fastest way to push is with your hero and illusions.

As a carry, you are generally a frontline hero as you go for tanky items, and with the help of your illusions and Song, you are hard to bring down even if you get initiated upon.

As a support, it is far better to stay safely behind your allies, sending forward only your illusions to scout, waiting for a good moment to use Song of the Siren. You can use your defensive items to back-up the pushing cores and if you think you are safe – you can use Meteor Hammer on the enemy buildings.

Ganking:

Ganking with Naga is very straightforward. You get as close as possible to the target from the fog of war and cast your Ensnare (you have already cast your illusions before initiating in order not to waste time when you are already fighting). Generally, you rely on your allies to finish the job, so ganking on your own (unless you are punishing overextension with a very farmed Naga) is not a good idea.

You need to think if your target can dispel or dodge the Net in some way. If that is the case, you might want to initiate with Song to buy your allies with more reliable disables time to get into position and cast their spells. Another advantage of Song is that the initiation range is very big (at lvl18).

In case you are using Song, however, you need to think if the enemy will be able to get away immediately after the song [instant BKB into some escape mechanism or simply instant Blink Dagger away (it will not be disabled, Song prevents damage)].

The good thing about ganking with Naga is that you can always disengage with Song if something goes wrong and many heroes come to protect the target of the gank.

With a carry, Naga you rarely want to intentionally search for ganks - flash farming, split-pushing and searching for team-fights is much more beneficial for you. With the help of allies, however, if your opponents are splitting up and farming, ganking is still viable.

Map Control and Vision:

Besides the usual Warding for supports, Naga can use her Mirror Images to scout. Sending illusions to the enemy jungle, rune spots, Roshan, Ancients and, generally, all points of interest is a good idea, especially when you are a support Naga and you are not using your illusions to flash farm the lanes and jungle. This way you will be able to see more often your opponents and as a result, will make more informed tactical decisions as a team.

Farming:

The most efficient way to flash farm with Naga, especially when your illusions are farmed enough, is to send one to different locations (for example one at the mid and safe lane, one at a jungle camp and your hero at another jungle camp). This way you will be able to farm 4 different locations at once, using the Rip Tide proc + the damage of the illusions. Of course, when you are sending only one illusion per lane, you are pushing out the lane much slower. So if your current goal is to split-push more rather than farm more, you might want to send more illusions to a single lane while your hero is farming somewhere else.

You want your illusions to be able to finish off a camp before they are dead, so initially you might want to send all three to one camp while you are farming another (or even keep all three with your hero if you are farming stacks or Ancients), and the stronger you get, the easier your illusions will be able to deal with camps. Remember that because of the AoE damage of Rip Tide, your illusions farm faster camps with lots of small units (Cobalts, Satyrs, Trolls) rather than camps with a few tanky units (Hellbears, Centaurs).