Mirana Guide by bOne7
Artist: Cersei Lannister
Author:
bOne7 & Co.
Date: 11/2018
Tags:
text
Mirana
Analysis
Tactics
Builds

Welcome to bOne7's Mirana Guide

Welcome to bOne7's Book of Mirana, a hero guide part of the Book of Dota series!

Here you will find all the information you need to learn to play the hero on a high level – from drafting and builds to the optimal playstyle in different lanes and situations. We hope you’ll enjoy this Mirana guide and find it useful!

bone mirana stats
TL;DR:

Drafting: Mirana is one of the most versatile heroes in Dota, which makes her easy to fit into various drafts. Because of this, picking her early on is seldom a bad choice – you can always change your lane or even position to give yourself the best chance to succeed.

Early Game: Try to utilize your kill potential if you have partners that can set up for your arrow. If not, focus on getting as much farm as possible. Utilize arrow to secure the ranged creep or to farm additional big jungle creeps. 

Mid & Late Game: You need to decide on what to focus in the particular game. If you have good kill potential with your team, try to find pick-offs and successful skirmishes (Moonlight Shadow helps a lot in this regard) and take map control out of them. If fighting is too risky, focus on out-pushing the waves, maximizing your farm and even split-pushing. This will buy you time and will give you the items you need to scale as a carry in the late game. Use Moonlight to help your team take (or dodge) fights even if you are not with them.

Authors

Pittner "bOne7" Armand
Endorsement

bOne7 is a professional Dota 2 player playing primarily in the offlane position.

He rose to fame by being part of the legendary C9 lineup that made the most 2nd place tournament runs in premier events in the history of Dota. A TI veteran, bOne7 is without a doubt one of the most creative players out there and a great guy to learn from.

Nikolay "CTOMAHEH1" Kalchev
Info & Editing

CTOMAHEH1 started his pro career as a support in Basically Unknown together with Mind Control. Since then he has consistently been playing on the European T2 scene, most recently on Unchained Esports. 

His highest placement on the EU ladder is top 100 - he plays all roles (mainly support), which is untypical for high-ranking players and shows his great versatility and understanding of the game.

Kyril "MrNiceGuy" Kotashev
PM, Writing & Editing

Esports and gaming enthusiast since forever and founder of Dotahaven.

Has been playing Dota since 2005 (5.84). An Ancient I player in Dota 2.

On the prowl…

Mirana is one of the most versatile heroes in the game. She can do fine in any lane, can fit almost any strategy and can be played in all possible positions. She is a ranged agility carry and scales well with items into the late game. However, at the same time, she has a strong early game presence. Because of her long range high duration stun and high nuke damage, she has good kill potential and can afford to be active around the map. The fact that she is mobile makes such a play style even more beneficial.

mirana loadout
Stats
Level 1
Level 15
Level 25
STR
18
Low
49
Low
71
Medium
AGI
18
Medium
63
Very High
95
Very High
INT
17
Low
41
Low
58
Low
Attack
43-48
Low
87-92
Medium
119-124
Medium
Armor
2.6
Medium
12
Very High
18
Very High
Resistance
26
Medium
27
Medium
29
Medium
HP
524
Low
1074
Low
1460
Low
MP
279
Low
555
Low
759
Low
MS
298
Medium
306
High
312
High
STRENGTHS

MAJOR

Tactical versatility:  Mirana can afford to fight and be played actively. She is a good ganker thanks to her mobility and kill potential. At the same time, she could be played more passively as well. She could split-push well, farm up and rely on her late game carry potential.

Flexible laner: Her skill set allows her to go to any lane in any role – Mirana scales well with items but is not too item dependent. This means that she can dominate with items, but she can also be useful without them. Moreover, she could do well in all three lanes.

Kill Potential: Big initiation range, possibly long disable, mobility and high nuke damage make Mirana quite good at killing heroes from early on.

MINOR

Mass Invisibility: Moonlight Shadow is a very powerful and versatile spell. It shines for team fight initiation or ganking as it allows the whole team to get in ideal position to fight. It forces the enemy team to constantly spend gold on detection, and if needed, Moonlight Shadow could be used defensively to disengage unwanted fights and save the life of your allies.

Mobility: Leap makes Mirana a fast and mobile hero. The movement speed increase and the ability to jump over impassible terrain mean she can easily disengage unwanted fights. Meanwhile, she can use the spell to chase and capitalize on kill opportunities.

Carry Potential: Even though her abilities don’t scale amazingly with items, Mirana is a mobile ranged AGI hero. Even only based on her stats she can deal serious amounts of damage if she gets her items.

Range: Mirana is one of the heroes in the game with the highest attack range, which is very useful for harassing or simply fighting from a safe distance

WEAKNESSES

MAJOR

Unreliable: Even though Mirana has the potential to shine in different situations, it is actually quite difficult in practice to maximize her impact (the more you play her, the easier this will be). Her Arrow is hard to land, and you will rarely be able to consistently hit long-range Arrows. Her Starstorm max-nuke damage requires her to be in melee range, and her Moonlight Shadow could theoretically be the perfect initiation spell; however, in practice, good opponents will have Sentries in position if they expect the move.

Low Attack Damage: Her low damage is problematic in the lane – it means she has trouble winning the last-hit war versus heroes with high damage. To mitigate this problem she can use her Arrow to last-hit the ranged creep and additional jungle creeps, but she is still not the greatest of laners. Moreover, Mirana does relatively low right-click DPS compared to other ranged carries in the mid and late game – hero only skill that helps in this regard is Leap. This means she needs items before she can transition into a real carry. If you don’t find farm, your nuke damage will fall off and so will your fight impact.

MINOR

Survivability: Mirana is a low HP AGI carry with relatively low armor. She fully relies on her elusiveness (mainly Leap, but also Moonlight) to keep her alive. This means long-lasting disables (and silences) could become a big problem in fights, especially when combined with enough nuke damage from the enemy team.

Replays

EG vs Aster, The Kuala Lumpur Major

MATCH ID 4210558498
Replay 

Sumail plays Mirana mid outstandingly against Storm. He showcases the kill potential the hero has – he gets a solo kill early on as well as kills with some help from his roaming support Tiny. He kills Storm three times before the 6th-minute mark and starts snowballing out of this good start. On the 10th minute, he has 69 last-hits and 21 denies compared to Storm’s 54 and 1.

The game turns out to be hard and contested and finishes on the 76th minute. Sumail has a final stat of 28-8-20 and deals the most damage out of all heroes beside the enemy Spectre. He showcases Mirana’s potential as a right-click carry in the super late game with items like Daedalus, Butterfly, Mjollnir, & Satanic.

The replay is great to watch both to learn how to play Mirana mid in a 1v1 situation and to learn how to have an impact with her in the late game.

Tigers vs Na’vi, DreamLeague Minor

MATCH ID 4203995670
Replay 

AhJit has a flawless performance on Mirana (14-0-20) in a 36 minute game against Na’Vi at the DreamLeague Minor grand final. He abuses the fact that Na’Vi’s draft has very little damage in the early & Mid game (Void, Alch, Enigma, Phoenix, Treant). After the standard Maelstrom, he goes for a very defensive build – Dragon Lance, Linken’s & BKB. This is what allows him not to die even once the whole game. Moreover, despite the defensive nature of the build he manages to do the most damage out of all heroes on the map. Remember that in the early-mid game Mirana deals a big portion of her damage with her spells.

He plays Mirana in the offlane. He gets help mostly from his support Tiny, but because of Mirana’s ability to survive on her own, Tiny is free to roam a lot and pressure other lanes as well, especially in the later laning stage.

Drafting

There are two main reasons Mirana is getting picked in competitive Dota:

  1. She is very versatile, so she is a safe pick in the first stages of the draft. She is quite hard to counter, and she can contribute to various strategies, which means that she gives tactical freedom to her team. This is a major reason she is a great hero to master. Spamming Mirana in pubs is quite easy exactly because she is very versatile and can fit various lineups quite well.
  2. Mirana shines in action-packed games that focus on fights in the mid game. The reason for this is that unlike most carries she has very decent nuke damage from spells and has high kill potential in the early-mid game. Nonetheless, her tactical versatility means that if needed, she can start dodging fights and farming up for the late game instead. She is a ranged AGI hero and she scales well if she gets enough farm (which she can get because she is a decent flash-farmer).

Role: Solo Mid Mirana

Mirana is not the strongest hero in 1v1 situations but she can do decently versus most opponents. Her biggest problem is her low attack damage, but her other stats are good. A great trick that helps her in 1v1 scenarios is to use the Arrow to secure the ranged creep last hit or if this isn’t needed – to fire the arrow at a nearby camp (preferably at the big creep) to get some extra resources.

It is a good idea to avoid 1v1 matchups against heroes with very high last hitting potential (e.g. Templar Assassin, Bloodseeker, SF in the later laning stage, Puck early on, etc.). A good player on such heroes will severely win the last-hit war.

She is also a relatively hard mid laner to gank because of Leap, so it is an option to put her mid even if you suspect the lane is going to get pressured. 

The solo XP will help her get a high level in Starstorm as fast as possible and allow her to start getting kills around the map from very early on.

Role: Dual Lane Core Mirana

A core Mirana in a dual lane is likely the most common laning option. It’s easier to contest last hits with a support to help you out. More importantly, however, if your lane partner has a reliable long disable (Shadow Demon & Bane are the most common options), your lane will have amazing kill potential from early on because you’ll be able to land a relatively long-range arrow easily. The long disable of the arrow will allow both you and your ally to right-click and possibly even finish the kill with follow-up nukes.

You can send the dual lane to all three lanes, depending on the match-up. Against a weaker lane, you’ll be able to get a lot of farm and transition into a carry faster while slowing-down the development of the enemy. Against a stronger lane, you could stay safe thanks to Leap and use arrow on jungle creeps to help yourself get more resources. 

Role: Pos. 4 Mirana

This position is probably the rarest out of the three because the hero needs some levels and farm to reach her full potential. Moreover, the main impact of a support Mirana is her ability to gank with long-range arrows, which is very unreliable and quite hard to pull off in practice.

Nevertheless, a roaming Mirana can apply a lot of pressure on the enemy cores, making them constantly watch out for arrows (a successful hit could easily lead to a kill if your cores have damage). If you have a core that can set up for the arrows (e.g. OD with Astral in the mid lane) your job will become much easier.

In case constantly roaming is not an option, with a couple of Clarities you can farm jungle creeps by killing the large one with the arrow. This will give you some resources and will ideally help you get enough items to transition into a semi-carry in the mid-late game. Because of Mirana’s resource dependence, she is not the best pos. 5 support and usually does best when played as a greedier pos. 4.

Nonetheless, Moonlight Shadow is always useful regardless of the level of farm you have.

Synergy

Setup for Arrow: Bane Elemental, Shadow Demon, Naga Siren, Winter Wyvern, Void, Venge

Bane Portrait
Shadow Demon Portrait
Naga siren
Winter Wyvern Portrait
Faceless Void Portrait
Venge
Heroes with long disables are ideal partners for Mirana because they can hold targets in one place, making landing a long-range Arrow much easier.

Arrow is the main tool that allows you to get kills as Mirana early on. Because of this, landing Arrows consistently will increase your overall impact by a great margin. Heroes that can set up for your Arrow with a long disable can be ideal partners and make your high kill potential much more reliable.

Frontline heroes with control: Tidehunter, Earthshaker, Axe, Tiny, DK, Void

Tidehunter Portrait
Earthshaker Portrait
Axe Portrait
Tiny
Dragon knight
Faceless Void Portrait
Melee heroes or/and initiators that have good control can benefit a lot from Moonlight Shadow and her ranged damage output.

If the enemy team doesn’t have Sentries or a Gem, you can use Moonlight Shadow to get your teammates in perfect position for a fight (right next to your opponents). This is most useful for powerful team fight initiators or melee heroes that need to be close to have an impact. An instant disable out of invisibility is a very powerful way to start a team fight or just to gank a lone target. 

Moreover, Mirana is a ranged damage dealer. Having front-line tanks with control is amazing for her because they will draw the attention of the enemy team and will allow her to right-click her targets freely.

Counters

Weak Against:

Bloodseeker

Bloodseeker: Thirst makes Moonlight Shadow very hard to use defensively, because if you use it to disengage fights some of your allies are likely to be on low enough HP to get revealed. Rupture is a direct counter to Leap – Mirana depends a lot on her mobility to stay alive and get out of bad positions. Finally, Bloodrage makes BS very strong vs Mirana in the lane – he can out-last-hit her and recover the not-that-high harass damage she deals.

Lane Counters: Lone Druid, Puck, Broodmother, TA, OD, Clinkz, Bloodseeker

Lone Druid
Puck Portrait
Broodmother Portrait
Templar Assassin
Outworld Devourer
Clinkz Portrait
Bloodseeker
Try to avoid laning against heroes with very high attack damage.

Lane dominators, especially heroes with high damage for last-hitting, are hard for Mirana to face in lane because of her low attack damage. It’s best to try to dodge such lanes or if not possible – to ask a support to help you out.

Silences and long/instant disables: Puck, ES, Naga, Rubick, Axe, Bane, Slark

Puck Portrait
Earthshaker Portrait
Rubick
Axe Portrait
Bane Portrait
Slark Portrait
Avoid picking Mirana versus teams with multiple counters to Leap.

Mirana relies heavily on Leap to stay alive and heroes who have mechanics that prevent her from using it (silences, roots, etc.) could become a big problem.

Counters to Moonlight: Bounty Hunter, Zeus, Slardar, Bloodseeker

Bounty Hunter
Zeus Portrait
Slardar Portrait
Bloodseeker
If your game plan relies heavily on Moonlight Shadow ganks, avoid these heroes.

Needless to say, true sight directly counters Moonlight Shadow. Zeus is probably the scariest of the bunch because he can provide true sight without pre-casting a spell on the enemy team (i.e. he can reveal already invisible heroes). Moreover, his magical nukes make it hard for Mirana to survive fights without BKB.

Strong Against:

Cores susceptible to kiting: Sven, Troll, Ursa, PA, MK, Jugg

Sven
Troll Warlord
Ursa Portrait
Phantom Assassin
Monkey king
Juggernaut
Mirana can punish squishy heroes by constantly pressuring them with pickoff attempts with Sacred Arrow.

Leap is a great mobility skill and the fact that it has multiple charges means that Mirana can actually kite melee carries who are traditionally hard to kite. For example, even if PA closes the distance with her Blink after your first Leap, you would often have another one to create even more space between yourself and the enemy carry.

Your long attack range is also very useful against heroes who want to get up in your face.

Long Range right-click heroes: Drow Ranger, Medusa, Sniper, Invoker

Drow Ranger
Medusa
Sniper
Invoker
Mirana does decently well against immobile back-line heroes.

Leap allows you to close the distance and get in their face very quickly. This could help you and your team burst them down. If needed (e.g. against Medusa’s ult or Invoker’s combos) you can use another charge of Leap to disengage.

Moreover, such heroes tend to stay on one spot in fights and right-click (behind the clutter of the actual fight). This makes them much easier targets for a Sacred Arrow if you find the right angle. Moreover, especially in lower brackets, the person playing this hero will be focusing on the targets they are attacking and wouldn’t have the presence of mind to actively dodge arrows.

Squishy supports, especially with channeling skills: AA, SS, Lich, Silencer, Witch Doctor, Enigma, Warlock, CM

Ancient Apparition Portrait
Shadow Shaman
Silencer
Witch Doctor
Enigma Portrait
Warlock
Crystal Maiden
Mirana can snowball in the mid game by picking-off squishy immobile supports thanks to her burst damage.

Unlike most AGI carries Mirana has a lot of burst damage right after the laning stage and she can kill almost instantly (with an arrow + double Starstorm) squishy support heroes.

Heroes with channeling spells (or who don’t to tend to move a lot in fights) are the easiest arrow targets out of all heroes (they don’t move while channeling).

X-hits to kill: Phoenix, Undying

Phoenix
Undying Portrait
Leap and her long range attacks counter Tombstone and egg.

Mirana has great range, mobility and an ability that gives her attack speed. This makes her the perfect hero to destroy the Tombstone or Phoenix egg.

Skills

Starstorm Mirana
Sacred Arrow Mirana
Leap Mirana
Moonlight Shadow Mirana

Calls down a wave of meteors to damage nearby enemy units. The closest enemy unit to Mirana in a 425 radius will be struck a second time for 75% of the damage.

STATS

Cast Animation: 0.5+0

Main Radius: 650

Secondary Radius: 425

Main Damage: 75/150/225/300

Secondary Damage: 56.25/112.5/168.75/225

CD: 12

Mana: 80/105/130/155

Aghanim's Scepter

Passively triggers Starstorm every 10 seconds. Does not trigger if the enemy doesn't see Mirana.

Starstorm

Nuke Damage

Starstorm is your primary source of nuke damage and is usually the first skill you want to max. The main reason is that it is reliable (with Arrow there is always the possibility that you might miss your target). In addition, it deals AoE damage, which makes it very useful for group fights and even more importantly - farming.

Clearing the creep wave with a Starstorm and a couple of attacks is definitely an option. In fact, if you want to maximize your farming, you need to use Starstorm as often as possible. The problem is mana sustain; however, you can solve it partially with Aquila, Bottle or Clarities.

In terms of damage, if you manage to hit your intended target with both Stars, they could deal up to 525 magic damage at max level. All other targets within the range of the spell get hit for 300.

Secondary Hit          

First of all, the easiest way to know if a target is close enough for a Starstorm is to see if the target is in range for an attack. Since the radius of Starstorm is 650, while your attack range is 630, if you are in range to attack a target, you are in range to hit it with Starstorm as well. Once you cast Starstorm, you will hit the target even if it blinks or force-staffs away – if it was targeted by Starstorm when you cast the spell, the target can’t dodge it by moving away.

If you want to maximize the efficiency of the spell and get the secondary hit, you need to be close to your target of choice – the second star always hits the closest target, so the safest option is to get in melee range. You usually do this by using Leap at the target just before Starstorm.

  • The second star will hit the enemy if he is within 425 range when the spell is cast. Even if the enemy blinks, force-staffs away or turns invisible, the second star will still hit.
  • The second star will always select a target that can be hit – that is, if all other targets but one are magic immune, the star will hit the one that isn’t magic immune. 
  • If a target dies by the first star, the secondary star will choose a newly available one. This means that if, for example, there are half-HP creeps next to the hero who you want to kill, this is not a problem – they will die from the first wave of stars and the secondary will land on your target. 
  • Finally, Starstorm doesn’t hit units you don’t see at the time you cast the spell – you cannot kill invisible targets or targets in the fog of war.

Fires a long-range arrow with deadly precision, which stuns and damages the first enemy unit it strikes. The stun duration ranges from 0.01 to 5 seconds, with bonus damage up to 140 added, based on the distance the arrow travels to its target. Instantly kills the first non-ancient creep it hits.

STATS

Cast Animation: 0.5+0

Cast Range: 3000

Max Travel Distance: 3067

Arrow Collision Radius: 96

Number of Arrows: 1 (Talent 3)

Base Damage: 50/140/230/320

Maximum Bonus Damage: 140

Min Stun Duration: 0.01

Max Stun Duration: 5

CD: 16/15/14/13

Mana: 100/110/120/130

Sacred Arrow

Kill attempts: Sacred Arrow is a single target nuke/stun which makes it most useful for kill attempts. Generally, you want to start the fight with an Arrow, and if you are successful at hitting your target, follow up with the rest of your repertoire. The cooldown isn’t too long, so the spell is relatively spammable – you can afford to try your luck often. Because of the huge range, even if you miss, you lose nothing but some mana.

Scouting: The projectile gives 650 range flying vision. This is very useful when you want to check key positions like a high-ground choke point or the Rosh pit.

Farming: The arrow instantly kills creeps. This is the least flashy and the most important mechanic for the spell early on. You can use it to kill the big creep in a jungle camp to get additional resources – viable both from a long range if you are playing in the lane and want some additional gold, or from a short range if you want to farm the whole camp.

Efficient usage:

You get the full range and full stun just from one lvl. This is what makes the spell such a strong early game killing tool – if you land a long-range arrow, this will give you and your allies up to 5 seconds to hit the target with attacks.

The projectile is relatively slow, which means that it takes some time to travel the maximum 3k range. That’s why having someone to set up your arrow with a more reliable disable is the easiest way to ensure you’ll hit your target. If you attempt a long-range Arrow, it might be worth it to start running towards the target right when you shoot it. This way, if you hit, you will be closer to the target and ready to attack.

The stun scales with the range – the longer the range, the longer the stun duration. For every 150 distance traveled the stun increases with 0.5 seconds. Because of this, at 1500 range you get the maximum duration of 5 seconds, while at 300 range you get 1 second of stun. As a result, if your target is being held in one place (by another disable), it might be worth it to try to land a relatively long range Arrow. You need to bear in mind that the longer the range, the longer time it will take you to reach the target after you have shot the Arrow (the problem is solved if you have Leap). Sometimes, a short stun duration is all you need to finish the kill, and short-range Arrows are much harder to dodge.

The damage also scales with the distance but less dramatically than the stun (14 bonus damage per 150 range). You can get up to 140 bonus damage; however, the main portion of Sacred Arrow’s damage (not based on the distance) is dealt even from melee range. Because of this, if you want to use the Arrow more for the damage rather than the stun, it is smarter to shoot a short-range Arrow – it will deal most of the damage and at the same time, as we mentioned, it is much harder to dodge.

Aiming:                                               

If you are shooting at a target which you expect to walk in a straight line with a normal MS of 350 and is currently approximately at 3k range from you, you need to shoot the Arrow at 1050 units in front of your target. For a target which is at 1500 range, this would be 525 units, for 750 range – 262.5 units, etc.

It is quite hard to hit a target when it is close to creeps - try to aim at isolated targets (e.g. lone ranged damage dealers) or groups of heroes to increase your chances.

Sacred Arrow hits invisible units – you can in theory snipe targets that are invisible or detect the movement of invisible heroes if your arrow hits them. The angle you are shooting at is also important – especially in the lane, it is easier to hit Arrows coming from the side rather than traveling along the lane because of the creeps.

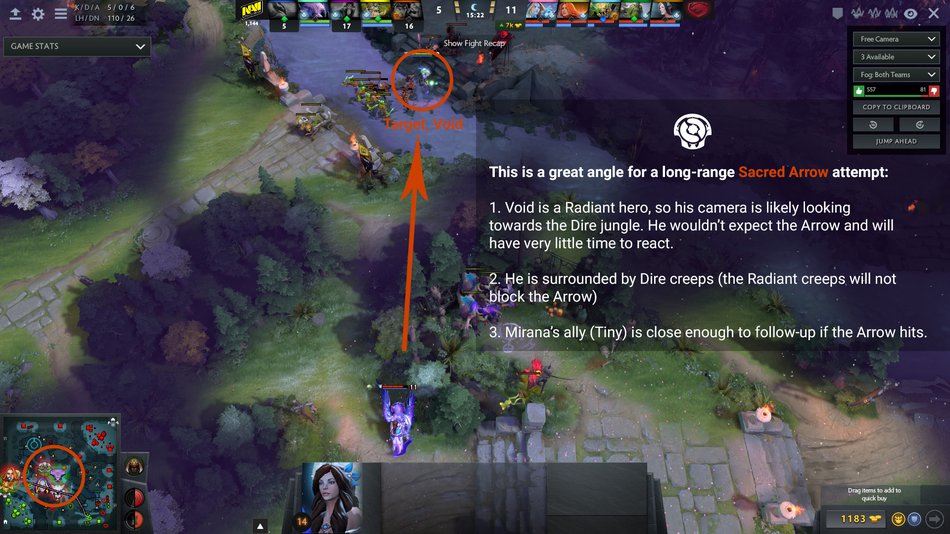
When you attempt an Arrow, you must always bear in mind that the projectile is quite easy to dodge if seen. Consequently, obvious long-range Arrows are more often than not useless. You need to shoot the Arrow from a smart angle so that your opponent has very little time to react from the moment he/she sees it. If the Arrow travels over trees or a high ground (in the fog of war) before it reaches its target, it will be much harder to notice and as a result – dodge. Another thing to consider is the camera positioning of your target. For example, in the middle lane, the Dire mid laner usually has the camera moved a bit south-west in order to see the creeps and the opponent, while the hero is in the upper right end of the screen. Hence, if you shoot an Arrow from such an angle that it enters the screen of the Dire mid laner from the east (right) side, the player will have much less time to react. If you shoot the Arrow from the lane, on the other hand, dodging it will take almost no effort. 

In general, players have their camera fixed on the action. In a fight, it is much easier to hit heroes with Arrows if you shoot from behind or the sides rather than from the direction of the fight.

Mirana leaps forward into battle, empowering herself with a ferocious roar that grants bonus attack and movement speed. Speed bonus lasts 2.5 seconds.

STATS

Cast Animation: 0+0

Leap Distance: 550

Move Speed Bonus: 8%/16%/24%/32%

Attack Speed Bonus: 60/80/100/120 (Talent 140/160/180/200)

Speed Duration: 2.5

Number of Charges: 3

Charge Replenish Time: 60/50/40/30

CD: 6

Mana: 40

Leap

Mechanics:

Always turn to the direction you want to Leap in (by right-clicking on the ground) before you press the Leap button because Mirana jumps instantly in the direction she is facing. Panic-jumping to the side inefficiently happens a lot to inexperienced players. The range is also fixed, which means that you need to think about where you will land. It is easy to get stuck in trees or some other impassable terrain which could cost you your life.

You have to remember that you have only 3 charges in your Leap, so try to not waste them all. Save at least one charge to get out of bad situations.

Offensive Use:           

Leap gives a huge AS boost for a very short period of time. Because of this using Leap once and instantly focusing down a target with attacks is a great practice, especially when you have Maelstrom’s procs.

Of course, the repositioning and MS of the spell could also serve offensively – you can use it to get closer to your target, especially after a successful arrow.

Defensive Use:

When you are running away, it is smart to use the jump over impassible terrain. This will make chasing you for most opponents impossible. Even if there is no such terrain, however, the distance of the leap and increased MS are usually enough to disengage slower enemies.

Always bear in mind instant disables and silences – this is probably the most important thing to do to stay alive in fights as Mirana. Don’t jump in offensively if you suspect you could get disabled, because it will prevent you to get to safety and you could easily get nuked down.

Turns Mirana and all allied heroes invisible. If a hero is revealed, invisibility will restore after the fade delay as long as Moonlight Shadow's duration has not expired.

STATS

Cast Animation: 0.5+0

Radius: Global

Fade Delay: 2.5/2/1.5

Movement Speed Bonus: 15%

Duration: 18

CD: 70/65/60

Mana: 100/150/200

Moonlight Shadow

The fade time is very long. This means that if you don’t want to be seen you (and everybody from your team) need to stay in the fog of war for a few seconds (2.5 on lvl 1). This is important to take into consideration also when you are using the skill defensively – you wouldn’t be able to cast it in the last second and survive.

Generally speaking, the spell is much more efficient when used offensively. It is very hard for your opponents to keep Sentries everywhere at all times – even if you are playing versus good opponents, you will get openings to initiate a favorable fight or gank with Moonlight Shadow.

Fight Initiation

Theoretically, Moonlight Shadow has the potential to be one of the most devastating initiation spells. If your opponents are staying together (e.g. coming to push your tower) and don’t have Sentries or a Gem, Moonlight will allow you to position your whole team on top of the enemy team and initiate in the best possible way with the spells you have. As a result, when Moonlight Shadow is combined with powerful team fight control spells, it can dictate engagements.

Practically, however, decent opponents will always have Sentries ready when they are staying as 5. This doesn’t only protect them from Moonlight, it could backfire on your team. Your opponents might bait you into thinking that they have no reveal and let your heroes get close. Then, they can initiate on you before you have a chance to start the fight yourselves.

Consequently, constantly looking in the inventories of all opponents (especially the supports) before initiation is crucial and even if you don’t see Sentries there, don’t take it as a guarantee that they don’t already have pre-placed wards. Carrying a gem on one of your frontline heroes might save you some blunders (because you will notice the Sentry and will be able to back off immediately).

Ganking                        

Ganking with Moonlight Shadow is considerably easier than initiating team fights as it is impossible for your opponents to constantly have Sentries around all heroes when they are spread out and farming. This will give you valuable initiation opportunities – think of your ultimate as a very powerful Smoke of Deceit that doesn’t break when you get close to your victim.

Every time you want to gank, the first thing you need to do is ask your allies to get out of vision. If an ally is staying outside the fog while you cast Moonlight Shadow, your opponents will notice and will immediately back out.

The spell gives you a very good opportunity to get pickoffs, which means that if you want to maximize the impact of Mirana in the game, you need to use the ult as often as possible. Even if you don’t see an ideal gank target, you can simply use the spell as a smoke: make your allies invisible and enter the enemy jungle, searching for farming heroes.

The effect of the spell is global, which means that there are various ways you can use it efficiently even if you are not participating in the gank. Let’s say you are farming in the jungle but your allies DK and Lina want to gank. If you cast Moonlight Shadow, you will increase their chances of success dramatically because you will allow them to get in position to cast their stuns easily.

Defensive Use

When your opponents are the aggressors, they know you have your ultimate as a tool for escape, and they will always carry detection, making it almost impossible to run away with the spell.
Because of these reasons, the correct way to use it is to try to be proactive and to get something done with it almost every time it is available.

It is very hard to save gank victims with Moonlight. In team fights, however, you have a much bigger chance to create chaos and save some heroes. When you get initiated and an unfavorable fight starts, you can use Moonlight. Your opponents will surely have detection and will plant it and probably will focus some heroes down. At the same time, however, your other allies might be able to create some distance between themselves and the fight, which will put them outside of detection range and will make it very hard for the enemy team to chase and clean-up after the initiation.

Sacred Arrow Example:

Mirana Arrow

Skill Builds

On lvl1:

Leap on lvl 1 is the defensive option, allowing you to disengage unwanted fights. Arrow is the usual choice, allowing you to attempt kills even from lvl 1, especially with combos that can set up for your Arrow. More importantly for a core Mirana – it allows you to secure the ranged creep last-hit when your damage is lowest. Generally, the smart thing to do is to save your first point until you need one of the two skills.

Moonlight Shadow:

In more passive games with static lanes, you usually want to delay your ultimate because you wouldn’t use it a lot while your allies are visible in their lanes. If the game becomes action-packed from early on, however, having the invis could be great for some early ganks. The rule of thumb is that as a support Mirana you usually want to have it sooner rather than later, and as a core, you usually want to delay it a bit.

Starstorm Skill Build
Sacred Arrow Mirana
1
Leap Mirana
2
Starstorm Mirana
3
Starstorm Mirana
4
Starstorm Mirana
5
Leap Mirana
6
Starstorm Mirana
7
Moonlight Shadow Mirana
8
Leap Mirana
9
Talent Icon
10
Leap Mirana
11
Moonlight Shadow Mirana
12
Sacred Arrow Mirana
13
Sacred Arrow Mirana
14
Talent Icon
15
Sacred Arrow Mirana
16
Moonlight Shadow Mirana
18
Talent Icon
20
Talent Icon
25
Pros: maximum kill-potential from the Starstorm damage, Arrow stun, and the Leap mobility; fast farming;
Cons: delayed ultimate; low arrow damage;

You need one point in both Sacred Arrow and Leap from early on because they provide a lot of value. Leap is your main survivability tool, while arrow gives you the maximum range and stun duration just with 1 point. If you manage to hit a long-range arrow, you can even use Leap offensively to secure the kill.

Maxing Starstorm first is the best option because you can use it both for kill attempts (the double-star deals very high single-target damage) and for farming – you can out-push the wave with the AoE damage or even kill camps more easily.

You max Leap second because the lower charge replenish time (CD) is vital for your survivability. The bonus attack speed is also very useful especially when you have Maelstrom’s proc.

Arrow is your least important skill to max because you mainly use it for the stun duration, not the damage. For a support Mirana, however, you may choose to get a second point in Arrow at level 3, instead of getting a point in Starstorm. This will potentially increase your kill potential early on and will help you manage your mana better - the Mana cost of Sacred Arrow is the same at all levels and you will not usually have enough Mana to support both Sacred Arrow and Starstorm as a support in the early laning stage.

Talents

-70  Moonlight Shadow CD

25

+2 Multishot Sacred Arrows

+25 Mana Break

20

+12% Spell Amplification

+80  Leap Attack Speed

15

-5s  Sacred Arrow cooldown

+200 Health

10

+15 Damage

Lvl10: Both options are equally viable. Go for the health if the enemy team has nuke damage, go for the DMG if you don’t feel threatened and can easily stay alive in fights.

Lvl15: Leap is always your choice if you plan to transition to a right-click carry. The arrow CD is viable only if you are a support and build utility items.

Lvl20: Mana Break is not game-breaking especially on lvl20 but it’s your usual choice because at that point you are mostly a physical damage carry. The Spell Amp could be used when you go for an Aghanim’s (and possibly Dagon) build, but this is rare.

Lvl25: Both talents are viable options. If you have good opportunities to initiate with Moonlight Shadow, the CD reduction is ridiculous and could keep your team invisible most of the time. The triple arrow, however, is also very powerful in cluttered engagements, especially when used from mid-range.

Item Builds

Right-Click Build

This build allows you to scale into a very potent right-click carry in the mid and late game.

In the early game, you go for the usual items for an AGI carry. A fast Aquila is vital because it gives you a much-needed boost to your right-click DPS. If you still have problems securing last hits you can go for Phase instead of Treads, but Treads are the usual choice because they make you a bit less squishy and help you more for farming with Maelstrom thanks to the AS.

The key item to the whole build is Maelstrom – it increases your farming speed a lot and with Leaps big AS boost you have very decent kill potential from early on. Afterward, you usually want to secure your survivability. In this example, you go for Dragon Lance and BKB, but you could choose alternative items. If you feel you don’t need the BKB so early, you can get it after the Mjollnir. 

In the late game, Mjollnir + Daedalus are the standard right-click items you get. Butterfly also gives very high value as on every AGI carry. Satanic is a great item in the super late game to help you stand your ground against enemy carries at least for your BKB duration.

Starting items
Wraith Band
Faerie Fire
Iron branch
Pulled Tango
Pulled Tango
Early game
Wraith Band
Power treads Strength
Magic wand
Mid game
Maelstorm
Dragon lance
Black King Bar
Late game
Mjollnir_icon
Daedalus
Butterfly
Boots_of_Travel_1_icon
Satanic
Wraith Band
Faerie Fire
Iron branch
Pulled Tango
Pulled Tango
Wraith Band

Wraith Band: A second (or even third) Wraith Band provides very decent stats. The bonus damage is great for 1v1 matchups.

Power treads Strength

Power Treads: Treads are the standard choice for a core Mirana if you feel you need more stats for survivability or mana pool.

Magic wand

Magic Wand: Wand is very useful for all heroes and Mirana is not an exception. Getting the item can help you with mana sustain in the early stages of the game – it could give you the mana for a Leap that can save your life or an additional nuke that can secure a kill for you.

Maelstorm

Maelstrom: The core item for a right-click Mirana build. The lightning proc synergizes very well with the Leap AS boost and gives you very decent damage output. More importantly, it increases your farming speed a great deal – you will no longer rely just on Starstorm for AoE damage to push-out waves and clear camps.

Dragon lance

Dragon Lance: Good stats in addition to an attack range amplifier that buffs your already impressive attack range and helps you deal damage from a safe distance. Go for this item if you are aiming to become a physical damage dealer. Otherwise, it is not worth the investment. The possible upgrade into Hurricane Pike in the late game increases further your mobility and makes you even more elusive. Don't rush the Hurricane upgrade - you already have mobility, you need stats and damage.

Black King Bar

BKB: this is your standard protection against magical damage and disables – you need it to stand your ground and right-click in team fights. You usually want to get it before team-fighting starts. In games where the enemy team has few disables, however, you could delay it.

Mjollnir_icon

Mjollnir: you usually want to upgrade Maelstrom to Mjollnir after you’ve secured your survivability (this usually means after BKB). Nonetheless, in games where the enemy team has little lockdown and nuke damage, you cha choose to build it earlier.

Daedalus

Daedalus: the best right-click damage boost after you’ve secured your AS with Mjollnir and Leap. 

Butterfly

Butterfly: Butter is probably the most cost-efficient late game item for any ranged agility hero. It gives a lot of AS, decent attack damage and evasion – all of which you need to start being able to man-fight more conventional carries.

Boots_of_Travel_1_icon

Boots of Travel: especially useful if you are forced to split-push in the late-game.

Satanic

Satanic: if you already have good DPS, this item will allow you to stand your ground and man-fight other carries, which makes it great for the right-click build in the super-late game.

Aghanim’s Build

The Aghanim’s build has fallen-off lately mostly because it doesn’t allow Mirana to scale as a true carry in the late game. In fact, even pos. 4 Miranas often go for a variation of the Maelstrom build. Nonetheless, an Agh’s burst damage build is still something to keep in mind if your team has enough late-game right-click carries.

In this example, the starting & early game items fit a roaming Mirana. If you are a core, you can simply use the standard AGI core items from above.

The Aghanim’s makes Starstorm a great tool for pushing out the waves and a devastating AoE nuke in fights. That’s why you usually want to follow it with a Blink, which allows you to position yourself perfectly for Starstorm and afterward disengage easily with Leap(s). You can repeat this every time your spells are off CD. 

In the late game, ETH + Dagon will increase your burst potential a great deal. Of course, it’s also possible to get some defensive items (e.g. Linken’s) to keep yourself alive if needed. It’s worth noting that BKB is less valuable in this build because you will rarely stand your ground and right-click - your playstyle is to go in-and-out of fights.

Starting items
Boots of Speed
Clarity
Clarity
Early Game
Arcane Boots
urnn
Mid Game
Aghanim's_Scepter_icon
Blink_Dagger_icon
Late game
Ethereal Blade
Dagon5
Scythe of Vyse
Boots of Speed

Boots of Speed: you are a relatively fast hero with huge attack range. Brown Boots help you harass and kite your lane opponents safely as a support. Moreover, the MS is very useful if you decide to roam from early on.

Clarity
Clarity
Arcane Boots

Arcane Boots: if there aren’t sufficient heroes in your team that can buy the Arcane Boots, you can opt for them. This will not only help your team – you can use the mana sustain to spam your Arrow very often, not only for kill attempts but also simply for scouting.

urnn

Urn of Shadows: since as a support you will be roaming for kills for the majority of the early game, you will have a lot of chances to fill up your Urn. This will give you mana and more importantly – HP sustain for the whole team.

Aghanim's_Scepter_icon

Aghanim’s Scepter: Agh's passively triggers Starstorm every 10 seconds (if there are no units around, the spell waits until there are valid targets). This gives Mirana huge burst damage potential – on theory a single unit could get hit by 3 stars. Even more importantly, Agh's increases Mirana’s flash farming potential. The stats and bonus HP and Mana are also quite useful for fights or farming. The big drawback of the item is that it doesn’t help the hero become a better physical damage carry.

Blink_Dagger_icon

Blink Dagger: purchased as a supplement for Aghanim’s, Blink allows you to reliably deal your whole magic nuke damage to heroes in fights (especially isolated enemies). Initiating with Blink also leaves you the option to disengage with Leap. Furthermore, if you are slit pushing a lot, Blink can make it easier to avoid ganks.

Ethereal Blade

Ethereal Blade: a great choice when combined with Agh’s and possibly Dagon. Increases your burst damage a great deal. The slow from the active could also be used to land the Sacred Arrow easier. The AGI bonus is also not wasted as Mirana is an AGI hero – it will increase your right-click DPS when needed.

Dagon5

Boots of Travel: The item helps Puck in two ways. First, it increases his global ganking potential – you can teleport on creeps or on summoned units (such as Visage’s Familiars) and gank targets anywhere on the map. Second, BoT allows Puck to split-push more effectively.

Scythe of Vyse

Scythe: Combined with Blink, Hex gives you an instant and very reliable source of disable, which in turn allows you to burst down targets more easily and safely.

Other Items

Early & Mid game
Phase boots
Bottle
Diffusal Blade
Late game
Manta_Style_icon
Linken's Sphere
Monkey_King_Bar_icon
Phase boots

Phase Boots: the damage bonus is great for last-hitting in the lane (it compensates for Mirana's low attack damage).

Bottle

Bottle: Bottle is a great regen tool if you play mid or roaming and have access to runes. The alternative is Clarities.

Diffusal Blade

Diffusal Blade: combined with your Mana Burn talent and Manta, Diffusal will increase your DPS decently. Nonetheless, it is inferior to Maelstrom because you need the AoE damage for farming.

Manta_Style_icon

Manta: a great tool to counter Roots (which are dangerous because they prevent you from Leaping). The stats are decent on Mirana (you can always use the bonus AGI and MS), but the illusions themselves will be very weak.

Linken's Sphere

Linken’s Sphere: Linken’s is a situational pick that can protect you from direct disables that work through BKB. Unlike some other AGI carries, however, rushing the item is not a very popular choice for Mirana. She needs more right click power (or Aghanims) to start flash farming and having an impact in fights. In the early and mid-game you might have to rely on your positioning to not get shut down by such powerful disables. The Linken’s will help you stand your ground in late-game team fights.

Monkey_King_Bar_icon

MKB: MKB is a direct counter to any source of miss chance (evasion, various debuffs, etc.) and the proc works great with the AS boost of Leap. 

Early Game

mirana model

In the early game, Mirana is a very versatile hero that can adapt the play-style to the specific lane and the position she is playing.


The way she is able to get the best out of the laning stage is by using her very good kill potential (thanks to the arrow and Starstorm), her elusiveness (Leap), and her cheap farming tool in Sacred Arrow.

Farming:

Mirana has a decent attack animation, but at the same time, her attack damage is quite low. This means that in the early laning stage contesting last hits against heroes with high damage might be very difficult – if you know you will be in a lane where you will have to fight for last hits, you might want to invest in items that increase your damage.

Use Sacred Arrow to secure the ranged last hit in 1v1 lanes if you suspect it could get denied. It is by far the most important creep and doing this will not let you fall behind in farm too much until you get some damage items.

If you are on the side lanes and contesting last hits is not such a problem, use Sacred Arrow on the nearby large jungle camp to get some additional resources. How often you do this depends on how much mana you can spare – if you have very good kill potential with your lane partner save the arrow for kill attempts. If getting early kills doesn’t seem viable, use it as often as possible for farming.

Harassing & Zoning out:

Passive Harass:

Because of your long range and decent attack animation, Passive Harass is relatively easy, especially against melee heroes or heroes with a short attack range. The more attack damage items you get, the more efficient your active harass becomes.

Active Harass:

In the early laning stage, you could try to hit a mid-range arrow and follow up with Leap and right-clicks. This could deal very decent harass damage and if your opponent is not on max HP it could even lead to a kill.

In the late laning stage, you could use Starstorm to secure last hits and harass at the same time. This is mana intensive, however. If you don’t have enough mana it would be better to save it for a kill attempt.

Kill Potential:

Your main killing tool on early levels is your Arrow. With a lane partner with good kill potential, if you manage to land a relatively long range Arrow, you could get a kill even from lvl 1. The long stun duration buys a lot of time to auto-attack.

In the later laning stage, when you have more levels in your Starstorm, your kill combo is the following: you manage to land an Arrow, you Leap towards the target, get in melee range, land a double Starstorm and finish the kill with attacks.

If the target is on relatively low HP and you don’t need a long stun duration to get the kill, you can choose to Leap first to ensure an easier to land Arrow and finish the kill the same way. For example, wait for an enemy to come closer to get a last-hit, you can use Leap and then cast Starstorm and short-range arrow to get the kill – try to Leap close to the enemy hero so that you can use can hit twice with Starstorm. 

The most reliable way to get kills, however, is with an ally that can set up for the Arrow. Otherwise, there is always a certain amount of luck involved in the success of your kill attempts. Anyway, if you don’t have this luxury, you should still try to land arrows whenever you think a kill is possible. Even if you are not successful, you don’t lose anything by trying – shooting the Arrow doesn’t require commitment, and you don’t risk anything but some mana.

Rotations:

Support Mirana

The key to success is landing your Arrow form a decent range, which will give you and your allies which are nearby time to finish the kill. With a setup, this could be relatively easy. Without setup, however, you need to think about the way you are shooting it. Take into consideration the aiming tips we have in the skills section of this guide – try to shoot from such an Angle that your target is unlikely to see the Arrow. Remember that when you are rotating to a lane in which you are not usually staying the enemy, there will not expect to get hit by an Arrow and will not be vigilant at all times.

Choosing where to rotate depends on the heroes in the lane. Even elusive and hard to kills targets can easily die to an Arrow initiation provided your ally in the lane has some damage to secure the kill. Because of this, you don’t really care if the enemy is tanky or squishy, mobile or not; the success of your rotations depends on your allies. Usually, it is best to rotate with another support – this way there will always be at least three heroes to finish the kill.

Core Mirana                        

For Mirana rotating out of the lane is optional. Mirana is strong at ganking because of her high nuke damage and control early on. So, if you decide that it is very important to attempt killing a particular hero, it might be worth it to leave the lane to do so. At the same time, you are a carry hero and you need to get as many resources as possible. Consequently, staying in the lane even in the late laning stage is not a bad choice.

Your biggest timing is when you get your ultimate. Try to coordinate your team and to capitalize on a Moonlight Shadow gank soon after you get the spell. You can gank your lane opponent; it isn’t necessary that you pressure the other lanes. You can even use your ult to help your allies gank without you present. 

Finally, it is much safer to rotate to a lane where your allies can set up your Arrow. This way the chances that your gank will succeed are much greater. Nevertheless, not having setup shouldn’t discourage you. If a lane needs help, it is better to try to help them rather than stay passive.

Solo Mid

Even though Mirana is not a lane dominator, she can do quite well in a 1v1 situation. If you simply try to get last hits, you might get the worse end of the exchange (low damage) - try to create some space for yourself by pressuring your opponent with harass and kill attempts. Nevertheless, you are a carry, so your own gold and XP gain is your own priority. Last but not least, you can attempt to gank either alone or together with an ally. Your rotation will be mainly connected to the movement of your allies because of Moonlight Shadow. Moreover, you will likely need a setup for your arrow.

Get levels and farm
Harass your lane opponent
Attempt kills, rotate and gank
Controlling the Rune:

At lvl 5/7 your Starstorm starts dealing significant AoE damage. This opens up opportunities for you-you can use it to push out the wave so that you can more easily contest the rune.

When it comes to rune control, Mirana has a significant advantage over most heroes. First of all, Leap makes you mobile, and with it, you can easily race slower mid lane heroes to the rune. Secondly, if you have good vision on the rune spot, you can attempt Arrow hits which can even set up for kills provided a support from your team is in position. Aiming the Arrow at the rune just before your lane opponent is about to reach it is a good tactic.

Double-wave

By instantly killing the ranged creep it is possible to double-wave your opponent fairly easily. This could be useful in the early laning stage to force him to last-hit under tower. Remember that you have low attack damage, so contesting last hits in a static lane would put you at a disadvantage. Because of this using such creep manipulation tricks is useful. (Don’t forget to use aggro tricks as well).

In the late laning stage when you have more levels into Starstorm you could use double-waving to set up a kill attempt. When your creeps push under the enemy tower you could attempt to Leap and get a double Starstorm on your opponent. Followed up by right-clicks and arrow this could give you a solo kill.

Video Example (Sumail):

Sumail plays mid flawlessly against Storm Spirit.

Notice that at early levels he focuses heavily on harassing. This is because he knows he has an advantage in the range of his attack. If he passively fights for last hits he will lose, because Storm has higher damage. Harassing him to make him pay for last hits is the better option.

Sumail even takes Starstorm on lvl1 which is unusual. While it doesn’t guarantee the ranged last hit like Sacred Arrow, it does some additional harass damage on the Storm. It pushes the wave (because of the AoE damage), but his is not a big deal in this matchup because Storm will constantly be pushing the wave as well with Remnant.

Notice that Sumail buys two Wraith Bands (later one becomes an Aquila) and Phase Boots. This shows how highly he values more attack damage – it’s vital for taking last hits comfortably.

On 03:08 (of the vide), Sumail gets a beautiful solo kill. Notice how he sets it up – he fires the arrow just as his opponent commits to the last hit, which doesn’t give him a chance to react. 

Tiny’s rotations are also interesting to note – before lvl6 Storm is not mobile, which makes him vulnerable to ganks. Tossing Storm on top of Sumail guarantees that he will be able to get a double Starstorm and secure the kill.

Dual Lane Core

Mirana is one of the strongest carries to put in a dual lane because of her huge combo kill potential from early on. Usually, you want to accommodate this kill potential and make it more reliable by getting her a lane partner that can set up for the Arrow.

Depending on your lane partner, you need to start attempting kills right when your kill combo becomes potent enough. In some cases, this could be even from level 1. For example, together with Shadow Demon or Bane, you can land a very long-range Arrow thanks to the disables of the supports and secure the kill with attacks.

If kill attempts are not possible at the moment, your priorities should be to:

Secure last hits
Passive harass – use your long range to whittle down the regen of your opponents
Farm creeps with Sacred Arrow – either the ranged creep or the nearby large jungle camp
Dual Lane Combos

As we mentioned the ideal partners for Mirana in a dual lane are heroes that can set up for her Arrow. This works best with long duration disables which can allow Mirana to easily land a long-range Arrow – the more stun duration you get from the Arrow, the more time you will have to attack the hero freely, and the higher the chance will be that you are able to finish it off.

It is preferable that your lane partner is ranged because the kill combo relies on auto attacks and a ranged hero will be able to stick to the target and auto attack for longer. 

Any source of additional damage (nukes, dots, etc.) is a good bonus.

Bane Portrait

Bane: Nightmare is one of the longest-duration disables on lvl1. Moreover, Bane is a very strong laner and with Brain Sap and right-clicks he can help a lot at harassing and securing kills. Bear in mind that good opponents could try to steal the Nightmare from their lane partner when they see you fire the Arrow, which will allow your target to dodge it.

Shadow Demon Portrait

Shadow Demon: the Disruption into arrow combo requires good timing, but it’s not that difficult with some practice. On lvl2 the combo becomes even more powerful because SD could put the damage AMP on your target and make it squishier. Bear in mind that the Disruption illusions also deal DPS to the disabled target.

Venge

Venge: setting up the arrow with Venge is much more difficult because her disable has a much shorter duration (consequently you’ll have to hit shorter-range arrows). Venge, however, has another synergy with you – she increases your damage and removes armor from enemies, which makes your passive harass stronger.

Later in the game, the Swap into Arrow combo is extremely powerful (but difficult to pull off and requires communication).

Other examples: Shadow Demon, Naga Siren, Maiden

Video Example (AhJit)

Ahjit playes Mirana in the offlane together with his ally Tiny against Void and Treant.

Even though this is not a tough lane (the enemy heroes don’t have kill potential on him), it’s a very hard lane to get last hits in. Both Treant and Void have much higher damage than him, so they can focus on last-hitting and denying. In order to ensure that he doesn’t fall behind in farm, he uses multiple last-hit tricks:

  • He stays in melee range to take the last hit as fast as possible.
  • He pulls the creep aggro towards him to prevent the Void from reaching the creeps.
  • He uses Sacred Arrow on enemy ranged and siege creeps to ensure the most important last hits.

On minute 05:20 (in the video), he manages to get a beautiful solo kill on the enemy Void. Crystalize thinks he can out-run the Mirana to the Bounty rune. Instead of racing him to the rune with Leap, Ahjit realizes he can ensure the Sacred Arrow hit if he times it with the rune spawn (a trick we mentioned in “Controlling the Rune”). He hits the arrow and follows up with Leap, double Starstorm and another Leap to secure the kill, managing to bring down Void from almost full health by himself.

It’s important to note that if Void hadn’t used Time Walk this kill wouldn’t be possible because he’d be able to backtrack the nuke damage, but since he used it to try to secure the rune he was left vulnerable. A similar situation happens at 08:15 in the video – Void uses Time Walk to run away, but he gets intercepted and disabled by CM. With the help of Frostbite's setup, it’s easy for Ahjit to hit the arrow and secure the kill.

On minute 12:00 Ahjit times a beautiful arrow, predicting the movement of Enigma and securing the kill. 

Notice that he stays in lane for a long time. He is practically his team’s position 1 hero and it’s important for him to maximize his farm. Moreover, he is extremely hard to gank, so staying to farm and pressure the enemy tower is the most productive choice in the long run. Nonetheless, he still uses Moonlight to try to help his allies whenever they are fighting.

Pos. 4 Mirana

If you are running a support Mirana, she will usually start the game the lane and transition into rotating to other lanes sooner rather than later, practically leaving the lane for the majority of the laning stage. Unlike some other roaming heroes, Mirana doesn’t really need a lot of levels to rotate efficiently. The success of her rotations is usually determined by the accuracy of her arrows – even on lvl1, she has the potential for a 5-sec stun.

Of course, the later the game goes, the more kill potential your core heroes will have, so the more dangerous arrows become.

If you are not in a position to get kills, you can pull and farm the jungle – arrow instantly kills creeps, so you can take the large creeps with it and finish off the small ones with attacks. When roaming you need to have enough clarities to sustain your arrow spam for farming and ganking.

Search for openings for kill attempts with arrow
Farm the jungle with arrow, pull if needed
Stay in lane to harass with attacks and help-out your core

Mid & Late Game

mirana immortal 350px

Talking about what you should do as Mirana in the mid and late game is hard because, as we mentioned, she is one of the most versatile heroes in the game. She is good in team-fighting, ganking or even split-pushing and as a result, your play style should be adjusted to the current game as an answer to what your opponents are doing.


Because of this versatility and variety of potential options, we cannot say with certainty that one activity is more important for Mirana than another. Generally speaking, however, she is better at being the aggressor either by ganking or taking favorable fights with Moonlight initiation. So, if you can do those things, this is your priority. If you cannot, you should avoid fights and farm up, getting to the late game with good items when you will be able to be a carry for your team.

Gank opponents with arrow and Moonlight Shadow to gain map control
Take team fights with the help of the initiation of Moonlight Shadow
Avoid fights and split-push (or at least out-push the waves)
Comeback Potential:

The laning outcome isn’t a huge determining factor of the play style of Mirana. If you have a resource lead, it is important to try to use it and pressure your opponents – gain map control and afterward out-farm them.

After a bad laning stage, you probably need to do the same thing. You are not the fastest farmer in the game - in fact, you don’t really flash farm before you get an item like Maelstrom (or Agh’s), so it is unlikely that you will be able to catch up by being passive. You need to use your kill potential and get as many ganks and favorable fights as possible with Moonlight and Arrow. That being said, it is possible to use Moonlight to set up fights for your allies while you are focusing on farming and split-pushing. This option, however, depends on your lineup.

Pushing & Split-Pushing:

5-Man Pushing:

In 5-man pushing Mirana is very rarely a front-line hero even if she is quite farmed. She is usually squishy and even with items could easily die if she is the one that gets jumped. You can use your Leap for more tower damage, but be careful and leave some charges if you need to escape.

Most of the time, opponents will have some initiators that can jump on you. In such a scenario when pushing as 5, try to stay at a distance and use your Arrow optimally. Try to hit a hero with it before the enemy team initiates (this could give your teammates time to finish off the tower and will make your opponents hesitant to jump). If you don’t see good Arrow targets, use it to scout the positioning of the enemy team. They might be wrapping around you to initiate from a better angle.

Split-Pushing:

Until you get your flash-farming items, you are a relatively slow split-pusher as you can kill waves only with Starstorm. After you get them, however, you could actually clear waves and push out the lane quite fast. You don’t do too much tower damage before you get right-click items. This means you usually want to push-out the wave and get back to a safer farming spot. In the late game, however, pressuring enemy towers while the enemy team is away to force a reaction is definitely a viable thing to do with Mirana.

When you see that enemies are missing and suspect they could be ganking you, you need to get away safely. If you think you are in real danger, it is not a bad move to use Moonlight Shadow to ensure you get to safety more easily. Using your Arrow to scout is also important – for example, check if enemies are hiding behind the tower to initiate on you (an enemy supports might be staying there and waiting for his ally to TP in and kill you).

If you see an opponent closing the distance, Leap is your main escape mechanism – if you manage to get it off before you are disabled, the enemy team is unlikely to be able to catch up. In case you are not sure where enemies are, you can Leap into the trees and teleport away. Alternatively, you can wait in the trees to see whether enemies are rotating to the lane. It could be that they have something else in mind (to kill Roshan or get a gank on your teammates). If you see that enemies are actually elsewhere on the map and are not coming, you can Leap out and continue split-pushing.

Team Fights:

Moonlight Initiation:

You shouldn’t think that detection totally counters Moonlight Shadow. When you are initiating a team fight with it, not all of your heroes would enter the range of the true sight right away. Usually, your initiators and tanks will be in the front lines, while the more squishy supports and damage dealers will move behind. The first heroes to be revealed will be the frontline heroes. Your opponents will have to jump on them because they wouldn’t immediately have the vision on your other heroes. For mobile pick-off heroes like Storm and other initiators who want to jump to the backlines and kill-off or control the squishier targets, this could be a big problem. After all, you want your tanks to be focused while your squishier heroes have the freedom to cast spells and deal damage. So, even with detection, using Moonlight might give your team a few seconds of freedom, which in even games might predetermine the outcome of a fight.

Positioning:

You as Mirana need to start the fight at the backlines. Your big attack range helps to contribute from a safe distance.

Ideally, you will have arrow to follow-up the disable of another ally. If there is no such opportunity, you can still attempt a short-range arrow after the Moonlight initiation. If an important target is disabled, you usually want to activate your BKB, Leap forward, cast a melee range Starstorm and finish the enemy off with attacks. You always have the option to Leap backward if you feel in danger.

Don’t commit blindly, however. It’s perfectly fine to right-click from the backlines until you see a good opportunity to jump. This is especially true if you don’t have BKB – Leaping in too aggressively is likely to get you into big trouble.

If you have Blink (and Agh’s) one of the best moves you can make in team fights is to blink on top of the enemy heroes, try to burst one down with Starstorm and any nuke items you have and to immediately disengage with Leap afterward.

Video Example (Sumail):

The fight starts unfavorably for EG. They try to initiate on the Necro and burst him down, but he manages to activate Eul’s and to dodge the arrow, which helps him stay alive. This is a problem for EG because they have wasted a couple of spells and now they are vulnerable to Aster’s counter-initiation.

Knowing this, Sumail tries to stay safe – watch his positioning. He stays out of range of the enemy initiation and whenever possible deals some damage.

When Storm commits on him, he creates some distance with Leap and hits him with Sacred Arrow, allowing EG to burst him down.

Afterwards, Aster commit on Arteezy and while they kill him they are left on low HP. Sumail needs to make a decision – to commit to a fight, get some kills and risk dying or to cut EG’s losses and Leap to safety. With Mirana it’s usually best to make the safe choices – dying too much will quickly make you irrelevant in the late game. 

In this case, however, Sumail realizes that he could take a couple of kills, one of which is Spectre. Trading a pos. 2 Mirana for a Spect + some change is always a good trade, so he jumps in with Leap and uses melee range Starstorm. Although he dies, he gets a triple kill, showcasing Mirana’s burst damage potential.

Ganking:

There are a few different ways to execute a gank:

  • The most fail-proof way is to use Moonlight Shadow so that you are not seen by Observers or something else that gives vision and initiate on your chosen target. Ideally, you would have an ally with a reliable disable with you, and you will be able to follow up with your Arrow and Starstorm to finish the kill.
  • With an ally that has a good setup for your arrow, you can choose to stay at a distance and wait for the initiation. Once it happens, you can land a long-range arrow and get a kill with the help of your allies out of the very long disable.
  • Finally, if you want to attempt a solo kill (or your allies don’t have any setup for the arrow), there are two ways to do so:

If you think you need a long disable to finish off the target, you should simply attempt a long-range Arrow. If it connects, you can run and Leap to your target and finish it off. If not, you can back off and wait for another ganking opportunity.

The second way will give you a more certain initiation – Moonlight Shadow (ask your allies to get back first – you cannot use it only on yourself), melee range Arrow and Starstorm into attacks. The disable will be very short, however, so you need to consider whether you will be able to do enough damage to get the kill.

Map Control and Vision:

Sacred Arrow is a powerful scouting tool because it provides 650 flying vision around it and because of the 3k range of the spell. Provided you don’t think you will need it very soon for a fight and if you have the mana sustain, you should use it often. Check all areas of interest – Roshan pit, Ancients, enemy jungle, paths from which you could get ganked or initiated for a team fight, etc.

Using Moonlight Shadow as something like a Smoke of Deceit is not a bad idea when you are entering foreign territory where you don’t have vision. This could give you the opportunity to surprise your opponents and get a pick-off and map control instead of walking into a trap. Nevertheless, the duration is lower than that of smoke, so it gives you very short time to enter the territory (e.g. enemy jungle) and do something out of it.

Farming:

Farming with Mirana is quite straightforward – you want to use your Starstorm for AoE damage to allow you to finish off camps and waves faster, and you want to use Leap to move faster from camp to camp and so, increase your farming rate. The IAS of Leap could also help you to kill faster high-HP creeps, like for example Ancients.

Using Sacred Arrow to kill off the highest HP creeps is quite important before you get enough items (but can still be used afterward to further speed up your farming).

Because of the long CD of Starstorm, it is a good idea, when it is not available, to hit different creeps a couple of times to bring them to lower HP in order to finish them off once it becomes available. If you have it available when you start farming the camp (or creep wave), it is generally best to use it right away.