Gyrocopter Guide by Qojqva
Artist: RocketAlex
Author:
Qojqva & Co.
Date: 12/2018
Tags:
text
Gyrocopter
Builds
Tactics
Analysis

Welcome

Welcome to Qojqva's Book of the Gyrocopter, a hero guide part of the Book of Dota series!

Here you will find all the information you need to learn to play Gyro on a high level – from drafting and builds to the optimal playstyle in different lanes and situations. We hope you’ll enjoy this guide and find it useful!

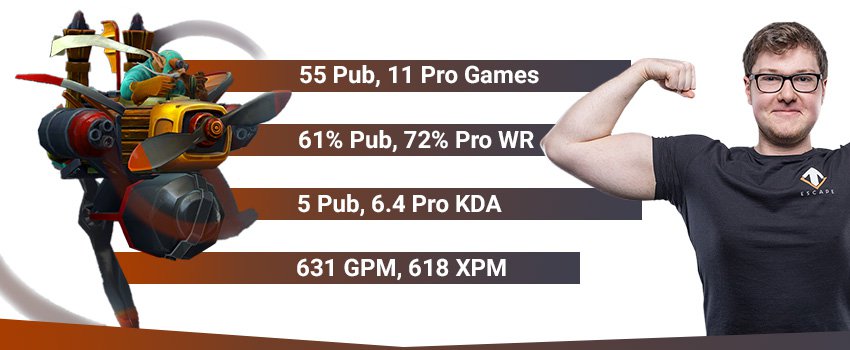
qojqva gyro stats
TL;DR:

Draft: Gyro is very versatile in the lanes and strong throughout the whole game. This makes him one of the few cores who are safe picks early on in the draft because he is quite hard to counter. Make sure you have allys with decent disables.

Early Game: Choose the best lane based on the other heroes in the game and use your kill potential together with your supports to win the laning stage and ideally – get kills and shut down your opponents. Nonetheless, don’t neglect farming and don’t take big risks: you are a carry and you need resources.

Mid & Late Game: Farm stacks and multiple camps with your AoE spells (even your ultimate) to get to important items. Use them to win team engagements and win map control. Get your luxury items and break the enemy base. If you are not in position to do so, stall the game. The later the game goes, the stronger your Flak Cannon will become.

Authors

Max "qojqva" Bröcker
Endorsement & Info

Qojqva is one of the very few old-school core players who have been able to consistently stay at the top of the game and to maintain their peak mechanical skill.

He has competed on legendary teams like MYM,  mousesports, Team Liquid, Team Tinker, Escape, NiP, and Alliance.

Nikolay "CTOMAHEH1" Kalchev
Info & Editing

CTOMAHEH1 started his pro career as a support in Basically Unknown together with Mind Control. Since then he has consistently been playing on the European T2 scene, most recently on Unchained Esports. 

His highest placement on the EU ladder is top 100 - he plays all roles (mainly support), which is untypical for high-ranking players and shows his great versatility and understanding of the game.

Kyril "MrNiceGuy" Kotashev
PM, Writing & Editing

Esports and gaming enthusiast since forever and founder of Dotahaven.

Has been playing Dota since 2005 (5.84). An Ancient I player in Dota 2.

Spin 'em up!

Gyro is one of the strongest team-fight carries thanks to his very high AoE damage capabilities. Unlike other hard carries that scale well with items, Gyrocopter is very strong at the early stages of the game and can contribute to fights even without a lot of items. This makes him a reliable and flexible pick and it’s not a surprise that he has been one of the most used carries in the history of competitive Dota. 

Gyrocopter Loadout
Stats
Level 1
Level 15
Level 25
STR
19
Low
51
Low
74
Low
AGI
19
Very High
62
Very High
93
Very High
INT
19
Medium
48
Medium
69
Medium
Attack
37-47
Very Low
80-90
Low
111-121
Medium
Armor
5.80
Very High
14.48
Very High
20.68
Very High
Resistance
26
Medium
27
Medium
29
Medium
HP
542
Low
1118
Low
1532
Low
MP
303
Low
651
Low
903
Low
MS
323
Very High
332
Very High
338
Very High
STRENGHTS

MAJOR:

High AoE Damage:
Gyro has three AoE abilities – two of them deal high nuke damage even very early on and the other one scales incredibly well with items. This is extremely useful in team fights.

Strong Laner:
Rocket Barrage and Missile give him high kill potential and Flak Cannon is a very useful tool for harassing. He also has good stats, which makes him a very flexible laner capable of doing well in offensive lanes or in 1v1 situations.

Scales Very Well with Items:
Flak Cannon gives him high range AoE attacks. In team fights, if Gyro has high-enough DPS from items, Flak Cannon can kill squishier supports and even potentially wipe the whole enemy team.

MINOR:

Very fast Attack Animation:
Gyro has one of the fastest attack animations in the game, which helps him get last hits very easily.

Fast Farmer:
Flak Cannon is great for clearing waves and stacks, while Rocket Barrage is very good for killing high HP creeps. He can even use his low-CD ultimate to take bigger stacks or creep waves.

Spammable Spells:
The low CD and relatively low mana cost of his abilities allow Gyro to use them often for fighting or farming.

High Movement Speed:
The high MS is essential for the hero for two reasons. First, he benefits from the speed because he can chase down opponents with Rocket Barrage. Second, the high MS makes him more mobile (and less likely to be kited) and survivable in fights.

WEAKNESSES

MAJOR:

Not Survivable:
Gyro has relatively low HP (low STR growth) and no escape mechanism which makes him an easy target to pick-off in ganks or fights. The problem is exacerbated by the fact that Gyro needs to get in the middle of the fight to maximize his impact.

Weak Single Target Damage:
Gyro has high single target damage in the lane thanks to Barrage, but the spell falls-off and in the later stages of the game he is very unlikely to win a direct man-fight with the enemy carry.

MINOR:

Bad Control:
Gyro has a hard-to-land slow from his ultimate and an unreliable and extremely slow stun from Homing Missile. This is a problem because it makes it hard to stick to a target with Rocket Barrage and attacks and it could be hard to land a Call Down.

Predictable Movement in Fights:
It is fairly easy for the enemy team to predict what Gyro can do in fights – activate his BKB, Flak and ultimate and start attacking. Therefore, what Gyro can do can be anticipated and as a result, countered by the enemy.

Replays

Secret vs VGJ.Storm, CHINA DOTA2 SUPER MAJOR

MATCH ID: 3930343388
Replay

MidOne has a very impressive performance on a mid Gyro with a KDA of 15-3-18 and manages to help his team win even though his position 1 Luna had a very hard game and the enemy team had a very significant lead for the majority of the game (peaks at 15k gold just before the 30th minute). It’s a great replay to watch if you want to learn how to position yourself on the map and in fights when your team is playing at a disadvantage.

OG vs Alliance, DAC Major 2018 Qualifiers

MATCH ID: 3723996197
Replay

A flawless performance by Resolut1on on Gyro, who displays the power of the hero in early & mid game fights. He goes for a standard very stat-heavy build (Wand, PT, Aquila, Drums, S&Y) to complement the aggressive early-mid game pushing style of DP and BM on his team. He is not worried so much about farming speed as he is about winning mid game fights to finish the game, which works out great.

The build helps him stay alive in all fights and both him and N0tail’s DP end the game with 0 deaths, finishing it before the 20th-minute mark.

VP vs VG, ESL One Katowice 2018 powered by Intel

MATCH ID: 3752505318
Replay

No[o]ne has an absolutely flawless performance on Gyro in the mid lane against the second best team in the ESL One Katowice tournament, VG. Notice that he builds a fast BKB (right after S&Y) despite having Omni on his team – he wants to be absolutely sure that he will be able to have an impact in mid game fights to extend the lead of his team and possibly finish the game.

A great replay to watch if you want to learn how to use Gyro in the mid lane.

Drafting

Gyro is a reliable and very well-rounded carry. Perhaps the primary reason why Gyro is picked is the combination of his team fight and laning presence. Gyro is one of the very few heroes in Dota who can win their lane, have a great impact in 5vs5 engagements in the mid game and carry his team in a late game.

The fact that Gyro is a strong laner makes him very flexible – you can use him in the safe lane, in the mid lane or you can even build offensive lanes with him. This makes him unpredictable and very hard to counter during the laning stage.

That being said, he is not especially flexible in the mid and late game. Gyro is not particularly good at split-pushing (no escape mechanism or mobility and low tower damage) and isn’t very good at ganking. Nonetheless, team-fight strength is useful in any strategy. It simply means that other activities will have to fall on the shoulders of his allies.

Safe Lane Gyro

A carry in a defensive lane is the most usual position for the hero. There it’s easiest to guarantee his farm. This is important because the hero needs a couple of stat items and ideally BKB before he starts team-fighting. Moreover, Gyro can apply pressure on the enemy offlaner on his own – Homing Missile and Rocket Barrage give him kill potential and can be used for harassing. If his lane is contested, with the help of supports he can easily fight back.

Substitute:

Luna

Luna is perhaps the only carry that works similarly to Gyro in terms of team fight potential (physical and magical AoE damage) in all stages of the game. She is a weaker laner (has much less kill potential on early levels), but she is faster at farming because her Glaives don’t have any downtime, which could help her get her late game items faster in passive games. Like Gyro, she is squishy and needs survivability items in order to fight head on.

Offensive Lane Gyro

Gyro is a good hero for an aggressive lane because he deals a lot of damage early on thanks to his nukes (Rocket Barrage primarily). The idea is to use this high burst damage to get kills and to shut down the enemy farmer by combining Gyro with strong lane supports ideally with good control to set up for the Barrage damage.

A downside of the hero in such a lane is that he is squishy – be careful not to send Gyro in a lane he cannot win, because you will slow down his item development significantly and he is a hard hero to play from behind after the laning stage.

Mid Gyro

Gyro goes in a 1v1 situation when the match-up is favorable. He would usually do well against most heroes but he could struggle against ranged lane dominators.

Gyro has a good last-hitting potential in a 1v1 thanks to his fast attack animation. Against heroes with very high attack damage, however, you might have difficulties taking all last hits. Your short range is also a problem if your opponent can harass you from a distance.

The Missile is very potent in 1v1 situations and can help him harass and zone out the enemy. Combined with Rocket Barrage, it also means Gyro has very high kill potential and excels if his supports rotate to his lane often (or even babysit him for most of the laning stage).

Synergy

Good friends to have are:

Supports with good single-target disables: Vengeful Spirit, Bane, Shadow Shaman, Rubick, Lion

Venge
Bane Portrait
Shadow Shaman
Rubick
Lion
When picking Gyro, it is a good idea to pair him with a hero that can lock down enemies to increase his kill potential, especially in the laning stage.

Heroes that can lock down an enemy in place can set up for Gyro’s high nuke damage, especially in the laning phase. Gyro can use his Rocket Barrage on the disabled target and quickly burst it down. Homing Missile also benefits from such disables because the target stands in one place while the slow projectile reaches it and stuns it.

Initiators, AoE control: Naga Siren, Puck, Axe, Dark Seer, Enigma, Disruptor, Magnus

Naga siren
Puck Portrait
Axe Portrait
Dark Seer
Enigma Portrait
Disruptor Portrait
Magnus Portrait
Picking initiators and heroes with AoE disables with Gyro will provide him with space to freely use his spells and deal damage in team fights.

Gyro works very well with initiators because he has a very powerful follow-up: Call Down + Flak Cannon hits. The initiators start the fight and provide the control, Gyro wins it with his AoE damage.

Call Down takes effect after some delay – if your allies are able to stop your opponents from moving for a few seconds, then hitting your Call Down is much easier. In addition, if your allies can control the enemy team, you will have more freedom to auto-attack with Flak Cannon during the fight.

5-man heroes, pushers: Dragon Knight, DP, Huskar, Viper, Undying, Underlord, Chen

Dragon knight
Death prophet
Huskar Portrait
Viper
Undying Portrait
Underlord Portrait
Chen
When drafting Gyro, picking heroes that can stay in front and tank up damage is a good idea if you want to push and force fights.

Gyro loves 5-man Dota and team-fighting but he is terrible at hitting towers. Those heroes can do just that and force the fights that Gyro wants to take. Moreover, tanky heroes make it hard for the enemy team to get to Gyro and focus him. As a result, he will have the freedom to deal damage and cast his spells in fights, while the enemy team focuses the front-line tanks.

Of course, Gyro works best with tanks that have AoE control.

Counters

Strong Against:

Illusions & summoned units: Visage, Lycan, Brood, Terror, CK, Beast, Naga, Chen

Visage
Lycan
Broodmother Portrait
Terrorblade
Chaos Knight
Beastmaster
Naga siren
Chen
Picking Gyro to deal with illusions and summons is a good choice.

Thanks to his Flak Cannon ability, in addition to his AoE damage spells, Gyro can clear illusions and summons very quickly (provided he has decent farm). Flak Cannon and Call Down also make Gyro good against such pushing strategies – he can deal AoE damage from a distance and slow down pushes without committing to a fight.

Squishy supports that need to get up-close to have an impact: Dazzle, Lesh, Lion, Io, CM, SS 

Dazzle Portrait
Leshrac
Lion
IO Wisp
Crystal Maiden
Shadow Shaman
The big range of Flak Cannon makes it efficient versus squishy supports that need to enter the fight to have an impact.

Flak Cannon is extremely hard to play around if you are a squishy support that needs to enter the fight. Often you will pay with your life for jumping in and it is hard to position yourself more defensively because the Flak range is huge.

Weak Against:

Long-range damage: Zeus, Tinker, Clinkz, Arc Warden, Sniper

Zeus Portrait
Tinker
Clinkz Portrait
Arc warden
Sniper
You are squishy and you have a very short ranage and no mobility, which makes palying against long-range damage dealers hard.

Gyro has a low attack range, which makes it difficult for him to reach such heroes. If they have high single target DPS, they could possibly nuke him down in fights before he has a chance to fight back.

Magic Immunity: Lifestealer, Jugg, Omni

Lifestealer Portrait
Juggernaut
Omniknight portrait
Winning mid-game fights against lineups with a lot of magic immunity and resistance is much harder when playing Gyro – his physical damage output isn’t great initially.

A big part of Gyro’s DPS is magical and carries with magic immunity can easily man-fight him and come out on top. The game is also harder to win against great Pipe buyers like Underlord, Tide, Doom, etc.

Skills

Gyro Rocket Barrage
Gyro Homing Missile
Gyro Flak Cannon
Gyro Call Down

Launches a salvo of rockets at nearby enemy units in a radius around the Gyrocopter. Lasts 3 seconds.

STATS

Cast Animation: 0+0

Search Radius: 400

Rockets per Second: 10

Damage per Rocket: 7/12/17/22

Barrage Duration: 3

CD: 7/6.5/6/5.5

Mana: 90

Rocket Barrage

The mechanics of the spell are fairly straightforward - you damage units within a 400 radius. Keep in mind that Rocket barrage doesn’t hit invisible units or units that are in the fog of war – Gyro needs to have vision over the target so that the spell deals damage to it.

The important thing to remember is that the damage is spread over all units in the area. This means that the fewer units there are in the area, the more damage the spell will deal to each one. The ability has a huge nuke potential from level 1 in case you manage to isolate a target. With set up from another hero (or your own Homing Missile), Rocket Barrage is your main kill-spell in the lane.

If your target is not isolated, you might want to position yourself in such a way that only the hero you want to kill is in the range of Rocket Barrage – this means stepping a bit to the side so that the target is just inside the 400 radius, however, the other enemy units aren’t.

Keep in mind that Rocket Barrage has no cast point animation. This means you can activate it while chasing/running away without falling behind and makes the spell even more useful in fights because you can use it while repositioning.

In addition, the spell has a very low CD and relatively low Mana cost – this means that you can use it frequently to harass and get last hits besides killing enemies.

Furthermore, you can use Rocket Barrage to clear lane or jungle creeps faster. Because Flank Cannon has a long CD, Rocket Barrage will be the spell you use most often to farm faster. It is a good idea to use Rocket Barrage to clear non-stacked camps and Flak Cannon to kill stacks and very large creep waves.

Fires a homing missile to seek the targeted enemy unit. The missile gains speed over time, dealing damage and stunning when it impacts the target. Enemy units can destroy the missile before it reaches its target.

STATS

Cast Animation: 0+0

Cast Range: 1050

Hero Attacks to Destroy: 3

Tower Attacks to Destroy: 6

Damage: 100/175/250/325

Stun Duration: 2.25/2.5/2.75/3

CD: 26/21/16/11

Mana: 120/130/140/150

Homing Missile

Once you cast the missile on the enemy hero, it doesn’t start traveling towards the target right away. It first stays in one place and “charges up” for three seconds. Then it starts traveling towards the target and slowly accelerates.

The Missile could be destroyed by a couple of hits, which means it’s not a good idea to place it on the ground close to multiple heroes. The further away from a target you use it, the greater the chance it will hit it (it also gains speed and it’s harder to destroy while in the air).

Worth noting is that the enemy hero will gain vision over the missile when it gets cast (i.e. shortly after you cast the spell). As a result, if you want to gank a hero or start a fight, DON’T start with Missile right away since you can reveal your position.

Removing Spell Block:

If enemies have Linken’s Sphere, you can cast Homing Missile to trigger Linken’s effect. It will be triggered once you cast the missile, not on hitting the target – this means that you can instantly remove the Spell Block from a large distance and allow your allies to use their more important targeted spells.

Vision:

You gain vision where the Missile target is moving (because the projectile gives vision). This means that it is very useful to cast Missile on mobile or invisible heroes even only for the information you gain. Keep in mind that the Missile actually hits invisible units – when you see this happening you will know where you need to use AoE skills, place a Sentry or use Dust to secure a kill.

Kill Attempts:

You can use Homing Missile as a disable to set up for your Call Down, Rocket Barrage or allies’ follow-up abilities.

In terms of kill potential, it is most useful for kill attempts on single targets when you have an ally with disable to set up for the Missile (like a Nightmare) to prevent the target from creating a lot of distance between getting hit.

Gyrocopter's attacks hit all enemy units in an area around it for a limited number of attacks. Only the main target of attacks will receive attack bonuses such as Critical Strike. Lasts 15 seconds or until the attacks are used.

STATS

Cast Animation: 0+0

Search Radius: 1250

Number of Attacks: 3/4/5/6

Duration: 15

CD: 40

Mana: 50

Flak Cannon

Flak Cannon is the most important spell of Gyro for the later stages of the game because it gives him his carry potential. Once you use it, you will attack all enemy units within a big radius with your regular attack damage. Keep in mind that Gyro’s attack range will still be 365 – i.e. you need to get in range to attack something in order to benefit from Flak Cannon’s effect. You should, therefore, attack anything that is close in range – you don’t have to get close to attack an enemy hero; instead, you can attack creeps or other units. Generally speaking, when you have Flak Cannon activated it might be a good idea to issue an attack-forward command. This way the hero will automatically start attacking the closest available target and when it is dead will immediately move to the next one.

Harassing: In the early game you can use the spells to harass your lane opponent from a huge distance.

Farming: Farming with Flak Cannon early on might not be very effective since you won’t deal a lot of physical damage – the attack charges might not be enough to finish off a stack or wave. In the very early game, Rocket Barrage should be your go-to farming skill. Later on, however, clearing large stacks with Flak will become much easier and you should use this to accelerate your farm.

Since it has a relatively large CD, you have to use it efficiently. Don’t farm with it if you suspect a fight will break out soon.

Fighting:  Bear in mind that you cannot hit enemy units in the fog of war. Squishy supports can try to stay safe by hiding in trees or on high grounds – good vision (e.g. from Observers) during an engagement can help you deal more damage. If an important target hides in the fog when you start attacking with Flak Cannon, you can use your Call Down to reveal the target and continue hitting it with the Cannon projectiles. Finally, attack bonuses like Critical Strike are applied only to your primary attack. This means that with an item like Daedalus you will deal higher damage with the primary attack. If you have such an item and you want to burst down a particular target it might be worth it to move to it and attack it directly.

Call down an aerial missile strike on enemy units in a target area. Two missiles arrive in succession, the first dealing major damage and minor slow for 2 seconds; the second dealing minor damage and major slow for 4 seconds.

STATS

Cast Animation: 0.3+0.5

Cast Range: 1000

Effect Radius: 600

Missile One Damage: 150/250/350

Missile Two Damage: 100/150/200

Missile One Move Speed Slow: 30%

Missile Two Move Speed Slow: 60%

Missile One Slow Duration: 2

Missile Two Slow Duration: 4

CD: 55/50/45

Mana: 125

Aghanim's Scepter

Adds a Side Gunner that at random attacks enemy units within a 600 radius every 1.1 seconds.

Call Down

The first important thing about the spell is that the first missile impacts 2 seconds and the second one - 4 seconds after Call Down is cast. This means that you have to aim the ability carefully – try to predict where enemies will stand in the next 2 seconds in order to hit your target.

Try to hit your main target with the middle of the AoE. This way the slow from the initial Rocket might set up for the second rocket hit. If you hit with the edge your target will easily move out of the AoE and will dodge the second hit, which is the more important one because it slows more.

You usually want to use it as a follow-up to a disable from an ally at the start of a fight. Using the spell without a setup makes it much harder to land.

Even though it is largely a team fight spell, using Call Down for ganks or even to farm is not a bad idea at all – it has a short cooldown and is likely to be available when you need to again.

Bear in mind that Call Down gives vision in the targeted area right when you cast it. This can help you find and focus down a hero that is trying to juke and run away.

You can also use it defensively: the slow from Call Down might help your team disengage an unfavorable fight or might slow-down a push from the enemy team.

Skill Builds

Gyro has a relatively inflexible skill build. You usually want to max Rocket Barrage because it gives you a lot of kill potential and it can be used for farming. Value points in your other skills are necessary, however maxing Flak Cannon before Missile is standard because after the laning stage you need to maximize your farming speed.

You want to get your ultimate whenever you get to level 6/12/18 since the spell is a great team fight damage and control tool.

Standard Build
Gyro Rocket Barrage
1
Gyro Homing Missile
2
Gyro Rocket Barrage
3
Gyro Flak Cannon
4
Gyro Rocket Barrage
5
Gyro Call Down
6
Gyro Rocket Barrage
7
Gyro Flak Cannon
8
Gyro Flak Cannon
9
Talent Icon
10
Gyro Flak Cannon
11
Gyro Call Down
12
Gyro Homing Missile
13
Gyro Homing Missile
14
Talent Icon
15
Gyro Homing Missile
16
Gyro Call Down
18
Talent Icon
20
Talent Icon
25
pros: high kill potential; maximum flash farming;
cons: low levels of control;

This is the most common build for a hard carry Gyro. It gives you nuke and kill potential during the laning stage and at the same time allows you to start flash farming from as early as possible with Flak Cannon. You max out Rocket Barrage and Flak Cannon in priority and get a value point in Homing Missile – to harass enemies, give vision over opponents and potentially provide some disable in fights.  Whenever you get to level 6, you will have a huge kill potential with Call Down and level 3 Rocket Barrage. If an ally can provide a good setup for you spells, getting a kill, especially against more squishy targets, is fairly easy.

Talents

Global Call Down

25

3 Homing Missile Charges

-25s Call Down CD

20

+40 MS

+11 Rocket Barrage Damage

15

+0.5s Homing Missile Stun Duration

+200 Health

10

+20 Damage

Lvl10: The health helps a great deal because you are quite squishy and it can let you tank an additional nuke early on. 20 damage is better only for very passive games because it speeds up your farm.

Lvl15: Usually you take the Rocket Barrage damage because it increases your farming speed and damage output versus a single target. If you intend to take the Homing Missile Charges, however, the stun duration could also be pretty powerful.

Lvl20: MS is the better choice because combined with your other MS items it will make you extremely fast. Call Down has a low-enough CD and unless you want to use it to anti-push every wave (your enemies are sieging your base), it is the inferior choice.

Lvl25: Late Game Missiles can lock down a person for a long duration and you might force some BKBs in fights, which is very useful. Moreover, using three missiles at once makes it much harder for your enemies to bring them down with attacks. That being said, the Global Call Down is quite good for out-pushing the waves especially if you have the CD reduction talent.

Item Builds

From his items, Gyro needs damage in order to farm faster and increase the strength of his Flak Cannon in fights AND survivability, because he is quite squishy. Consequently, the most common items for him are stat items since they give a bit of both. Which stat items and in what order is up to you to decide based on the situation. The best practice is to invest in cost-efficient stat items first to make sure you are able to fight from early on. Here are some common item progressions:

MoM & S&Y Build:

You get the usual cheap stat and DPS items (Wraith Bands, Boots, Wand) and then you buy MoM to give yourself sustain and increase your farming speed. MoM is also great for early game fights because you can use all of your skill before you go in and then simply activate MoM to increase your Flak Cannon DPS. Afterward, you go for S&Y for the great stat and MS boost and BKB to keep yourself alive in fights.

In the late game you disassemble your MoM and build Satanic and Butterfly from both components. The two luxury items provide you with great survivability against enemy carries but also with very significant DPS.

Starting Items
Tangoes
Healing_Salve_icon
Slippers of agility
Circlet
Early Game
Wraith Band
Wraith Band
Phase boots
Magic wand
Mask of madness
Mid Game
Sange_and_Yasha_new
Black King Bar
Late Game
Butterfly
Satanic
Tangoes
Healing_Salve_icon
Slippers of agility
Circlet
Wraith Band

Wraith Band: Gyro doesn’t have a lot of base damage. Therefore, getting the item can help him get more last hits against opponents with high attack damage in the laning stage.

Wraith Band

Wraith Band: Gyro doesn’t have a lot of base damage. Therefore, getting the item can help him get more last hits against opponents with high attack damage in the laning stage.

Phase boots

Phase Boots: PBs are the aggressive option - they give you a lot of MS which helps with chasing down enemies with Rocket Barrage.

Magic wand

Magic Wand: A cheap source of extra HP/Mana in fights. Since Gyro is squishy, the item can help him survive early engagements.

Mask of madness

Mask of Madness: Allows you to farm faster by giving you sustain and increasing your DPS. Combining MoM with your naturally high MS and your MS talent at lvl15 can allow you to move with more than 500 MS to chase enemies down. Moreover, you can use all of your skills before you enter the fight with MoM. The obvious drawback is that it makes you squishier against physical damage dealers.

Sange_and_Yasha_new

S&Y: S&Y is a great first-big-item choice because of the versatility it provides. Going straight for damage items makes you too vulnerable while going straight for a defensive choice (i.e. BKB) slows down your farming and gives you little physical DPS for the early fights. S&Y is the middle ground - the DPS and MS are great for fighting and farming and the STR gives you some survivability.

Black King Bar

Black King Bar: As is the case with most squishy carries in the game, Gyro needs BKB in order to stay safe and to attack freely in fights. He often needs to stand in the middle of the fight because of his short range, which exposes him to danger. Getting BKB before you start team-fighting is vital, and with Gyro you usually want to start team-fighting earlier rather than later.

Butterfly

Butterfly: Gives survivability in the form of Evasion. In the later stages of the game, Butterfly is simply the best mix of DPS and survivability and is a must if you are facing strong physical damage dealers.

Satanic

Satanic: The best late game survivability item for Gyro. It helps him man-fight enemy carries and survive if he gets initiated upon before he gets to activate his BKB (you can activate Satanic when you are low on HP after the initiation and steal life back to full HP while protected from the BKB). 

Survivability Build:

The idea of this build is to invest in Wraith Bands, Treads, Wand, and Dragon Lance ASAP, which gives you A LOT of cheap stats and great MS early on. This makes you very survivable in case you are getting pressured and need to be able to fight back. For the same reason, you invest in a quick Pike+ BKB after the Lance. At this point, you have solved your survivability issues and at the same time have almost filled your inventory. Your choices are open but bear in mind that the next items need to be more expensive and slot-efficient. Butterfly is great because it gives both DPS and survivability against physical damage while your BKB is on.

Bear in mind that with this build your farming speed is not great, so try to win fights as often as possible.

Starting items
Circlet
Tangoes
Tangoes
Iron branch
Iron branch
Mango
Mango
Early Game
Wraith Band
Wraith Band
Magic wand
Power treads Strength
Dragon lance
Mid game
Black King Bar
Hurricane Pike
Butterfly
Late game
Satanic
Divine Rapier
Circlet
Tangoes
Tangoes
Iron branch
Iron branch
Mango
Mango
Wraith Band
Wraith Band
Magic wand

Magic Wand: A cheap source of extra HP/Mana in fights. Since Gyro is squishy, the item can help him survive early engagements.

Power treads Strength

Treads:  The bonus stats are great for survivability.

Dragon lance

Dragon Lance: Dragon Lance gives you cost efficient stats and more importantly – attack range, which is very valuable since Gyro is one of the ranged heroes in the game with the shortest attack range. Nonetheless, Flak Cannon provides a different solution to your range problem and since there are other items that give you similar cost efficient stats (e.g. S&Y), Dragon Lance is a situational choice.

Black King Bar

Black King Bar: As is the case with most squishy carries in the game, Gyro needs BKB in order to stay safe and to attack freely in fights. He often needs to stand in the middle of the fight because of his short range, which exposes him to danger. Getting BKB before you start team-fighting is vital, and with Gyro you usually want to start team-fighting earlier rather than later.

Hurricane Pike

Hurricane Pike: Upgrading to Hurricane Pike usually happens in the late game, since the stats of the upgrade are not as valuable for Gyro and consequently you want to get your other core items first, which provide you with more damage and survivability. Getting an early Pike, however, is possible versus heroes like Riki or Clock as it will help you survive. It’s worth mentioning that you can use the Force effect on your Rocket to make it hit your opponents faster.

Butterfly

Butterfly: Gives survivability in the form of Evasion. In the later stages of the game, Butterfly is simply the best mix of DPS and survivability and is a must if you are facing strong physical damage dealers.

Satanic

Satanic: The best late game survivability item for Gyro. It helps him man-fight enemy carries and survive if he gets initiated upon before he gets to activate his BKB (you can activate Satanic when you are low on HP after the initiation and steal life back to full HP while protected from the BKB). 

Divine Rapier

Divine Rapier: Although Rapier is a very high-risk high-reward item choice, Gyro is one of the few heroes in the game for whom Rapier is a viable item choice not just in desperate situations. The Flak Cannon ability, together with the insanely high damage of Rapier, can turn the tide of a game very easily (or make you impossible to face in fights).  In a team fight, Gyro can single-handedly wipe a team with the item. If you are survivable enough but you are struggling to deal damage, then Rapier + Aegis could seal the deal and win you the game.

Aghanim’s Build:

Aghanim’s is a very interesting option for Gyro because it follows the logic of building him stat-heavy and tanky, while at the same time giving the possibility of quite a high DPS especially bearing in mind the side-gunner attack fully uses proc effects. Because of this, the Maelstrom + Aghanim’s combination is great both for farming and for fights.

The order of the build is not set in stone – you can get the BKB earlier or later depending on how much magic burst and control your opponents have.

Starting items
Circlet
Slippers of agility
Healing_Salve_icon
Tangoes
Early Game
Wraith Band
Power treads Strength
Drums
Mid Game
Maelstorm
Aghanim's_Scepter_icon
Black King Bar
Late Game
Satanic
Mjollnir_icon
Circlet
Slippers of agility
Healing_Salve_icon
Tangoes
Wraith Band
Power treads Strength

Treads:  The bonus stats are great for survivability.

Drums

Drums of Endurance: The item is great if you need to fight from early on. The Aquila + Drums combo will provide you with a lot of cost-efficient stats. Moreover, the MS synergizes very well with your high base MS and the active of Phase Boots, allowing you to chase people down with Rocket Barrage.

Maelstorm

Maelstrom: Generally you go for this item only if you have Agh’s on Gyro, synergyzes great with Aghs and gives you more chance to proc.

Aghanim's_Scepter_icon

Aghanim’s Scepter: Aghs adds a Side Gunner that fires an automatic attack at a random enemy within 600 range roughly every second. It follows the same firing rules as Rocket Barrage, but does not attack while invisible and is disabled by Break. Obviously, the item scales very well with bonus damage items, similarly to Flac Cannon. Like Rocket Barrage, it is stronger versus isolated targets and is quite weaker versus many units, like illusions or summons. The fact that the side gunner attack can use proc effects makes it great in combination with Maelstrom (to increase your farming speed and Agh’s effect in team fights) and later on with MKB or Daedalus.

Black King Bar

Black King Bar: As is the case with most squishy carries in the game, Gyro needs BKB in order to stay safe and to attack freely in fights. He often needs to stand in the middle of the fight because of his short range, which exposes him to danger. Getting BKB before you start team-fighting is vital, and with Gyro you usually want to start team-fighting earlier rather than later.

Satanic

Satanic: The best late game survivability item for Gyro. It helps him man-fight enemy carries and survive if he gets initiated upon before he gets to activate his BKB (you can activate Satanic when you are low on HP after the initiation and steal life back to full HP while protected from the BKB). 

Mjollnir_icon

Mjollnir: Usually you want to upgrade this as your last item. Even though your side gunner benefits greatly from the lightning proc, he doesn’t benefit from the AS increase of Mjollnir.

Other Items:

Early & Mid Game
Yasha
Shadow_Blade_icon
Manta_Style_icon
Late Game
Daedalus
Monkey_King_Bar_icon
Linken's Sphere
Yasha

Yasha: The extra movement speed and damage of the item can help you flash farm faster. The MS has good synergy with your Rocket Barrage because it allows you to stick to your target. Going for a casual Yasha is not a bad idea even if you don’t intend to upgrade it right away.

Shadow_Blade_icon

Shadow Blade: The item is very situational for Gyro. Shadow Blade is usually a ganking/initiation/escape item and doesn’t fit Gyro’s team fight carry playstyle too much. Nonetheless, in games where your opponents are dodging fights and farming passively, ganking is a great option. Being invisible, you can position yourself close to a target and burst it down with Rocket Barrage, Call Down and attacks. Shadow Blade can also be used defensively if your opponents don’t have detection.

Manta_Style_icon

Manta: You can upgrade your Yasha to Manta if you have spells that you can dodge/dispell with Manta, otherwise S&Y is the better choice because your illusions are quite weak.

Daedalus

Daedalus: You can crit only on your primary attack, i.e. you won’t crit on any of the Flak Cannon attacks. Therefore, Daedalus doesn’t synergize too much with Gyro. However, if you need as much damage as possible to bring down a single target (for example, the enemy carry in a man-fight), then the item can be a good choice. If you want to focus on your AoE/Team fight damage, then going for another damage item would be better. 

Monkey_King_Bar_icon

Monkey King Bar: MKB is a great choice to counter evasion. Moreover, the very high proc chance synergizes great with the side gunner attack of Aghanim’s.

Linken's Sphere

Linken’s Sphere: Linken’s gives little stats for its price, so get it only when you need it to survive powerful single-target initiation (Bat, Doom, Beast).

Early Game

Gyro 350px

Theoretically, Gyro can go to all three lanes and be played as a solo, in dual lanes or trilanes. This flexibility is very useful and allows you to out-smart your opponents and find the best possible match-up (of course, depending on what allies you have).


No matter where you are laning you will play Gyro as a carry and you will focus firstly on farming, but also on utilizing your laning strength to shut down your opponents and ideally get kills with the help of your supports.


Farming:

Gyro has a decent base damage and a very fast attack animation. This helps him get last hits relatively easy during the laning stage. You have a relatively low-range attack, however, which makes you susceptible to harass from long range heroes.

You can use Flak Cannon to push-out the wave while very easily harassing your lane opponent, or Rocket Barrage to nuke down a single creep (e.g. the ranged creep) to secure the last hit and prevent your opponent from denying.

Both spells can also be used to farm faster. Flak Cannon is great for clearing out multiple low HP creeps, while Rocket Barrage is great for killing a single high HP creep. Barrage has a low CD and mana cost so you can use it more liberally. Cannon has a high CD, so try to use it efficiently – to clear stacks or possibly hit multiple camps at once.

Gyro Scr 1
Harassing & Zoning out:

Although Gyro doesn’t have high range or mobility that can help him harass enemies, the hero has spells that can be used from afar to chip away at your opponent’s HP and even zone him/them out.

Flak Cannon’s high range attacks are a great harassing tool, but keep in mind you will push-out the creep wave by using it.

Homing Missile is also a great harassing tool because it deals high damage from early on and the stun can help you reach the enemy with Rocket Barrage. Don’t use it near your opponents especially when you are playing against a dual or trilane – they will easily kill the rocket.

Sustaining Missile harass could be difficult because it is your most mana intensive spell. If you have mana problems you might want to save it for kill attempts with your supports.

Against Melee Heroes, Rocket Barrage is also useful to harass. When your opponent comes close to the wave to take last hits you can move towards him and use Barrage. Ideally, you will be close enough to the hero but far enough from the creeps to deal most of the Rocket damage on your opponent. If you don’t want to draw the creep aggro towards you don’t issue an attack command on the enemy hero. Against ranged opponents, however, getting close in order to use it as a harassing tool might be difficult.

Kill Potential:

Gyro has high kill potential in the laning stage. The hero has spells that deal a lot of nuke damage (Rocket Barrage and Call Down) and can consequently, burst targets very quickly. With good setup from his supports, Gyro can easily get kills even from very early on. On his own, however, the task is much harder since he doesn’t have control (his Ultimate and Homing Missile – both are unreliable and hard to land by yourself).

Nevertheless, provided your enemy gets stunned by the Missile, you can use Call Down right away from afar and then start moving towards the hero. Once you get close, use Rocket Barrage to finish him off. Alternatively, you can predict the movement of the enemy and cast Call Down in the area where he will be after the casting delay. If you manage to hit, you can again get close to nuke him down with Rocket Barrage.

In some situations, you can use Flak Cannon to finish the kill when your target gets out of Rocket Barrage and attack range. If there are other enemy units nearby, you can start attacking them with Flak Cannon –the Flak projectiles will hit the fleeing target and if it is low enough on HP you can secure the kill this way.

With a setup from an ally, your job gets much easier – follow up the disable with you ultimate and Missile, then get in range to nuke the target with Rocket Barrage and right-clicks.

Surviving:

You don’t have an escape mechanism, so if you cannot out-run your opponents the best option is to man-fight with Rocket Barrage (and possibly Call Down). If you receive TP support fast enough you can turn the fight or at least allow your support to get a counter-kill. This is one of the reasons why you want cheap early game stat items – to survive and win such skirmishes.

Defensive Lanes:

In a defensive lane, your focus will be on getting as many last hits as possible while helping your supports to keep the enemy offlaner out of XP/farm range. Whenever possible you should work together with your supports to zone out or even kill the enemy offlaner. Follow up on the initiation of your supports with your spells. Position yourself more offensively to be able to use Barrage as quickly as possible.

Farm
Kill if possible
Harass and zone out
Maximizing Farm:

Gyro’s AoE abilities that can be used even early on to nuke down creep waves and farm up faster. Once you get more levels in your spells you can start pushing out the wave with Rocket Barrage and killing jungle camps with Barrage and Flak. If you intend to spend a lot of time farming the jungle, it is smart to get a source of HP sustain (usually Mask of Death into Madness).

Provided you or your supports have stacked camps (usually the large camps), you can even use your ultimate to clear the stack faster. Stacks are the best way to increase your GPM with Gyro.

Video Example:

This laning stage is a great example of Gyro’s early game strength. Facing an offensive trilane of Undying, SS and Tusk would be absolutely devastating for more passive carries, but Gyro (with the help of his supports) is able to fight back and with time  - win the lane.

Getting level 3 safely is the key early on. His lvl 2 Barrage allows him to start threatening his opponents more and as a result – farm more safely.

You can`t skip Homing Missile when you have Bane and Naga for supports. On minute 05:10 you can see the Bane Nightmare into Missile + Barrage combo and it results in a very easy kill. After Lvl6 with the burst magical damage from the ult, it becomes even easier to get kills (as seen on 07:10).

Notice how at 6:30 he is pushing the wave and stacking the big camp so that he can farm it later. On min 09:00 he even uses his ult to farm the stack and maximize his GPM in the safe lane.

Offensive Lanes:

Going in an offensive dual or trilane is done to use Gyro’s high kill potential to dominate the enemy safe lane. Ideally, you want to do this with supports who are strong laners and have disables to maximize your chances of getting kills. Don’t play too aggressively – you are still a squishy hero and sometimes enemies can turn on you. Simply follow-up on the efforts of your supports and if this doesn’t result in a kill – go back to farming. You are still a carry and need to prioritize your safety and farm. Because of this, it is unwise to build an offensive lane with Gyro if your opponents can fight back– it’s too risky and it could backfire.

Farm
Pressure your lane opponents together with your support and ideally get kills
Dual Lane Combos:

Gyro has huge burst potential thanks to Rocket Barrage, but he lacks good disables. As a result, his lane partner should have some lockdown that can serve as a setup for Gyro’s nukes. If your partner manages to disable and isolate an enemy, you can get in range to cast Rocket Barrage and nuke him down or later in the laning stage follow up the initiation with a Call Down. Long single target disables are especially useful for setting up for a Homing Missile. Bane is noteworthy because his Nightmare can very easily set up for your Missile into Barrage. Moreover, he is quite good at trading harass in the lane. Tusk is also great because he can get you on top of your opponent, which makes using Barrage much easier.

Examples: Bane, Tusk, Shadow Demon, Naga Siren

Bane Portrait
Tusk
Shadow Demon Portrait
Naga siren

Solo Mid

As a carry, your top priority should be to get farm. You have some harassing potential, but zoning-out will be extremely difficult in the mid lane. Instead, focus on last-hitting and harass while getting farm and when your supports rotate - help them out to secure kills.

Get farm and levels
Help your supports secure kills
Matchups:

Gyro is quite good 1v1 against some heroes but has difficulty against others. Avoid ranged lane dominators (QoP, Viper, Clinkz, Huskar) at all cost, or you could lose the lane very hard. Against weaker laners and melee heroes, you can get farm much more easily and even trade harass favorably with Missile and Rocket Barrage.

Combining Gyro mid with very strong rotating supports or even a babysitter with kill potential is a great idea because of his very high Rocket Barrage damage in the early game.

Mid & Late Game

Gyro Immortal 350px

Gyrocopter has great mid and late game presence. He has abilities that allow him to do a lot in fights even without many items and in the same time, he scales very well into the late game thanks to Flak.


With Gyro you want to use your mid game fighting potential. Forcing fights is a great way to claim map control. In the same time, you don’t want to fall behind in farm. The best practice is to utilize your flash-farming potential to get key items and to immediately use them to force favorable fights.


Be aggressive from early on if you are in position to fight
Flash farm key items to put yourself in position to fight
Comeback Potential:

Gyro has great comeback potential, but at the same time he doesn’t really like to play from behind:

If you fall behind in farm early on, you will not be in a position to fight efficiently in the mid game because you will be too squishy. This will make it much more difficult to maintain map control and the game could start slipping away.

Gyro is not a split-pusher – farming too far away from your team will easily get you killed. Instead, the best way to come-back is to utilize stacks to farm an important fighting item (usually BKB) and then to try to force favorable engagements with your teammates. Even without damage items, you will have a decent fight impact just from your skills. Successful fights will get you back to even terms.

If this fails, your best option is to stall the game for as long as possible. Gyro is quite good at holding his high-ground thanks to his ultimate and Flak Cannon. If you manage to get to the late game, your Flak Cannon damage can turn things around for your team. If you are desperate, your best chance is a Divine Rapier. The absurd AoE damage could easily win you a fight even against opponents with a significant resource advantage.

Team Fights:

In team fights, you will most of the time follow up a disable from an ally with Call Down and start attacking heroes with Flak Cannon with BKB activated. You don’t want to run in first because your opponents might simply disengage. If you waste your BKB and Flak Cannon duration you will be in trouble – the enemy team will be able to re-engage and your impact win the fight will be much, much lower.

What to keep in mind before a fight:

 The most important thing to have in an engagement is your Flak Cannon. In case the spell is on CD, you should avoid fighting until it’s up. If you expect a fight to start soon, don’t use Flak Cannon to farm.

Your BKB is most of the time the 2nd important thing to have in fights. Provided it is on CD for some reason, you should also avoid fights, especially if enemies have strong burst damage or lockdown. If you need to fight but your BKB is unavailable you need to enter the fight only after your opponents use all of their important nukes and disables on an ally (ideally your tank/initiator).

Who you should focus:

Gyro is a unique carry hero in fights in the sense that he doesn’t need to worry about who to focus most of the time. The reason for that is Flak Cannon – you can attack anything that is in range and still apply damage to all enemies within a huge AoE. Because of this, you will deal the most possible damage by attacking your closest target, rather than chasing after a specific hero and wasting time.

In most situations, enemy carries will have BKB’s; this means that using the Missile on an enemy support will be the common choice (for example on a hero that needs to cast a lot of spells in a fight, especially if he/she has some channeling spells – Enigma’s Black Hole, Bane’s Fiend’s Grip, etc.). Using the Missile to disable a Linken’s is also possible.

How to move/survive in a fight:

As we mentioned already, Gyro is a relatively squishy hero even with BKB.

If enemy heroes start focusing you, you might have to move and kite them in order to stay alive. Keep in mind that the high range of Flak Cannon allows you to deal damage to enemies from afar. You can use that to your advantage, back down a bit to get away from the enemy damage dealers (especially strong man–fight heroes like Lifestealer, Ursa etc.) and attack creeps or enemy units that are close to you.

If the enemy man-fight hero doesn’t have BKB, Rocket Barrage (and possibly Aghanim’s) can help you deal enough damage to win the 1v1 hit exchange. Because of this, it is a good idea to try to position yourself away from other enemy units when fighting 1v1. In the earlier stages of the game, when the single target DPS of Rocket Barrage is still deadly even to farming heroes, you might even discourage a man-fight carry from focusing you just by activating Rocket Barrage.

In case you are winning the engagement, you can chase people down and finish them with Rocket Barrage (usually you will have good movement speed thanks to your items). You can also cast Homing Missile on running heroes to get them killed or at least to see the direction in which they are moving.

Example:

After the unsuccessful enemy RP, Resolution showcases how good Gyro is at chasing thanks to Call Down’s Slow, Missile’s stun and vision and most importantly – the movements speed and tankiness from the Drums + S&Y build.

At 00:12 he makes a very cool side-step, dodging the Impale of Nyx and continuing to chase.

Pushing:

5-man Pushing:

Gyro is quite a potent carry when it comes to pushing as 5. You have strong team fight abilities that can help you win an engagement should enemies decide to initiate on your team to defend the tower.

You usually don’t want to be the frontline tower hitter unless you are very farmed. Stay behind your frontline hero and be ready to counter-initiate with Call Down and Flak Cannon.

If you are ahead you can use your Flak Cannon to zone out/harass enemies and drive them away from their tower if they are trying to stall the push. However, using Flak Cannon like that can be a bad decision since you won’t have it available if enemies decide to initiate on you afterward. Usually, you want to use it like that when you are at an advantage and you suspect your opponents won’t commit to a fight and/or there are only 2-3 heroes defending and you want to zone them out to prevent them from slowing down your push.

In the late game, you will almost always save your Flak Cannon for the team fight.

Split-Pushing:

Although Gyro has great spells to clear out creep waves, he can be easily ganked if he split-pushes.  Usually, you won’t attempt to split-push because of this reason – it is too dangerous; instead, you will focus on farming in safer locations and sticking close to your team.

Ganking:

Gyro is a bad ganker – he doesn’t have mobility spells or any reliable lockdown. The only way to gank with the hero is together with allies that have initiation. You can then follow up with your ultimate and score a kill. Most of the times, however, it would be much better to farm than to gank – leave ganking to the potent gankers in your team and while they are doing it farm up and prepare for team fights.

In case you are ganking don’t use your Homing Missile before you initiate. The enemy will gain vision on the projectile before it flies off and your gank will get revealed – this will give an opportunity to your target to run away.

Map Control:

Ancients stacking and farming is quite important for you. You should urge your supports to ward/deward the Ancient area so that you can stack and farm freely. If you don’t have vision of your own stack your opponents might steal it.

You have two skills which give vision:

Homing Missile gives vision around the projectile and since the projectile chases the target hero wherever he goes, it is a very useful tool for chasing. The target will be unable to juke efficiently because you will always know in which direction to follow. This is also very useful for chasing invisible units – it can let you know where to use detection or your AoE spells.

Call Down gives vision over the target area right when you cast it. This is very useful if a target is trying to juke in the fog of war and you need to gain vision on it. You can also use it on a high ground where you suspect the enemy team is hiding or on the Roshan Pit to gain information and help your team initiate favorably.

Farming:

Flak Cannon is incredibly strong for farming once you have enough damage. Nonetheless, you don’t have constant access to your AoE attack because of the large CD and if you don’t use it efficiently you could get out-farmed by other flash-farmer. Make sure you utilize stacking and you hit multiple camps with Flak.

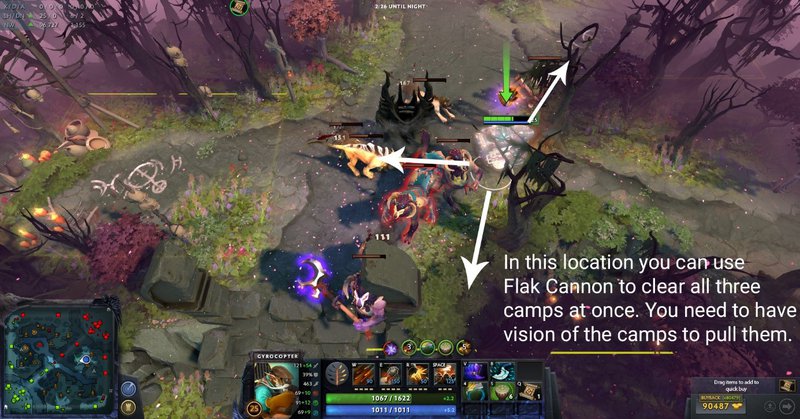
When it comes to farming in the jungle, you can benefit from the high attack range of Flak Cannon to bring down neutrals in adjacent camps.  You can neet to pull one camp and move towards the other. Once you have vision on all creeps you want to farm, attack the closest unit and Flak will hit all of them because of the very large range:

Gyroo

A useful trick for farming Ancient stacks is to use Flak Cannon 10 seconds before you engage the Ancients. This way for the remaining 5 seconds of the duration you will be able to use all the charges and you will have to wait less until you can use Flak Cannon again. If you use the spell just as you engage, you will use-up the charges fast and you will have to wait almost the entire cooldown.

In the mid and late game, you will have enough mana to virtually spam Rocket Barrage for every creep camp when farming. The low CD and high damage will allow you to clear creep waves and jungle camps fast.

Be careful when you use Flak Cannon to farm – if a fight is about to start, you should save it for the team engagement.