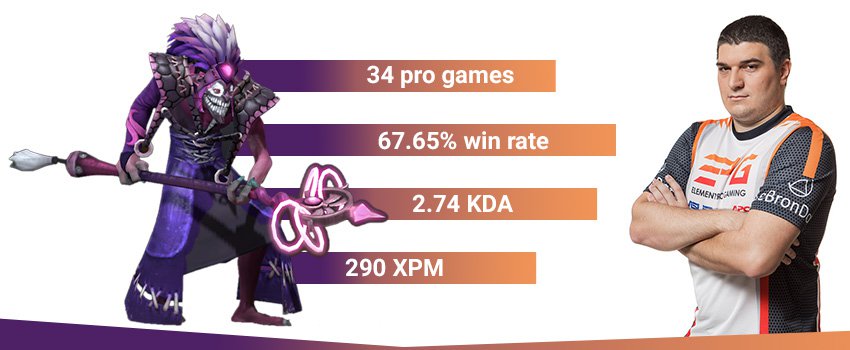
Dazzle Guide by LeBron
Artist: Gooba
  • Guide Navigation
  • HOME
  • ABOUT
  • DRAFTING
  • SKILLS & BUILDS
  • ITEMS & BUILDS
  • EARLY GAME
  • MID & LATE GAME
Author:
LeBron & Co.
Date: 02/2019
Tags:
text
Dazzle
Builds
Tactics
Mechanics
Analysis

Welcome

Welcome to Lebron's Book of  Dazzle, a hero guide part of the Book of Dota series!

Here you will find all the information you need to learn to play Dazzle on a high level – from drafting and builds to the optimal playstyle in different lanes and situations. We hope you’ll enjoy this guide and find it useful!

Lebron Dazzle Stats
TL;DR:

Draft: Try to play him in 5-man pushing strategies – this is where Dazzle’s skill set shines the most.

Early Game: In the lane Dazzle is a very traditional babysitter – try to secure farm for your core by harassing and zoning-out, pull and stack camps. Take care of warding and dewarding.

Mid & Late Game: Ideally you want your team to push as 5. You provide HP sustain and saves in case the enemies initiate. If your team cannot push, try to stick to your most vulnerable core to be in a good position to save him from ganks with Grave and any defensive items you have.

Authors

Nikola "LeBronDota" Popović
Endorsement & Info

LeBron is a professional Dota player currently playing support for EPG.

He rose to fame after finishing first in a season of the Faceit Pro League - a very impressive feat for a support player. Later he found success in various pro teams, including EPG and Na'Vi.

Nikolay "CTOMAHEH1" Kalchev
Info & Editing

CTOMAHEH1 started his pro career as a support in Basically Unknown together with Mind Control. Since then he has consistently been playing on the European T2 scene, most recently on Unchained Esports. 

His highest placement on the EU ladder is top 100 - he plays all roles (mainly support), which is untypical for high-ranking players and shows his great versatility and understanding of the game.

Toon "Jeten" Casteele
Writing

An IT dev by day, a Dota enthusiast by night.

Toon is not a stranger to writing Dota guides - he has a whole series of them in r/Dota2! He has a very versatile hero pool and loves watching and analyzing pro games.

Kyril "MrNiceGuy" Kotashev
PM & Editing

Esports and gaming enthusiast since forever and founder of DotaHaven.

Has been playing Dota since 2005 (5.84). An Ancient I player in Dota 2.

Who needs healing?

Dazzle the Shadow Priest is a hard support who, contrary to most supports in the game, has a skill set that is purely geared towards physical damage. His saves through healing and grave as well as his armor reducing ultimate make him a very impactful support at all stages of the game with great sustain if left unchecked, even against heroes with magic immunity.

It's also possible to play Dazzle as a core to make use of his good stats and the CDR from his ultimate.

Dazzle Loadout
Stats
Level 1
Level 15
Level 25
STR
18
Low
48
Low
69
Low
AGI
21
High
44
Medium
61
Medium
INT
25
Very High
72
Very High
106
Very High
Attack
41-59
Medium
88-106
High
122-140
Very High
Armor
2.36
Medium
6.168
Medium
8.888
Medium
Resistance
26
Medium
27
Medium
29
Medium
HP
524
Low
1065
Low
1452
Low
MP
450
Very High
1155
Very High
1665
Very High
MS
313
Very High
316
Very High
319
High
STRENGTHS

MAJOR

One of the best saves in the game: Shallow Grave is a spell that gives your core 5 seconds of free reign to deal more damage or survive the enemy team focusing him.

Very high range on all of his spells: When maxed, all of Dazzle’s skills have 800 range or higher. This makes it a lot easier to ensure your impact in a fight with Shallow Grave anti-initiation and Shadow Wave heals.

Scales well: A physical damage and armor reduction geared skill set allows him to be relevant during all stages of the game. Shallow Grave is always an extremely good save.

MINOR

Needs very little gold to be impactful: Almost every item Dazzle gets is a luxury item. His skill set is relevant throughout the game and because of his high cast range, he can sit on the outskirts of a fight, casting his low cooldown spells safely.

Spammable skills: Dazzle’s skills all have relatively low cooldowns and cast animations. This makes them (particularly Shadow Wave) very spammable.

Base movement speed: With a base movement speed of 305, Dazzle is faster than most spellcasters. It means, together with Poison Touch being low mana cost, that he can safely harass most solo laners.

High mana pool: With both the 4th highest starting INT and INT growth, Dazzle sits very comfortably in the mana pool department. The only 3 heroes that sit above him (Invoker, Pugna and Skywrath Mage) all have very high mana costs on their spells, something Dazzle doesn’t have. That allows him to spam his heals in a fight at will if he has a full mana pool.

WEAKNESSES

MAJOR

Very squishy: Although very impactful when able to stay out of the thick of the fight, a Dazzle that is caught is often a dead one. The only chance he has at surviving is getting a grave TP off, which requires him to not get disabled.

No disables: Dazzle has no stuns and very little crowd control in general. This makes him pretty bad at roaming on his own and limits your draft options.

Level 1 Shallow Grave: You usually want to get one value point in Shallow Grave, however, the range at level 1 (550) is horrible compared to his other spells. It puts you in an awkward spot if you want to get it off in time.

MINOR

Mana dependent: As mentioned in his strengths, Dazzle has a very high mana pool and relatively low mana cost spells. However, that doesn’t mean he doesn’t run into mana issues. Dazzle wants to spam his low cooldown spells and still have mana left for Shallow Grave, which often leaves you with an important choice.

Level-dependent: All of your spells scale well, which means you really don’t want to lag too far behind. You want to have Weave when you start to push as 5, but you also want Shadow Wave maxed and get some extra levels in Shallow Grave to get more range.

Replays

EG vs VGJ Thunder, Galaxy Battles: Emerging Worlds

(pre 7.20)

Match ID: 3691341015
Replay:

It’s a great example of how well Dazzle works in 5-man pushing drafts. In this game he is drafted along DK and Terrorblade, two heroes who love to stay in the front lines and hit towers – Dazzle gives them sustain and can save them when the enemy team decides to initiate.
Dazzle played by VGJ.T.Ayo.

Drafting

Dazzle works best in line-ups that like constant 5-man fighting, preferably with some good physical damage pushers.

He also works well with a hard carry who he can focus on protecting. Having a greedy tri-core line-up makes it hard for Dazzle since he can’t be everywhere at once.

The third type of strategy in which Dazzle works well is a minus armor draft. Check the Synergies further in this guide to see which specific heroes Dazzle works well with for this type of lineup.

Position 5 Support:

You most often babysit whichever hero on your team needs it most in the early game, which is generally the safe lane carry. Dazzle buys most of the support items and later on in the game focusses on staying alive on the outskirts of the fight so he can cast his spells.

Position 2 or 3 Core:

Dazzle is level dependent, and even though he isn't item dependent, he uses items well because of the CDR in his ultimate. He has good stats (fast, good attack animation), which means he is actually a powerful laner. Needless to say, a core Dazzle is not a carry and needs other cores in his team that could do this job. He is a utiltiy hero.

Substitutes:

Oracle Portrait

Oracle: Probably most similar to Dazzle. Might have the only save in the game that’s better than Shallow Grave. He has a lot of sustain (more geared towards single targets) and some burst damage as well. Oracle is more magic damage oriented, whereas Dazzle serves a purpose with and against physical damage line-ups.

Omniknight portrait

Omni: Provides a combination of sustain versus both physical and magical damage. He has similar burst damage from heal bombs. Being a STR melee hero, he plays quite differently in the lanes – he is usually a core, he is a relatively bad babysitter.

Abbadon

Abadon: Great sustain through his heal and Apothic Shield, as well as being able to front-line thanks to his ultimate and natural tankiness. Abbadon is more open than Dazzle draft-wise. He lacks a great save and burst damage, however, his Shield applies a strong dispel, which is great against long disables.

Venge

Venge: When drafting a minus-armor line-up with plenty of physical damage on your team, Vengeful Spirit can also fulfill this role, especially if you’re looking for more of a roamer and damage boosting hero. Her ultimate can also work as a saving mechanism for your cores.

Synergy

Good friends to have are:

Heroes with Armor reduction: Templar Assassin, Weaver, Vengeful Spirit, Shadow Fiend, Slardar, Naga Siren

Templar Assassin
Weaver
Venge
Shadow Fiend Portrait
Slardar Portrait
Naga siren
Dazzle is the perfect position 5 hero in a minus armor draft.

Between Bad Juju, physical damage heal bombs and the armor reduction of the heroes above, you can blow up heroes, even if they are naturally tanky. 

Heroes that make good use of slows to close the gap: Juggernaut, Ursa, Terrorblade

Juggernaut
Ursa Portrait
Terrorblade
Tip: Juggernaut, in particular, synergizes really well with Dazzle for both taking Roshan (once Dazzle gets medallion) and mid-game push sustain with his Healing Ward.

Especially in the lane, these heroes can get kills on overextending offlaners thanks to their high right-click damage, melee range spells and Poison Touch. If they themselves overextend, you can save them with heals and Shallow Grave.

Physical damage supports: Witch Doctor, Vengeful Spirit, Slardar

Witch Doctor
Venge
Slardar Portrait
Dazzle works great with greedier pos. 4 heroes.

These supports can roam and make good use of gold to have a higher impact. Their physical damage or extra armor reduction compliments Dazzle well.

Early pushing heroes: Bristleback, Huskar, Death Prophet, Broodmother

Bristle Portrait
Huskar Portrait
Death prophet
Broodmother Portrait
Tip: Huskar, in particular, makes amazing use of Shallow Grave thanks to his Berserker’s Blood.

Great at fighting early on, especially with a Dazzle behind them to keep their health up and grave them when they get low. These heroes can also deal extremely high (burst or sustained) damage and have an escape or lifesteal for when they get graved.

Illusion/Summon heroes: Naga Siren, Chaos Knight, Broodmother, Nature’s Prophet, Phantom Lancer, Meepo, Terrorblade

Naga siren
Chaos Knight
Broodmother Portrait
Phantom Lancer
Meepo
Terrorblade
With these heroes it is much easier to use Shadow Wave offensively.

Most of these can do high physical damage, but you mostly get them for the huge damage that can come out from Shadow Wave bombs on multiple units.

Counters

Strong Against:

High HP, average/low armor Heroes: Bristleback, Wraith King, Centaur Warrunner, Lifestealer, Abaddon

Bristle Portrait
Wraith King
Centaur
Lifestealer Portrait
Abbadon

Heroes with armor values around 10 take the biggest damage amplification from Bad Juju because of the diminishing returns of Armor. Moreover, physical damage is the best way to bring down high HP heroes because most magical damage spells don’t scale that well.

Heroes that focus on single targets: Legion Commander, Slark, Ursa, Drow Ranger

Legion commander
Slark Portrait
Ursa Portrait
Drow Ranger

Shallow Grave is best against carries that go for single targets, often without a disable after their initiation, which allows your ally to TP out under the cover of Grave.

Weak Against:

Ways to wait out Shallow Grave: Eul’s Scepter of Divinity, Shadow Demon, Outworld Devourer

Euls
Shadow Demon Portrait
Outworld Devourer

These allow you to counter Shallow Grave by disabling the hero that got graved for a long time. Once the grave runs out, they will easily kill the hero.

Axe Portrait

Axe: Culling Blade is the only thing in the game that kills people through Shallow Grave and therefore Axe is known as the biggest Dazzle counter.
This isn’t completely the case though because Dazzle does counter Axe in lane thanks to Shadow Wave – Axe wants to draw the creep aggro, which gives you the opportunity to heal-bomb him. Moreover, with the slow, you can kite him.

Ancient Apparition Portrait

Ancient Apparition: Ice Blast stops all ways to gain health, which clearly counters Shadow Wave. Not only that, but the Ice Blast debuff lasts a really long time which means your ally will often still die after Shallow Grave, even if he can complete the TP to base. He also sometimes gets Eul’s, which allows him to get cold feet off on a graved unit.

Skills

Dazzle Poison Touch
Dazzle Shallow Grave
Dazzle Shadow Wave
Dazzle Weave

Releases a cone of poisonous magic that strikes multiple enemy units. Deals damage over time and slows the targets. Anytime the targets get attacked, the debuff duration is refreshed.

STATS

Cast Animation: 0.3+0.57

Cast Range: 500/600/700/800

Starting Radius: 200

Max Distance: 500

End Radius: 300

Number of Targets: 2/4/6/8

Damage per Second: 16/28/40/52

Movement Speed Slow: 14%/16%/18%/20%

Duration: 2/4/6/8

CD: 27/24/21/18

Mana: 110/120/130/140

Poison Touch

Mechanics:

  • Hits multiple targets in a cone shape in the cast direction (which is a target) and the maximum distance at which you can hit heroes is 1000 units (regardless of cast range).
  • Applies a slow and deals damage over time.
  • Relatively long cooldown (especially for harassing at level 1)
  • Poison touch stacks with itself. If you are able to keep the debuff on the target for long enough for the skill to come off CD, you can cast it again on the same target. Powerful combined with your ult CDR.

Usage:

This is your main harassment tool in lane. With enough attacks to keep the debuff on, it deals significant damage. Using Poison Touch, combined with your high base movement speed, allows you to keep the distance between you and the enemy.

Later on, it’s mainly a chasing tool and a way to slow down enemy melee cores. If you manage to stack it with itself it deals significant damage.

Tips:

Even with the cast range only being 500 at level 1, you can still hit targets up to 1000 units away if you cast it on a unit in front of your actual target because of the cone.

An ally blessed with Shallow Grave, no matter how close to death, cannot die while under its protection.

STATS

Cast Animation: 0.4+0

Cast Range: 550/700/850/1000

Duration: 5

 CD: 60/46/32/18

 Mana: 150

Aghanim's Scepter

Causes Shallow Grave to be an AoE spell.

Shallow Grave

Mechanics:

  • Both the cooldown and the cast range scale very well (and are very bad at level 1).
  • Becomes a 450 AOE spell with Aghanim’s Scepter.
  • Prevents any way of dying, except from Axe Culling Blade.

Usage:

This is your signature skill. Having a way to keep everything from killing your carry (except Axe Culling Blade) for 5 seconds is extremely good. Relatively poor at level 1, game-breaking later on.

Tips:

You want to postpone leveling this as long as you can because of the cooldown and cast range. However, in some situations, you’ll find you have to. It might be smart to hold on to a skill point early in the game to make sure you have it when needed.

You can tell when Shallow Grave ends by checking when the pink ring drops down.

Teleport out, while under Shallow Grave, after the enemies used all of their stuns (and with no Axe around) to guarantee your escape.

ends out a bolt of power that arcs between allies, healing them while damaging any units standing nearby. Dazzle is always healed by Shadow Wave.

STATS

Cast Animation: 0.3+0.57

Cast Range: 800

Damage Radius: 185

Bounce Distance: 475

Number of Bounces: 3/4/5/6

Heal: 80/100/120/140

Damage: 80/100/120/140

CD: 14/12/10/8

Mana: 90/100/110/120

Shadow Wave

Mechanics:

  • Deals Physical damage and pierces magic immunity.
  • Can deal up to 960 damage when maxed out, without the level 20 talent; 6 bounces + yourself for 140 damage each.

Usage:

The skill you will use most to sustain your heroes in a push/fight. Can be used to control the creep equilibrium, but make sure to not accidentally push the lane too hard when you don’t want to.

Has a secondary usage in heal bombs - the more units you heal, the more damage you will deal. It's a great damage tool if the enemy hero aggroes the melee lane creeps.

Tips:

Try to use this just when Shallow Grave is about to end to give your ally more chances of survival.

If your core is dying fast and you’re just out of range to get the Shallow Grave off, casting a Shadow Wave on the way over might just buy him enough time to get Grave off.

Passively reduces cooldowns on your abilities and items. Anytime you cast a spell, all nearby enemies will have their armor reduced. Debuff stacks and refreshes duration.

STATS

Cooldown Reduction: 20%/35%/50%

Radius: 1200

Armor Reduction per Cast: 2/2.25/2.5

Duration: 8

Bad Juju

Mechanics:

  • Stacks multiplicatively with other sources of CDR
  • Affects invisible units
  • Does not affect Roshan
  • Does not trigger on active item abilities

Usage:

The spell has two aspects.

First, the cooldown reduction is great not only for your spells but also for active items. This makes Dazzle arguably the best hero to carry utility items like Guardian, Glimmer, Lotus, etc. and it is the reason why Necro is a core item on the hero when played in a core position.

Second, the armor reduction synergizes with your low-CD spammable spells and your physical damage. Of course, it's best if you have allies that can benefit from the armor reduction as well.

Skill Builds

Defensive Build
Aggressive Build
Dazzle Poison Touch
1
Dazzle Shadow Wave
2
Dazzle Shadow Wave
3
Dazzle Shallow Grave
4
Dazzle Shadow Wave
5
Dazzle Weave
6
Dazzle Shadow Wave
7
Dazzle Shallow Grave
8
Dazzle Shallow Grave
9
Talent Icon
10
Dazzle Shallow Grave
11
Dazzle Weave
12
Dazzle Poison Touch
13
Dazzle Poison Touch
14
Talent Icon
15
Dazzle Poison Touch
16
Dazzle Weave
18
Talent Icon
20
Pros: great lane sustain; best for babysitting; possibility to push towers early; good heal bomb damage;
Cons: very little possibility to be aggressive; no real damage against ranged heroes; very little crowd control;

Most prevalent build for support Dazzle. If you can zone the offlaner with Poison Touch, take it at level 1. You mostly take it for the slow at this point, so you can safely harass him.

Maxing Shadow Wave first gives you maximum sustain as well as a way to deal a large amount of burst damage in early skirmishes.

With this, the game plan is to keep your cores safe and healthy. Therefore you max Shallow Grave second so you can cast it from a safe distance and have it available more often.

Poison Touch mostly comes in handy if you want to chase mid game, so if you feel like your team has good pick-off potential but poor catch, you might want to max this earlier than Shallow Grave.

Weave is leveled first when you want to start pushing as 5 (or need to defend against an enemy 5 man) and then whenever it’s available.

Dazzle Poison Touch
1
Dazzle Shadow Wave
2
Dazzle Poison Touch
3
Dazzle Shadow Wave
4
Dazzle Poison Touch
5
Dazzle Weave
6
Dazzle Poison Touch
7
Dazzle Shadow Wave
8
Dazzle Shallow Grave
9
Talent Icon
10
Dazzle Shadow Wave
11
Dazzle Weave
12
Dazzle Shallow Grave
13
Dazzle Shallow Grave
14
Talent Icon
15
Dazzle Shallow Grave
16
Dazzle Weave
18
Talent Icon
20
Talent Icon
25
Pros: maximizes damage; allows you to gank; good against immobile heroes;
Cons: forfeits your high sustain; less possible burst damage; late grave;

A high level of Poison Touch is very strong in the lane, which makes this a possible build both for a core and support Dazzle. It synergizes greatly with a fast Necro Book.

Commit to the aggressive build by maxing Shadow Wave second and leaving Shallow Grave for last. You probably still want to get at least one value point in it, as shown in this example.

Talents

+0.5 Bad Juju Armor Reduction

25

+40% Poison Touch Slow

+45 Poison Touch DPS
20
+50 Movement Speed
+20 Shadow Wave Heal / Damage
15
+125 Cast Range
+200 Health
10
+75 Damage

Lvl10: Get the +HP talent in most cases. When maxing poison touch, the +75 damage talent is better. If you really don’t think you’re going to die, take 75 damage, it gives double of what you have at that point.

Lvl15: This is a hard choice since both talents help to sustain. If you’re more concerned about getting Grave off, get the increased range. If you think the combination of sustain and heal bombs will do more, go for that.

Lvl20: The movement speed is almost always the best choice here. At that point in the game,  extra damage over time isn’t really going to do much anyway. More importantly, the movement speed helps your mobility in general - fight positioning is vital for Dazzle in the late game.

Lvl25: The slow is the default choice in most cases - it's extremely useful when the BKBs of enemy cores become short duration. The armor reduction is better only if the fights in the game you're playing tend to be very long.

Support Dazzle Build

Even though Dazzle only really has one item build, it’s a very flexible one. From the mid game items onward, none of them are must-haves. Judge for yourself what your team needs most.

Starting items
Animal Courier
Tangoes
Wards Icon
Clarity
Early Game
Boots of Speed
Magic Stick
Infused Raindrop
Arcane Boots
Mid Game
urnn
Medallion
Late game
Solar Crest Icon
Glimmer Cape
Spirit Vessel
Animal Courier
Tangoes
Wards Icon
Clarity

Clarity: As a support, clarities give a lot more value than mango’s do, especially since creeps can no longer cancel them.

Boots of Speed

Boots of Speed: Almost every hero in the game needs this early on for obvious reasons. You need to be able to consistently be on time for harassing, graving and moving around the map in general.

Magic Stick

Magic Stick: Cheap item that can help your health, but mostly your mana sustain. One of the highest value items in the game. You can upgrade this into a Magic Wand, but in most cases, you don’t want to since you’ll probably die anyway if you get jumped. 

Infused Raindrop

Raindrops: Great to stop yourself from getting blown up and having some extra mana regeneration. You can also get a Cloak if you plan on getting an early Glimmer Cape to help out your allies and are not too worried about the mana. You can also forego both if you’re not worried about getting burst down by magic damage at all.

Arcane Boots

Arcane Boots: If you have Raindrops, you can sometimes forego these in favor of Tranquil Boots or even Power Treads. However, you’ll often find that you really need them, not to mention that your team might be very thankful for the burst mana every now and then.

urnn

Urn of Shadows: If the game is going your way or if a lot of kills are happening on both sides, Urn of Shadows is the way to go. It increases your sustain a lot and if you’re ahead, it also increases your pick-off potential combined with Poison Touch.

Medallion

Medallion of Courage: On paper, this is the item that complements your skill set best. It both increases your allies’ armor further and decreases the enemies’ so they can be burst down quicker. It gives huge armor increase or reduction in combination with Bad Juju, also allowing huge heal bombs. It helps your team take Roshan quicker.

Solar Crest Icon

Solar Crest: Upgrade for Medallion of Courage. Especially good against physical damage teams thanks to the added evasion for your cores. It also helps you take high ground easier when you put the buff on your frontline hero.

Glimmer Cape

Glimmer Cape: Gives both yourself and your allies higher chances of survival, especially against magic damage cores. On paper, this sounds even better than force staff, but the main reason you might not want to get this early on is that the active mana cost is quite high.

Spirit Vessel

Spirit Vessel: Logical upgrade if you’ve bought Urn of Shadows earlier. Keeps your item slot relevant by giving you more tankiness and a better heal and DOT that scales over time. Upgrade it earlier if you’re playing versus other healers.

Core Dazzle Build

A few Null talismans help in the early game - bonus damage and mana pool to spam your abilities. Afterward, you need to get your core item, Necronomicon, as fast as possible. It's not only great in fights - it helps you farm faster.

After Necro you usually go for team-centered items. Guardian Greaves is the usual choice - it's extremely strong with the CDR from your ultimate. The choices from that point onward are entirely situational.

Starting
Circlet
Circlet
Mantle of Intelligence
Tangoes
Iron branch
Early Game
Null talisman
Null talisman
Boots of Speed
Necronomicon lvl1
Mid Game
Guardian Greaves
Necronomicon
Late Game
Aeon Disk
Lotus Orb
Circlet
Circlet
Mantle of Intelligence
Tangoes
Iron branch
Null talisman
Null talisman
Boots of Speed
Necronomicon lvl1

Necronomicon 1: the CDR from your ultimate means you can use them more often. The units are great for farming - they deal piercing damage. Moreover, they synergize amazingly with your Poison Touch (their attacks refresh the duration) and Shadow Wave (give you additional targets for a heal-bomb).

Guardian Greaves

Guardian Greaves: make you tankier, but more importantly, give you another sustain/heal mechanism for your teammates. The CDR means you can use them much more often. The dispel is great for silences.

Necronomicon

Necronomicon lvl3: you usually want to upgrade your Necro book after finishing Guardians. This is because lvl1 Necro is good enough for farming, while you need the Greaves as fast as possible to push as 5 wiht your teammates.

Aeon Disk

Aeon Disk: since you might be the main focus in fights, you can build Aeon Disk to survive longer. It could keep you alive for long enough to cast a clutch Grave.

Lotus Orb

Lotus Orb: When the game goes really late, this is a great item. The cast range is similar to your other spells, which makes it great for you to use from the backlines, mostly to dispel silences or for extremely clutch plays where you can return a Hex or Abyssal Blade for instance.

Other Dazzle Items

Early & Mid Game
Bracer
Force staff
Aether Lens
Euls
Holy Locket
Late Game
Scythe of Vyse
Aghanim's_Scepter_icon
Boots_of_Travel_1_icon
Bracer

Bracer: if you have trouble staying out of harm's way, get one or two Bracers for survivability.

Force staff

Force Staff: Great for clutch plays as well as just getting around in general. Gives you yet another save for your allies and also allows you to more safely roam the map to ward. As far as saves go, this is comparable to Glimmer Cape, depending on what heroes you’re up against.

Aether Lens

Aether Lens: Gives you even more range as well as some very welcome mana. You mostly get it for the range though. Especially consider getting this when playing against heroes with a large reach such as Faceless Void, Phantom Assassin and other heroes that want to and can find you quickly.

Euls

Eul’s Scepter of Divinity: An extra save for yourself and a little extra catch. Also allows for a setup for a heal bomb, but expensive compared to the utility it gives compared to other items in most cases. If this item could be used on allies it would be a core item for Dazzle, but for now, it’s just another less useful utility item for Dazzle.

Holy Locket

Locket: if your main contribution is the sustain and the heals, then you can go from Locket. You can build it from disassembling Arcanes.

Scythe of Vyse

Hex: great source of control in the late game. Makes it easy for your necro units (and allies) to stick to the target, which in turn makes it easy to cast a heal-bomb.

Aghanim's_Scepter_icon

Aghanim’s Scepter: Recently changed to an AOE Shallow Grave. This is obviously a very situational item which is mostly relevant against heroes that force you to be in small spaces, both allied (with multiple melee cores) and against specific enemies (Magnus, Dark Seer, Axe…).

Boots_of_Travel_1_icon

Boots of Travel: great mobility, especially with the reduced CD from Bad Juju.

Early Game

Dazzle 350px

Dazzle plays in the early game like most other defensive lane supports. He has good MS and a great attack, which means passive harass usually comes easily. Moreover, he is good at sustaining his core and the damage potential of Shadow Wave actually gives him kill potential with the right allies.


Make sure to use your time efficiently even after you are not needed in the lane. Even though you are not good at ganks, going to another lane to help your core and apply pressure is not a bad idea. Alternatively, you can try to stack for your carry.

Secure your carry’s farm and botch the enemy offlaner’s farm with Poison Touch and right clicks.
Save allies with Shallow Grave (carry a Town Portal Scroll).
Sustain allies with Shadow Wave.
Provide vision for your team.
Add extra burst damage with heal bombs.
Crowd control and damage with Poison Touch
Farming:

Support:

As Dazzle, the only way you’ll be getting gold all game is passive and team gold (from towers, assists, etc.) and the occasional bounty rune. Farming is not something you should be doing at all.

You can last hit the creeps you pull and later on you can heal bomb creep waves to push, but that’s about the only farming you’ll do as a support.

Core:

As a Core, you can use Shadow Wave more liberally on the creep wave to accelerate your farm. When you get Necronomicons, use them to farm neautral camps as well (ideally - Ancients). Use Shadow Wave to sustain them and deal some additional damage. With the lvl10 dmg talent, Necro and Shadow Wave you would be farming at a very decent speed.

Harassing/Zoning out:

This is your main task in the early game. You want to keep the enemy from getting levels as much as possible. You’re pretty good at this thanks to your decent range, great starting movement speed and Poison Touch. Be careful not to push the lane with heal bombs unless you can get a kill on an enemy hero because of it. Pull and stack as often as possible in between.

Survival:

If you’re against a solo offlaner, you probably shouldn’t be too afraid of dying. You should be able to keep your distance and put out solid harass while taking minimal damage.

Against a dual or tri lane, this becomes a lot harder. In this case, assess the situation and try to judge if your lane is stronger than theirs or not.

If it is, feel free to take multiple points in Poison Touch early on if you feel like you can kill them. Since you can hit multiple units with it now, it can shine more versus multiple heroes.

If your lane is weaker, hang back and try to enable your carry’s farm by keeping his health up and having Shallow Grave ready for when things go south. Assess if your fellow support is needed to keep your carry safe. If not, tell him to roam/go to another lane/jungle/etc.

Kill Potential:

Your kill potential is generally speaking very low and only increases thanks to having certain allies in the lane with you. Illusion and heroes with summons are particularly powerful in this case to get a surprisingly high amount of burst damage from Shadow Wave. Other than that, look for strong early laners that can really bully an enemy out of lane or kill them with Poison Touch (such as Bristleback, Ursa or Juggernaut).

Make sure to use Shadow Wave when the enemy aggroes your creep wave.

Timings and Rotations:

As a defensive support, you’ll often want to stay in your lane. Do carry a Town Portal Scroll, however. When you level Shallow Grave, it can easily save an ally and turn a tower dive around.

When you do rotate out of the lane, it will most often be to gather runes at every 2-minute mark and/or to stack neutral camps or pull.

Video Example:

Game from Galaxy Battles Grand final between EG and VGJ Thunder. Dazzle played by VGJ.T.Ayo.

Dazzle is laning with Terrorblade, which gives him some kill potential, purely through heal bombs.

Starting items are Tango’s, one Sentry ward and 2 Observer wards (one given to an ally).

0:25  Plants observer ward in his safe lane, near the side shop. If Dazzle manages to pull constantly, this ward will help him spot enemies invading his jungle to contest the pull.

0:00 – Dazzle and Terrorblade do not contest the bounty rune in their own jungle because the entire enemy team is missing and his allies already scouted deep into the enemy jungle, meaning there’s probably no one there and Dazzle or Terrorblade might die if they contest.

0:40 – Hiding in the trees, Dazzle tries to output some harass on the enemy dual lane. Note that this is likely not a lane where they can get kills 2v2, so Dazzle saves the skill point to see how the lane goes. Elder Titan rotates over through the river to make Terrorblade’s lane a little easier against 2 high magic damage enemies in Tinker and Tusk.

1:20 – Right after the first neutral camp spawns, Dazzle immediately goes to pull the wave so he can make the lane even easier for his carry. Thanks to his high armor, Terrorblade is able to tank enemy lane creeps under his tower from the start of the game. Dazzle tries to do a pull-through here, meaning he will pull the hard camp towards the small camp when it’s almost dead so his creep wave completely dies. Tusk stops this from happening with a clutch use of Ice Shards. This will push the Dire’s lane since the remaining creeps will team up with a new wave.

1:53 – Radiant tries to contest the bounty rune while Elder Titan is also stacking the hard camp. Dazzle is ready to help out his teammate and skills Poison Touch the moment he notices they can get a kill. It hits 2 heroes, allowing Elder Titan to chase and net them first blood. In the meanwhile, the lane has become a tri versus tri-lane, meaning Dazzle has to stick close to his carry to ensure he doesn’t die.

3:05 – Dazzle notices that the small camp didn’t spawn creeps, meaning the Radiant have a ward there blocking it. Thanks to the Sentry bought at the start of the game, he can deward instantly.

3:35 – Because a support should use the courier as little as possible so it’s available for his cores, Dazzle drops his new observer ward in base so the Elder Titan, who needed to regen, can pick it up.

5:00 – After a successful pull through, the Radiant contests the pull to net some gold and XP. In the ensuing fight, Elder Titan dies thanks to a clutch snowball from Tusk and Dazzle defuses the attention from his carry by attacking the enemy heroes from the low ground as his carry retreats. Shortly after he gets too aggressive, running into a cask together with Elder Titan and dropping quickly.

5:40 – After respawning, he teleports mid to give Dragon Knight some much-needed vision against incoming ganks, so he can push down the tower in Dragon Form more safely. Shortly after, his carry dies in the safe lane, maybe making him regret using the teleport scroll (being almost level 3 and thus possibly having a grave TP ready). Always think twice before using a Town Portal Scroll if it’s not urgent. Dazzle and Tiny go for a kill on the enemy Death Prophet mid, but the burst isn’t high enough to kill her through Spirit Syphon.

7:30 – A gank happens on the Terrorblade mid, Dazzle teleports but arrives just too late to help him out, which would have probably been in vain even if he was on time since he didn’t take a skill point in Shallow Grave yet.

8:20 – Realizing Death Prophet could see him beyond normal night time vision at 7:55, Dazzle dewards the enemy high ground ward.

9:40 – Raindrops seem like the best item choice for early mana regen in this game. The magic burst from Tusk, Tinker and Death Prophet makes it a high-value item in this game. A Smoke of Deceit also arrives because he realizes they need some breathing room on the map.

From this moment onward, both teams start to team up more and focus on objectives. 

Mid & Late Game

Dazzle immportal 350px

The mid and late game as Dazzle isn’t too complicated because the hero is strongest at one particular task – keeping his cores alive. Because of this, as Dazzle your top priority is to be perfectly positioned to save your allies in fights as well as to sustain pushes for as long as possible (in addition to the usual support tasks of warding/dewarding, etc.).


You are best at 5-man Dota, so try to identify the timings when your team is strongest. Communicate this with your allies and try to take objectives as 5.

Saving your allies;
Sustaining 5 man pushes;
Pushing out lanes with Shadow Wave. You can also use Poison Touch if your mana pool allows it;
Providing vision for your team through Observer Wards;
Comeback Potential:

Dazzle has no really significant comeback potential of his own. A well-timed Shallow Grave or a defensive item can turn a fight if it’s on the right ally, but you'll rely on your cores to have enough farm

Sadly the same is true for a core Dazzle. You don't scale amazingly in the late game, and you are bad at split-pushing and ganking, which means you really have only one game-plan: to gather up with your teammates as 5 and apply pressure from early on. If this fails, you usually fall-off in the late game. Your main goal in such situations is simply to get useful items and to keep your teammates alive in fights in order give them the best chance to kill the enemy team and turn the game around.

Team Fights:

Positioning:

Hang out on the outskirts of the fight, even out of vision. Come into range to cast your spells but don’t bother trying to help with right click attacks. If you find yourself dying first in every engagement, before you get to cast Shallow Grave, consider getting a Force Staff, Glimmer Cape or Aether Lens to help yourself out.

Spell Usage:

Poison Touch is used on cooldown when your positioning allows it, but be careful - overextending to cast it is not worth it. Especially don’t come out of hiding purely to do this. The range is about the same as Shadow Wave, so if you’re casting this and there’s an enemy just as close or even closer, go for it. Don’t forget that you can possibly hit multiple heroes with it.

Obviously, you want to save Shallow Grave until one of your cores is about to die. Most often the first core that gets focused will be the right choice, but if you feel like another one of your cores might drop almost as fast and can do a lot more in the fight with Grave on him or he’s more important for survival (because he doesn’t have buyback for instance or has a Divine Rapier), feel free to save it for him.

Use Shadow Wave to keep your team as healthy as possible throughout the fight. Getting heal bombs are secondary but are bound to happen anyway in a team fight. If you have a Medallion/Solar Crest, use it based on what you want Shadow Wave to do as well. Is your team heavily winning and focusing hero after hero? Use it on the focused enemy. Is your team dropping low and are your cores taking damage? Use Medallion/Solar Crest on one of them.

(pre 7.20)

He notices that his DK is getting focused and immediately buys back. This is very important bearing in mind that the fight happens in the supper late game and losing it could mean losing the game. He times his Shallow Grave extremely well – it prevents the DK from dying from the last Maledict tick and missile.

Notice how he has a priority list in his head – even though the ET is in a bad position and in danger of dying himself, while the DK seems to be out of danger, Dazzle has the game sense to realize that the Maledict tick will kill him and prioritizes using Shallow Grave on his core instead of his support ET.

Pushing:

5-man pushing:

If your team doesn’t clear waves that well, you can use Shadow Wave to do so. Stay at a safe distance and sustain your allies with your heal. If a fight breaks out, be in the right position to provide support with Shallow Greave and your defensive items. Make sure you don't get initiated.

Split-Pushing:

Dazzle is not a great split-pusher (like most supports). Shadow Wave does kill creep waves relatively fast, but always make sure you’re absolutely safe when you push out lanes with it.

Ganking:

Dazzle practically never wants to travel alone, let alone go for ganks alone. Early game there might be situations where you do so if you have a core with kill potential in that lane, but it’s a rather rare thing to do.

If you’re ganking with multiple heroes, the main thing you want to do is make sure you get Shallow Grave off if you get counter-initiated and secondarily get Poison Touch and Medallion off (if you have one) on the enemy target.

Map Control & Vision:

As with every position 5 support, you will buy the lion share of the wards throughout the game. As the map becomes more open (due to the lack of towers), you want to ward specifically according to what your objective for the upcoming minutes is.

Farming:

Farm only if you’re not needed elsewhere on the map and if your allies don’t need the gold from those creeps. Use Shadow Wave to speed up the process (heal your own creep wave to burs down the enemy creep wave) or Poison Touch to kill jungle camps.